Advertisement
Quick Links
Advertisement

Related Manuals for HIKOKI CB12-ST2


Summary of Contents for HIKOKI CB12-ST2
- Page 1 Band Saw Stand 帶鋸機台架 Handling instructions 使用說明書...
-
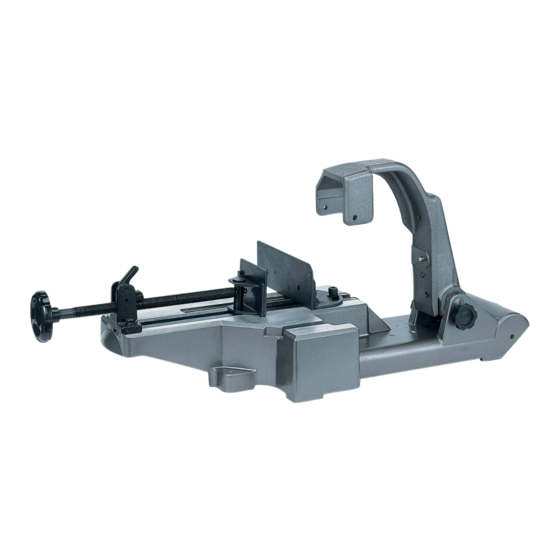
Page 2: Names Of Parts
English BAND SAW STAND SAFETY STANDARD ACCESSORIES WARNINGS Contour table Slide cover ● Correctly install the band saw stand by following the instructions provided in the manual. ● In order to prevent accidents, when installing or removing the band saw stand, turn the switch of the rotary band saw off... -
Page 3: Specifications
(B). Only tighten the one on the rear implementation of right-angle cutting, angle cutting, and side. (Fig. 3) contour cutting work, for use with the following HiKOKI band saw: CB3612DA For details regarding the latest available band saw, check our general catalogue and other information. - Page 4 English (7) Check that the D6 knob bolt on the rear side is correctly M6 screws tightened, and that the main tool unit is securely installed on the stand. (Fig. 5) Guide plate Front side Rear side of the of the band saw band saw Hinge (B)
- Page 5 English If the spring stopper is pressed in when the main unit is <Adjustment of the perpendicularity between the top surface of the base and the band saw blade> in a low position, the force of the spring will be applied (1) Apply the vise guide to vise (B), and lightly secure the in the opposite direction, preventing the main unit from vise guide using vise (A).
- Page 6 English 7. Cutting thin or small diameter workpieces 9. Contour cutting work When cutting a thin or small diameter workpiece, place WARNING the vise guide supplied as a standard accessory onto the Be sure to correctly install the protective cover, contour top of vise (B) to reduce the clearance between the band table, and slide cover before use.
- Page 7 English 10. Moving the band saw installed on the band saw Pulley guard (B) stand When moving the band saw installed on the band saw stand, move the main unit down to the lower limit position Slide cover as shown in the fi gure below. Tighten the stopper bolt so that the main unit does not move up, then hold both ends of the base.
- Page 8 中國語 帶鋸機台架安全警告 標準附件 ● 請按照說明書中的指示正確安裝帶鋸機台架。 輪廓工作台 滑動護蓋 ● 為了防止發生事故,安裝或拆卸帶鋸機台架時, 請關閉旋轉帶鋸機的開關。若您使用的是電源線 型帶鋸機,請從插座拔下電源插頭。若您使用的 是充電式帶鋸機,請從主體取出電池。 ● 將帶鋸機安裝到帶鋸機台架後,請按照旋轉帶鋸 機說明書中的指示進行操作。 進 行 輪 廓 切 割 作 業 時 用 於 進 行 輪 廓 切 割 作 各部位名稱 使用。 業時防止帶鋸條露出。 1 個 1 個 鉸鏈...
- Page 9 中國語 (3) 將皮帶輪護罩 (A) 側面的孔對準鉸鏈 (A) 的 D8 插 用途 銷,然後將 D8 插銷插入孔中。(圖 3) (4) 鉸鏈 (B) 的前後兩側各有一個 D6 旋鈕螺栓。請只 本帶鋸機台架專為進行固定型直角切割、角度切割 鎖緊後側的那個螺栓。(圖 3) 及輪廓切割作業而設計,其適用於以下 HiKOKI 帶鋸 機: CB3612DA 有關最新可用帶鋸機的詳細資料,請查閱本公司的 總目錄及其他資訊。 規格 旋鈕螺栓 CB12-ST2 型號 帶鋸機的 皮帶輪護罩 Φ115 mm 最大切割 圓管...
- Page 10 中國語 (7) 檢查後側的 D6 旋鈕螺栓是否正確鎖緊,且工具 M6 螺絲 主體是否牢固安裝在台架上。(圖 5) 導向板 帶鋸機的 帶鋸機的 前側 後側 鉸鏈 (B) 止動螺栓 帶鋸條 底座頂面 圖 5 圖 7 2. 操作開關 4. 調整帶鋸條的垂直度 <調整虎鉗 (B) 與帶鋸條之間的垂直度(圖 8)> 帶鋸機安裝到台架上後,請檢查開關能否正常操 (1) 使用隨附的標準附件 8-mm 六角扳手鬆開兩個虎 作。 (1) 檢查帶鋸機台架是否正確固定,且撥桿開關是否 鉗 (B) 調節螺栓。確保虎鉗 (A) 遠離虎鉗 (B)。 處於...
- Page 11 中國語 <調整底座頂面與帶鋸條之間的垂直度> 註 (1) 沿著虎鉗 (B) 放置虎鉗導板,然後使用虎鉗 (A) ● 設定切割負荷時,請務必將主體提升到上限位 輕輕固定虎鉗導板。(圖 9) 置。 如果在主體處於低位時按入彈簧擋塞,則彈簧的 作用力會向相反的方向施加,使主體無法提升到 虎鉗 (A) 虎鉗導板 上限位置。 ● 設定較輕的切割負荷會延長切割工件所需的時 間,但切割精度會提高。 拉出彈簧擋塞。 「重負荷」 (從 面拆下。 ) 虎鉗 (B) 將其插入孔 。 「中負荷」 將其插入孔 。 「輕負荷」 圖 9 將其插入孔 。 「最輕負荷」 (2) 使用隨附的標準附件...
- Page 12 中國語 7. 切割薄或小直徑工件 9. 輪廓切割作業 切割薄或小直徑工件時,將隨附的標準附件虎鉗 警告 導板放在虎鉗 (B) 的頂部,以縮小帶鋸條與虎鉗 使用前請務必正確安裝防護罩、輪廓工作台及滑 導板之間的間隙。(圖 13) 動護蓋。 切割薄或小直徑工件時,如果帶鋸條與虎鉗 (B) 之 注意 間的間隙較大,則工件可能會變形或劇烈振動。 如果切割作業中帶鋸條被鎖定,請立即關閉開關 停止操作。 <安裝輪廓工作台(圖 15)> (1) 將主體提升到上限位置,然後略微降低一點,並 虎鉗導板 保持在主體與底座頂面呈垂直的位置。 在此位置,牢牢鎖緊鉸鏈的止動螺栓以固定主 體。 註 如果在主體未處於垂直方向時鎖緊止動螺栓,則 主體可能會擺動並鋸到輪廓工作台。 (2) 一邊將輪廓工作台放在導向板上,一邊對準凹槽 與帶鋸條。 (3) 使用虎鉗 (B) 固定輪廓工作台。 待切割的薄板 虎鉗...
- Page 13 中國語 10. 搬移安裝在帶鋸機台架上的帶鋸機 皮帶輪護罩 (B) 搬移安裝在帶鋸機台架上的帶鋸機時,如下圖 所示將主體向下移動到下限位置。鎖緊止動螺 栓以免主體向上移動,然後握住底座的兩端。 滑動護蓋 (圖 18-a) 帶鋸機台架配有車輪,您可握住前握把,同時提 起皮帶輪護罩 (B) 側來搬移帶鋸機。(圖 18-b) 蝶形螺栓 (5 mm) 註 即使僅移動或存放安裝在帶鋸機台架上的帶鋸機 M8 螺栓 時,也應拆下帶鋸條及電池。 滑動護蓋座 突起部 圖 16 止動螺栓 圖 18-a <輪廓切割作業(圖 17)> (1) 打開撥桿開關。 (2) 用雙手握住工件。在輪廓工作台上將工件緩慢滑 前握把 動靠近帶鋸條,進行輪廓切割。 (3) 將工件抵住帶鋸條,施加的負荷切勿過大,以免 鋸片彎曲。請謹慎操作,避免對鋸片施加過大負...
- Page 16 Shinagawa Intercity Tower A, 15-1, Konan 2-chome, Minato-ku, Tokyo, Japan Code No. C99147031 F Printed in China...
Need help?
Do you have a question about the CB12-ST2 and is the answer not in the manual?
Questions and answers