Table of Contents
Advertisement
Quick Links
Advertisement
Table of Contents

Related Manuals for ADInstruments pH Amp


Summary of Contents for ADInstruments pH Amp
- Page 1 Amp Owner’s Guide...
- Page 2 This document was, as far as possible, accurate at the time of release. However, changes may have been made to the software and hardware it describes since then. ADInstruments Pty Ltd reserves the right to alter specifications as required. Late-breaking information may be supplied separately.
-
Page 3: Table Of Contents
The pH Amp ........ - Page 4 A Technical Aspects pH Amp Operation ........27 Technical Description .
-
Page 5: Safety Notes
ADInstruments products are NOT intended to be used as medical devices or in medical environments. That is, no product supplied by ADInstruments is intended to be used to diagnose, treat or monitor a subject. Furthermore no product is intended for the prevention, curing or alleviation of disease, injury or handicap. - Page 6 Safety Symbols Devices manufactured by ADInstruments that are designed for direct connection to humans are tested to IEC 601-1:1998 (including amendments 1 and 2) and 60601-1-2, and carry one or more of the safety symbols below. These symbols appear next to those inputs and output connectors that can be directly connected to human subjects.
- Page 7 • All Bio Amp front-ends (except for the ML138 Octal Bio Amp) and PowerLab units with a built-in Bio Amp are supplied with a 3-lead or 5-lead Bio Amp subject cable and lead wire system. The ML138 Octal Bio Amp is supplied with unshielded lead wires (1.8 m). Bio Amps are only safe for human connection if used with the supplied subject cable and lead wires.
- Page 8 IEC60601-1-1: General requirements for safety - Collateral standard: Safety requirements for medical systems . Reference to this standard is required when setting up a system for human connection. pH Amp Owner’s Guide...
- Page 9 PowerLab systems (and many other devices) require the connection of a personal computer for operation. This personal computer should be certified as complying with IEC60950 and should be located outside a 1.8 m radius from the subject (so that the subject cannot touch it while connected to the system).
- Page 10 They shall only be used for supplying power to equipment which is intended to form part of the system. Cleaning and Sterilization ADInstruments products may be wiped down with a lint free cloth moistened with industrial methylated spirit. Refer to the manufacturer’s guidelines or the Data Card supplied with transducers and accessories for specific cleaning and sterilizing instructions.
- Page 11 Your PowerLab system can be periodically checked for basic safety by using an appropriate safety testing device. Tests such as earth leakage, earth bond, insulation resistance, subject leakage and auxiliary currents and power cable integrity can all be performed on the PowerLab system without having to remove the covers.
- Page 12 Amp Owner’s Guide...
-
Page 13: Overview
Overview The pH Amp is one of a family of modular devices called front-ends, ® designed to extend the capabilities of the PowerLab system. The pH Amp is designed to record signals from: • pH electrodes • potentiometric ion selective electrodes (ISEs) •... -
Page 14: How To Use This Guide
How to Use This Guide This owner’s guide describes how to set up and begin using your pH Amp. The chapters give an overview of front-ends in general and the pH Amp in particular, and discuss how to connect the hardware, perform a simple power-up test, and use the front-end with some ADInstruments programs. -
Page 15: The Ph Amp
flexibility and ease of use of the PowerLab system. The pH Amp The pH Amp is designed for recording signals from pH and other potentiometric electrodes, and it operate under full software control. It is automatically recognized by ADInstruments software, which controls the gain range, signal filtering, and other settings. -
Page 16: The Online Indicators
The Online Indicators When lit, these indicate that the software (such as LabChart or Scope) has located and initialized the pH Amp. If the software is on and an indicator has not lit up, check that the pH Amp is properly connected. -
Page 17: Setting Up
Setting Up This chapter describes how to connect the pH Amp to your PowerLab and perform a quick test to make sure that it is working properly. The best way to configure your system for one or more front-ends is discussed, along with how to use the front-end with ADInstruments application programs. -
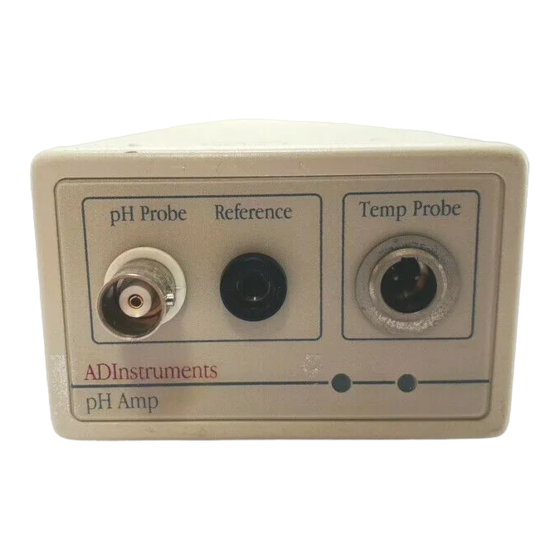
Page 18: Connecting To The Powerlab
C cable and two BNC cables. Use the BNC cables to connect the signal outputs on the back of the pH Amp to the signal inputs on the front of the PowerLab. If the PowerLab has differential (rather than single-ended) inputs, the BNC cables must connect to the positive analog inputs because ADInstruments applications will not find the front-end on start-up if a... -
Page 19: Multiple Front-Ends
Front-ends are used with PowerLabs and ADInstruments programs such as LabChart and Scope. The combined amplification and filtering of the pH Amp, the PowerLab and the program are presented as a single set of software controls, replacing the Input Amplifier dialog with the pH Amp dialog. -
Page 20: The Front-End Driver
To replace the drivers, you should reinstall the ADInstruments software. Front-end Self-test Once the pH Amp is properly connected to the PowerLab, and when the correct software version is installed on the computer, the following quick check can be performed on the pH Amp: •... -
Page 21: The Ph Amp
The pH Amp The pH Amp dialog appears when you choose the menu pH Amp… command in LabChart (or click the button in Scope). This pH Amp… dialog allows software control of the various amplifiers and filters of the hardware. Change settings in the dialog, then click to apply them. -
Page 22: Signal Display
Range pop-up menu lets you select the input range or sensitivity of the channel – the combined range of the pH Amp and PowerLab. Changing the range in the pH Amp dialog is the equivalent to changing it in the Chart or Scope window; applied once you click At 25 °C a range of 59 mV corresponds to a range of approximately... -
Page 23: Filtering
(more than two points), use the Multipoint Calibration extension; do NOT use Units Conversion. Both extensions are available from the ADInstruments website. For more information about Units Conversion, see the LabChart Help Center. Calibrating the pH Amp Electrode Calibration of the pH electrode should be performed using the pH Extension. -
Page 24: Setting Up The Temperature Signal
Figure 2–6 Signal amplitude Pause and Scroll buttons Range pop-up menu The Temperature dialog (LabChart for Windows) Amplitude axis Click this button to open the Units Conversion dialog pH Amp Owner’s Guide... - Page 25 Amplitude axis Signal amplitude Range pop-up menu Figure 2–7 The Temperature dialog (LabChart for Macintosh) Pause/Scroll button Click this to open the Units Conversion dialog Compression buttons The factory Figure 2–8 settings for the The Units Conversion dialog RTD probe are: (LabChart for Macintosh) 0 V = 0 °C Unit pop-up...
-
Page 26: Setting The Range
100 Ω nominal resistance, to which the temperature amplifier is factory set to produce 0 mV at 0°C and an output of 50 mV/°C. Only use these values to calibrate the probe supplied with the pH Amp. You can substitute other RTD probes for the one provided, however the factory calibration will no longer apply, and you will have to use two precision temperature sources to calibrate the probe. -
Page 27: A Technical Aspects
You do not need to know the material here to use the pH Amp. It is likely to be of interest to the technically minded. (However, you should not use it as a service manual: user modification of the equipment voids your rights under warranty.) -
Page 28: Technical Description
PowerLab via BNC-to-BNC cables, through which the amplified and filtered signal is sent to the PowerLab. The overall operation of the pH Amp can be better understood by referring to Figure A–1. The pH input amplifier of the pH Amp is an electrometer type amplifier with extremely high input impedance. -
Page 29: B Troubleshooting
A P P E N D I X Troubleshooting If you experience any difficulty with the pH Amp use this section to try to resolve the problem. In the majority of cases, the problem can usually be fixed by ensuring that the connecting cables are correctly connected and firmly attached and then re-starting the LabChart or... - Page 30 PowerLab may not be properly connected. Check that the cable is firmly connected to the BNC connector on the back panel of the pH Amp and to a BNC input on the front panel of the PowerLab.
-
Page 31: C Specifications
Specifications pH Section pH amplifier: High impedance, electrometer type. Input ranges: ±200 μV to ±2 V full scale in 13 steps (combined PowerLab and pH Amp) Input resolution: 16 bits, 0.0015% of range Ω typical Input impedance: Amplifier noise: < 1μV rms (< 4 μV p–p) with a bandwidth of DC –... -
Page 32: Control Port
Dimensions (h × w × d): 50 mm × 76 mm × 260 mm (1.97" × 3.0" × 10.2") Weight: 0.8 kg (1.8 lb) Operating conditions: 5–35˚C 0–90% humidity (non–condensing) ADInstruments reserves the right to alter these specifications at any time. pH Amp Owner’s Guide... -
Page 33: Index
Index ADInstruments programs 19–26 LabChart 19 back panel 16 maintenance 10 calibration 23 pH Amp checking the pH Amp 14 filtering 23 cleaning 10 setting the range/sensitivity 22 connections to the PowerLab setup 21–26 multiple front-ends 19 software 21–23 single front-end 18... - Page 34 31–32 temperature probe calibration 26 temperature signal setting the range/sensitivity 26 setup 24–26 Units Conversion 26 troubleshooting 29–30 user modification voids warranty 27 using ADInstruments programs 19–26 pH Amp Owner’s Guide...
Need help?
Do you have a question about the pH Amp and is the answer not in the manual?
Questions and answers