Table of Contents
Advertisement
Available languages
Available languages
Quick Links
H-259, H-347
π
H-408
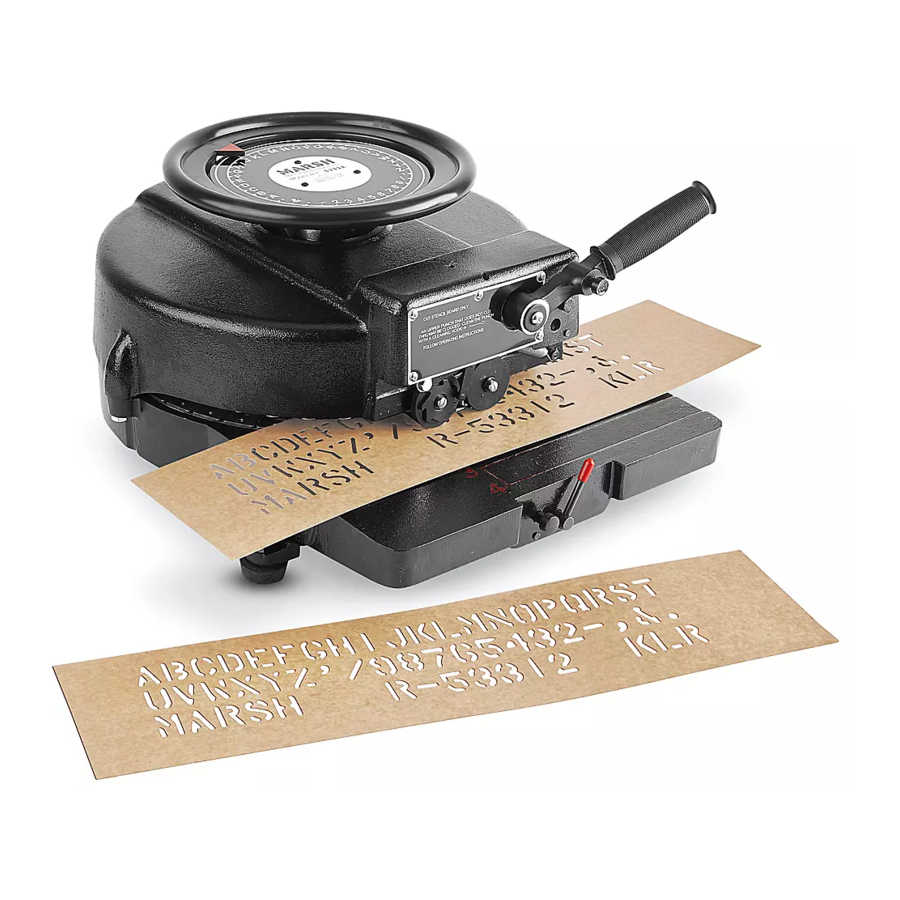
STENCIL MACHINE
NOTE: No assembly is necessary after you
unpack your machine.
INSERTING THE OIL BOARD
1.
Move the release lever to the right. This drops the
lower feed roller and allows space to insert the oil
board.
2. Position the oil board so the top edge covers the
punch center lines and then align the bottom edge
of the oil board with the appropriate guideline.
(See Figure 1)
NOTE: The left edge of the oil board may align
with the left side of the guideline markings. If
you need a wider left margin, you may align
the left edge of the oil board with one of the
punch center lines. (See Figure 1)
3. When the oil board is in position, push the release
button. The release lever snaps back to its original
position and raises the lower feed rollers to secure
the oil board.
Figure 1
Punch Center Lines
Lower Feed Roller
Release Lever
Release Button
Guide Lines
PAGE 1 OF 15
1-800-295-5510
uline.com
OPERATION
Oil Board
Pour le français, consulter les pages 11-15.
CUTTING THE OIL BOARD
To cut and space characters, follow the steps below
and refer to Figure 2.
1.
Move the hand wheel and align the indicator with
the desired character.
2. When the indicator is aligned, push the handle
down.
3. To create a space between words, press the word
space button on the handle as you push down.
(See Figure 2)
4. When a line of stenciling is complete, swing the
release lever to the right to release the lower feed
rollers.
5. Align the oil board in the starting position. Advance
the top of the oil board into the machine and align
the bottom of the oil board with an appropriate
guideline.
Figure 2
Indicator
Handle
Word Space Button
Punch
Center Lines
Release
Lever
Para Español, vea páginas 6-10.
Hand Wheel
0521 IH-259
Advertisement
Table of Contents

Related Manuals for U-Line H-259


Summary of Contents for U-Line H-259
- Page 1 Para Español, vea páginas 6-10. Pour le français, consulter les pages 11-15. H-259, H-347 π 1-800-295-5510 H-408 uline.com STENCIL MACHINE OPERATION CUTTING THE OIL BOARD NOTE: No assembly is necessary after you unpack your machine. To cut and space characters, follow the steps below INSERTING THE OIL BOARD and refer to Figure 2.
-
Page 2: Maintenance
MAINTENANCE CLEANING THE PUNCHES 2. Remove the handle screw and washer. Then, pull the cover plate and handle assembly away from As you use your stencil machine, the punches may the machine and place it to the side. become clogged with oil board particles. If these particles prevent the machine from cutting complete characters, the punches need to be cleaned. - Page 3 4. Adjust the square head screw to the desired position. NOTE: H-259 has a fourth washer. Only turn the square head screw 1/4 turn at a time. 5. Push the spacing cam to the right and put the feed If you want to apply more punch depth, turn the wheel in place.
- Page 4 MAINTENANCE CONTINUED Figure 8 Figure 9 Holes in Die Carrier Punch Screw Side Bolt, Nut Feed Roller and Lock Washer Assembly Base Wall Eccentric Shaft Stud Collar Set Screw Punch Release Button Die Screw 4. Insert screwdriver through the holes in the die carrier 4.
-
Page 5: Troubleshooting
TROUBLESHOOTING OPERATING ISSUE CAUSES RECOMMENDATIONS The oil board is moving erratically There is a buildup of heavy oil on the moving Be sure the machine is properly oiled and through the machine. parts under the cover plate. cleaned every one to two years. The treads on the lower feed wheel are dirty. - Page 6 H-259, H-347 π 800-295-5510 H-408 uline.mx MÁQUINA PARA PLANTILLAS FUNCIONAMIENTO NOTA: Una vez desempacada la máquina, no CORTAR LA PLANTILLA TRATADA CON ACEITE se requiere ensamble alguno. Para cortar y espaciar los caracteres, siga los pasos INSERTAR LA PLANTILLA TRATADA CON ACEITE abajo indicados y consulte el Diagrama 2.
-
Page 7: Mantenimiento
MANTENIMIENTO LIMPIAR LOS PERFORADORES 2. Quite el tornillo y la rondana del asa. A continuación, extraiga la placa de cubierta y el ensamble del asa Al usar la máquina para plantillas, los perforadores de la máquina y colóquelos a un lado. podrían obstruirse con partículas de la plantilla. - Page 8 4. Ajuste el tornillo con cabeza cuadrada a la posición deseada. Gire el tornillo de cabeza cuadrada NOTA: H-259 tiene una cuarta rondana. únicamente 1/4 de vuelta cada vez. Si desea aplicar una mayor profundidad de perforado, gire el tornillo 5.
- Page 9 CONTINUACIÓN DE MANTENIMIENTO Diagrama 8 Diagrama 9 Orificios del Perno de Arrastre del Troquel Tornillo del Perno, Tuerca Troquel Perforador y Rondana de Seguridad Laterales Ensamble de Rodillo Pared Base de Alimentación Tornillo de Ajuste Eje Excéntrico Collarín Botón de Perforador Liberación Tornillo del Troquel...
-
Page 10: Solución De Problemas
SOLUCIÓN DE PROBLEMAS PROBLEMA DE FUNCIONAMIENTO CAUSAS RECOMENDACIONES La plantilla tratada con aceite se Hay una acumulación de aceite denso en las Asegúrese de que la máquina está bien mueve de manera irregular por la partes móviles que hay debajo de la placa de lubricada y de que se limpia cada uno o dos máquina. - Page 11 H-259, H-347 π 1-800-295-5510 H-408 uline.ca MACHINE À POCHOIR FONCTIONNEMENT COUPER LE CARTON HUILÉ REMARQUE : Aucun assemblage n'est requis après avoir déballé la machine. Pour découper et espacer les caractères, suivez les INSÉRER LE CARTON HUILÉ étapes ci-dessous et reportez-vous à la Figure 2.
-
Page 12: Entretien
ENTRETIEN NETTOYAGE DES POINÇONS 2. Retirez la vis et la rondelle de la manivelle. Enlevez ensuite la plaque de finition et l'ensemble de la Lorsque vous utilisez votre machine à pochoir, les manivelle de la machine et mettez-les de côté. poinçons peuvent se boucher de particules provenant du carton huilé. - Page 13 4. Ajustez la vis à tête carrée à la position souhaitée. Tournez la vis à tête carrée seulement 1/4 de tour à la fois. Si vous souhaitez poinçonner plus REMARQUE : H-259 comprend une quatrième profondément, tournez la vis à tête carrée dans le rondelle.
- Page 14 ENTRETIEN SUITE Figure 9 Figure 8 Trous du support de matrice Vis de Boulon, écrou Matrice et rondelle de poinçon blocage latéraux Ensemble du rouleau d'alimentation Paroi de la base Arbre excentrique Col de goujon Vis de réglage Bouton de dégagement Poinçon Vis de matrice 4.
-
Page 15: Dépannage
DÉPANNAGE PROBLÈME DE FONCTIONNEMENT CAUSES RECOMMANDATIONS Le carton huilé se déplace de façon De l'huile visqueuse s'est accumulée sur les Assurez-vous que la machine est bien huilée et erratique dans la machine. pièces mobiles sous la plaque de finition. nettoyée chaque année ou tous les deux ans. Les bandes de roulement sur la roue Nettoyez les bandes de roulement sur la roue d'alimentation inférieure sont sales.
Need help?
Do you have a question about the H-259 and is the answer not in the manual?
Questions and answers