Table of Contents
Advertisement
Quick Links
Gynecological
Examination
Simulator
LM-110
Instruction Manual
Thank you for purchasing the Gynecological Examination Simulator.
Please read this instruction manual carefully to ensure correct use of the product,
and store it in a safe place for easy access.
KOKEN CO., LTD.
1-4-14 Koraku, Bunkyo-ku, Tokyo 112-0004 JAPAN
URL:http://www.kokenmpc.co.jp
E-mail:customer@kokenmpc.co.jp
© 2016-2020 KOKEN CO.,LTD. C-1-1026-1-01-04
Advertisement
Table of Contents

Related Manuals for KOKEN LM-110


Summary of Contents for KOKEN LM-110
- Page 1 Thank you for purchasing the Gynecological Examination Simulator. Please read this instruction manual carefully to ensure correct use of the product, and store it in a safe place for easy access. KOKEN CO., LTD. 1-4-14 Koraku, Bunkyo-ku, Tokyo 112-0004 JAPAN URL:http://www.kokenmpc.co.jp E-mail:customer@kokenmpc.co.jp © 2016-2020 KOKEN CO.,LTD. C-1-1026-1-01-04...
- Page 2 Handling and Safety Precautions These precautions should be strictly observed in order to ensure safe, long-term use of the product. The following precautions should be observed particularly strictly: 1. This model is made from special materials so that it closely resembles the feel of a living body, so please handle this product gently as you would do so with a living body.
- Page 3 11. The model may warp if stored in a very cold or very hot environment for an extended period of time. The materials may also deteriorate, warp, or discolor if exposed to direct sunlight or UV. Please store the product in an environment with a temperature of 0° C to 50° C, away from direct sunlight and UV.
-
Page 4: Table Of Contents
Table of Contents 1. Outline and characteristics 2. Structure and components 3. Handling instructions 3-1. Instructions for use 3-2. Adjustment of ovarian cysts and hydrosalpinx 3-3. Possible examinations and procedures 3-4. Removal of the genital unit 4. Care instructions 5. Specifications... -
Page 5: Outline And Characteristics
1. Outline and characteristics Outline This model enables practical training in basic gynecological examination. It is best suited for the education of doctors-in-training and medical students, including general practice. Characteristics 1. Soft, special material used for the external genital piece and abdominal piece impart a feel to the model during bimanual examination (internal and external examination) and rectal examination that closely resembles that of a living body. -
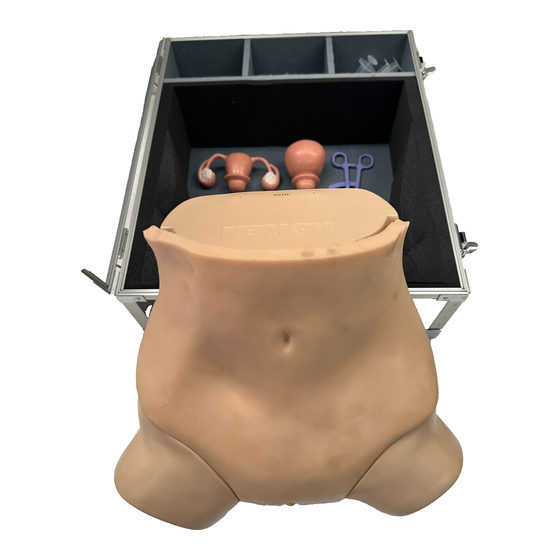
Page 6: Structure And Components
2. Structure and components Component Number of component Main body ① Genital unit ② Fixing screw ③ ④ Normal uterus Early pregnancy uterus ⑤ Hysteromyoma 1 (in tunica muscularis) ⑥ Hysteromyoma 2 (under endometrium) ⑦ ⑧ Ovarian cyst 1 (ping-pong ball size) Ovarian cyst 2 (tennis ball size) ⑨... -
Page 7: Handling Instructions
3. Handling instructions 3-1. Instructions for use 1. Remove the abdominal wall protective sheet from the storage case, and take out the main body. Storage case Abdominal wall protective sheet *If the genital unit feels sticky, apply the enclosed baby powder over the entire surface. 2. - Page 8 4. Apply glycerin to the stopper ring on the uterus Picture is of the normal uterus Stopper ring 5. Insert the uterus into the hole for attaching the uterus. Cross section of the insertion site External genitals Set correctly Uterus *On the inside of the hole for attaching the uterus is a groove into which the stopper ring will fit.
-
Page 9: Adjustment Of Ovarian Cysts And Hydrosalpinx
6. Cover the main body with the abdominal wall and secure it with the hook and loop fasteners. *If the abdominal wall around the ilium is not aligned properly, adjust to align it. 7. When removing the uterus, pull it out of the hole for attaching the uterus. ○... - Page 10 2. Open the handle on the straight stopcock and close the air pump valve before pumping in air. Close Open *If you want to reduce the amount of air, loosen the air pump valve to release the air. *Beware that pumping in too much air may cause the uterus to rupture. 3.
- Page 11 5. Cover the main body with the abdominal wall, and secure it with the hook and loop fasteners.
-
Page 12: Possible Examinations And Procedures
3-3 Possible examinations and procedures ○ The product is designed to accommodate practice of the following procedures. In addition, the uterus may be changed to recreate the conditions of a normal uterus or uteri of various abnormal states. Internal examination Bimanual examination Rectal examination Vaginoscopy... -
Page 13: Removal Of The Genital Unit
3-4 Removal of the genital unit ○ The genital unit is removable. To care for or replace the unit (for instance, if the genital part has split), unscrew the fixing screws (in 2 locations) and unfasten the hook and loop fasteners around the leg (in 2 locations) to remove it. -
Page 14: Care Instructions
4. Care instructions 1. After use, wipe off dirt and the glycerin applied during the practical. Use water or neutral detergent diluted with water, and wipe with a wet cloth or gauze. Wipe off the moisture with a dry, soft cloth such as gauze, and apply baby powder over the entire model. *Never use organic solvents such as disinfecting alcohol, paint thinners, or benzenes to clean this product.
Need help?
Do you have a question about the LM-110 and is the answer not in the manual?
Questions and answers