Table of Contents
Advertisement
Quick Links
Colonoscopy
(Lower GI Endoscopy)
Simulator TypeII
LM-107
Instruction Manual
Thank you for purchasing the Colonoscopy(Lower GI Endoscopy) Simulator TypeII.
Please read this instruction manual carefully to ensure correct use of the product,
and store it in a safe place for easy access.
KOKEN CO., LTD.
1-4-14 Koraku, Bunkyo-ku, Tokyo 112-0004 JAPAN
URL:http://www.kokenmpc.co.jp
E-mail:customer@kokenmpc.co.jp
C-1-1017-1-01-02
9999
Advertisement
Table of Contents

Related Manuals for KOKEN LM-107


Summary of Contents for KOKEN LM-107
- Page 1 Thank you for purchasing the Colonoscopy(Lower GI Endoscopy) Simulator TypeII. Please read this instruction manual carefully to ensure correct use of the product, and store it in a safe place for easy access. KOKEN CO., LTD. 1-4-14 Koraku, Bunkyo-ku, Tokyo 112-0004 JAPAN URL:http://www.kokenmpc.co.jp E-mail:customer@kokenmpc.co.jp...
- Page 2 30ºC, it may change in shape or degrade, rendering it unusable. 1-2. Please use the Simulated Polyp as early as possible after it has been unsealed. KOKEN is not responsible for quality of Simulated Polyps that have already been unsealed.
- Page 3 1-6. Always store in the storage liquid. Storing it in other liquids will cause degeneration of the polyp. Be careful not to spill the storage liquid or throw it away before using all the Simulated Polyps (for polypectomy). 2. When resecting a Simulated Polyp (for polypectomy), always use a disposable electrode. 3.
- Page 4 Handling and Safety Precautions These precautions should be strictly observed to ensure safe, long-term use of the product. Caring for the model after use 1. After using this product, thoroughly flush out the lubricant with cold or hot water. 2. To clean the storage case, wipe with gauze or similar material moistened with water or a watered- down,mild detergent.
-
Page 5: Table Of Contents
Table of Contents 1. Outline and Features 2. Components and Configuration 3. Handling the Model 3-1 How to apply lubricant 3-2 How to assemble the intestine 3-3 How to attach simulated polyps (for observation) 3-4 How to attach an optional LM-103A Simulated Polyp (for polypectomy) 3-5 Caring for the product after use 4. Specifications 5. Optional Items (sold separately) -
Page 6: Outline And Features
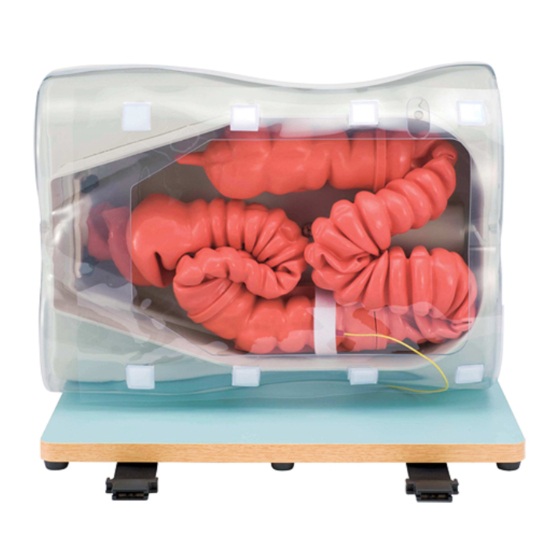
1. Outline and Features Outline This training model is used to confirm methods of insertion and orientation for a colonoscope. Attaching optional parts also enables treatment-related training such as polyp incision and hemostasis, as well as small intestine insertion training using a balloon endoscope. Features 1. -
Page 7: Components And Configuration
2. Components and Configuration Components and Configuration Name Name Main unit Main unit Rectum/sigmoid colon part Rectum/sigmoid colon part Descending colon part Descending colon part Transverse colon part Transverse colon part Ascending colon part Ascending colon part Simulated polyps (for observation): Simulated polyps (for observation): Conduction cable for Simulated Polyps (for polypectomy) Conduction cable... -
Page 8: Handling The Model
* Before using this product, be sure to apply a generous amount of endoscope lubricant to the inside of it. An insufficient amount of lubricant will increase resistance between the scope and intestine, making insertion more difficult. 3. Handling the Model * Use a lubricant specifically designed for endoscopes. - Page 9 2. Detach colon connectors from these three points. 2. Detach colon connectors from these three points. 2. Detach colon connectors from these three points. 3. Pull the ascending and descending colons upward to remove them from the main unit. 3. Pull the ascending and descending colons upward to remove them from the main unit. 3.
- Page 10 4. Apply lubricant to the rectum/sigmoid colon. 4. Apply lubricant to the rectum/sigmoid colon. 4. Apply lubricant to the rectum/sigmoid colon. 4. Apply lubricant to the rectum/sigmoid colon. Insert lubricant from the anal region as well as the sigmoid colon connector opening. After inserting Insert lubricant from the anal region as well as the sigmoid colon connector opening.
-
Page 11: How To Assemble The Intestine
7. Apply lubricant to the ascending colon. 7. Apply lubricant to the ascending colon. Squeeze lubricant into the intestine. After inserting a generous amount, squish the 7. Apply lubricant to the ascending colon. 7. Apply lubricant to the ascending colon. intestine together so that the lubricant spreads all the way through it. - Page 12 2. Connect the polyp attachment band to the pin on the upper right section of the main unit, then 2. Connect the polyp attachment band to the pin on the upper right section of the main 2. Connect the polyp attachment band to the pin on the upper right section of the main push holes in the descending colon's seat into the pins to attach the descending colon to the main unit, then push holes in the descending colon's seat into the pins to attach the unit, then push holes in the descending colon's seat into the pins to attach the...
- Page 13 4. Reconnect the disassembled ascending colon to the transverse colon. 4. Reconnect the disassembled ascending colon to the transverse colon. 4. Reconnect the disassembled ascending colon to the transverse colon. 4. Reconnect the disassembled ascending colon to the transverse colon. Ascending colon and transverse colon Ascending colon and...
- Page 14 6. Attach the simulated peritoneal membrane sheet to the main unit. 6. Attach the simulated peritoneal membrane sheet to the main unit. 6. Attach the simulated peritoneal membrane sheet to the main unit. Attach the simulated peritoneal membrane sheet to the main unit. ...
- Page 15 How to attach the model to the holding table (dorsal position) How to attach the model to the holding table (dorsal position) How to attach the model to the holding table (dorsal position) How to attach the model to the holding table (dorsal position) 1. Align holes on the bottom of the main unit with the holding table's fixing pins. 1.
-
Page 16: How To Attach Simulated Polyps (For Observation)
3-3 How to attach simulated polyps (for observation) Select from the simulated polyps (for observation) below and attach them to the designated areas 3-3 How to attach simulated polyps (for observation) Select from the simulated polyps (for observation) below and attach them to the on the ascending colon and descending colon. designated areas on the ascending colon and descending colon. - Page 17 Attaching a simulated polyp to the ascending colon ○ Attaching a simulated polyp to the ascending colon 1. Remove the ascending colon from the main unit, insert the selected polyp (for 1. Remove the ascending colon from the main unit, insert the selected polyp (for observation) into observation) into the polyp attachment hole, and re-attach the ascending colon to the the polyp attachment hole, and re-attach the ascending colon to the main unit.
-
Page 18: How To Attach An Optional Lm-103A Simulated Polyp (For Polypectomy)
3-4 How to attach an optional LM-103A Simulated Polyp (for polypectomy) [Caution] Be sure to disconnect the conduction cable from the model when not using (attaching) any simulated polyp (for polypectomies) in order to avoid any electrical hazards. ○ Attaching the return electrode 1. Use the Velcro on the back of the main unit to attach the conduction cable with the plate side facing the main unit. When using simulated polyps (for polypectomies) in both the ascending and descending colons, you should attach the two plates side-by-side to the Velcro on the back of the main unit as shown in the lower right illustration below. - Page 19 2. Attach a return electrode which you might have to cover the plate of the conduction cable. When using simulated polyps (for polypectomies) in both the ascending and descending colons, you 2. Attach a return electrode on hand to cover the conduction cable for simulated polyps should attach the return electrode so that it is in contact with the two plates as shown in the lower (for polypectomies).
- Page 20 Attaching a simulated polyp (for polypectomies) to the descending colon ○ Attaching a simulated polyp (for polypectomies) to the descending colon Attaching a simulated polyp (for polypectomies) to the descending colon Attaching a simulated polyp (for polypectomies) to the descending colon 1.
- Page 21 4. Re-attach the polyp attachment band to cover the flange. Polyp attachment band Polyp attachment band Conduction cable ring Intestine Conduction cable ring Intestine Simulated polyp (for polypectomies) in set position Simulated polyp (for polypectomies) in set position 4. Position the conduction cable between the Velcro and re-attach the simulated 5.
- Page 22 Attaching a simulated polyp (for polypectomies) to the ascending colon ○ Attaching a simulated polyp (for polypectomies) to the ascending colon Attaching a simulated polyp (for polypectomies) to the ascending colon Attaching a simulated polyp (for polypectomies) to the ascending colon 1.
- Page 23 4. Position the conduction cable between the Velcro and re-attach the peritoneum sheet. 4. Position the conduction cable between the Velcro and re-attach the peritoneum sheet. Velcro Conduction cable ring Intestine Main unit Simulated polyp (for polypectomies) in set position - 20 -...
-
Page 24: Caring For The Product After Use
3-5 Caring for the product after use Make sure to wash the Type II Colonoscopy Training Model after use as described below. 3-5 Caring for the product after use Make sure to wash the Type II Colonoscopy Training Model after use as described below. * When washing the model in a rubbing motion, make sure not to use your fingernails. Doing so may 3-5 Caring for the product after use * When washing the model in a rubbing motion, make sure not to use your 3-5 Caring for the product after use... - Page 25 4. Remove the flange plate screws, then remove the rectum/sigmoid colon and flange 4. Remove the flange plate screws, then remove the rectum/sigmoid colon and flange plate from the plate from the main unit. 4. Remove the flange plate screws, then remove the rectum/sigmoid colon and flange main unit.
-
Page 26: Specifications
4. Specifications Length Width Height Weight Main model unit Approx. 33 cm Approx. 46 cm Approx. 21 cm Approx. 2.9 kg Holding board Approx. 27 cm Approx. 44 cm Approx. 9 cm Approx. 1.4 kg Case Approx. 40 cm Approx. 53 cm Approx.
Need help?
Do you have a question about the LM-107 and is the answer not in the manual?
Questions and answers