Table of Contents
Advertisement
Quick Links
Multipurpose
Injection Training
Arm
LM-074
Instruction Manual
Thank you for purchasing the LM-074 Multipurpose Injection Training Arm.
Please read this instruction manual carefully to ensure correct use of the
product, and store it in a safe place for easy access.
KOKEN CO., LTD.
1-4-14 Koraku, Bunkyo-ku, Tokyo 112-0004 JAPAN
URL:http://www.kokenmpc.co.jp
E-mail:customer@kokenmpc.co.jp
C-1-938-2-03-02
9999
Advertisement
Table of Contents

Related Manuals for KOKEN LM-074


Summary of Contents for KOKEN LM-074
- Page 1 Injection Training LM-074 Instruction Manual Thank you for purchasing the LM-074 Multipurpose Injection Training Arm. Please read this instruction manual carefully to ensure correct use of the product, and store it in a safe place for easy access. KOKEN CO., LTD.
- Page 2 10000...
- Page 3 Handling and Safety Precautions These precautions should be strictly observed in order to ensure safe, long-term use of the product. The following precautions should be observed particularly strictly: 1. The model is made to simulate the texture of human skin. Rough handling may cause damage. 2.
-
Page 4: Table Of Contents
Table of Contents 1. Outline and Features 2. Components and Configuration 3. Stand Assembly 4. Hypodermic Injection Configuration 5. Set-up for Hypodermic Injection 6. Care for Hypodermic Injection Parts 7. Intramuscular Injection Configuration 8. Set-up for Intramuscular Injection 9. Care for Intramuscular Injection Parts 10. -
Page 5: Outline And Features
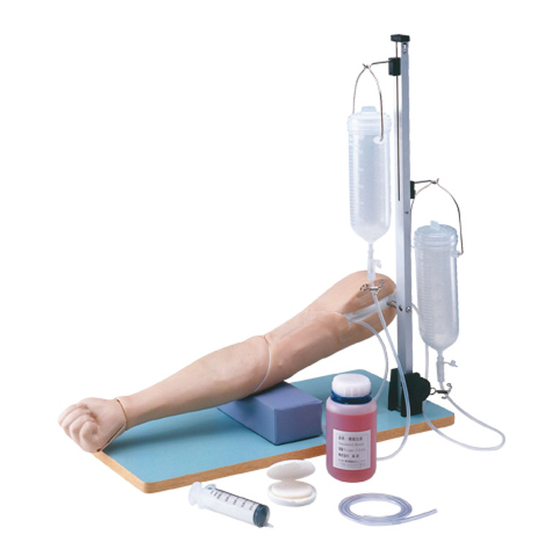
1. Outline and Features Outline • Three different injection techniques—intramuscular injection, hypodermic injection, and IV injection—can be practiced with this single model. Moreover, intravenous (IV) injection can be practiced in the median antebrachial vein and opisthenar vein, allowing a total of four different injection techniques to be practiced. -
Page 6: Components And Configuration
2. Components and Configuration Names of the Components Quantity ① Main body ② IV injection site ③ Hypodermic injection site ④ Hypodermic injection sponge ⑤ Intramuscular injection gel bag ⑥ Intramuscular injection sponge ⑦ Acromial part ⑧ Arm skin (hand) ⑨... -
Page 7: Stand Assembly
3. Stand Assembly *When the Training Arm is delivered, the height-adjustable hook will be covered with a protective tube. Do not discard this tube. Remove the tube to use the hook during IV injections. When practicing techniques other than IV injection, or when storing the Training Arm, cover the hook with the tube. -
Page 8: Hypodermic Injection Configuration
4. Hypodermic Injection Configuration Stand Main body Acromial part Hypodermic injection sponge Hypodermic injection site Drainage tube Upper arm skin... -
Page 9: Set-Up For Hypodermic Injection
5. Set-up for Hypodermic Injection 1. First apply baby powder to the surface of the hypodermic injection site, and then set the hypodermic injection sponge in place. 2. Insert the hypodermic injection site into the acromial part installed in the main body. 3. - Page 10 4. While supporting the joint protruding from the main body, insert it into the hole in the upper portion of the pole until the flange on the joint makes contact with the pole. Joint Flange 5. Put the joint into the groove labeled SC on the main body. Final assembled configuration...
- Page 11 6. Rotate the elbow 180° . *Because of the structure of the Training Arm, the direction of rotation is opposite that of the human body. Use caution, as rotating the Training Arm in the incorrect direction may cause damage. 7. Pull back the skin, and attach the drainage tube to the drainage tube connector on the main body. Place the tip of the drainage tube into a drainage receptacle.
-
Page 12: Care For Hypodermic Injection Parts
8. The hypodermic injection setup is now complete. *When performing IV injections after first practicing hypodermic injections, drain and dispose of the fluid remaining in the hypodermic injection site before practicing IV injections. *After practicing, dry the water from the hypodermic injection sponge well. Inadequate drying may result in mold. -
Page 13: Intramuscular Injection Configuration
7. Intramuscular Injection Configuration Stand Main body Acromial part Intramuscular injection sponge Intramuscular injection gel bag Drainage tube Upper arm skin... -
Page 14: Set-Up For Intramuscular Injection
8. Set-up for Intramuscular Injection 1. First apply baby powder to the intramuscular injection sponge and set it in the acromial part. 2. Set the acromial part in the main body. 3. Apply baby powder to the intramuscular injection gel bag, and then place the injection site on the main body. - Page 15 5. While supporting the joint protruding from the main body, insert it into the hole in the upper portion of the pole until the flange on the joint makes contact with the pole. Joint Flange 6. Insert the joint into the groove labeled IM on the main body. Final assembled configuration...
- Page 16 7. Rotate the elbow 90° *Because of the structure of the Training Arm, the direction of rotation is opposite to that of the human body. Use caution, as rotating the Training Arm in the incorrect direction may cause damage to the model. 8.
-
Page 17: Care For Intramuscular Injection Parts
9. Care for Intramuscular Injection Parts 1. Remove the main body from the stand pole. When attached to the pole, the main body can be removed by raising slightly and then pulling. 2. -
Page 18: Injection Configuration
10. IV Injection Confi guration Irrigators IV injection site Tube connector Gel bag IV injection site Irrigator connectors Tube connector Main body Stand Gel bag Connector Pinch cocks Hose clamps Blood vessel tube Connector Blood vessel connector IV injection site Forearm skin Blood vessel tube Hand skin IV opisthenar blood vessel tube IV opisthenar bloodvessel tube Blood vessel connector IV opisthenar blood vessel tube *Puncture site The IV opisthenar blood vessel tube and blood vessel tube degrade over time. -
Page 19: Set-Up For Iv Injection
11. Set-up for IV Injection 1. After applying baby powder to the IV injection site, pull out the tube connector (female) protruding from the main body by about 3 cm, and insert the IV injection site connector. After confi rming a solid connection, set in place in the main body. *When pulling the tube connector out (female) from the main body, be careful not to pull too far. - Page 20 2. Open the wrist cover, insert the opisthenar blood vessel tube in the groove in the back of the hand as shown in the diagram, and close the cover. *Be careful not to open the wrist cover too far. Damage may occur if the wrist cover is opened too far or excessive force is used.
- Page 21 4. After applying baby powder to the hand skin, set it in place on the main body. Cover the hand portion of the main body with the hand skin. Affix with hook-and-loop fasteners. 5. Insert the joint protruding from the main body into the hole in the lower portion of the stand pole until the flange makes contact with the pole.
- Page 22 6. Pass the pinch cock and hose clamp over the tube from the side of the irrigator connector. Pinch cock Hose clamp 7. After setting the irrigator connector on the end of the irrigator, lower to the stand. *Insert the end of the irrigator firmly and deeply into the irrigator connector. Not inserting the end of the irrigator firmly enough may result in leakage of simulated blood.
- Page 23 8. The setup for IV injection is complete. Open the irrigator lid and add simulated blood. Move the position of the pinch cock from the tube toward the connector to start the circulation of simulated blood. When the irrigator above is emptied of simulated blood, hold the “Push” button down while reversing the upper and lower height adjustable hook.
-
Page 24: Care For Iv Injection
12. Care for IV Injection 1. Remove the main body from the stand pole. When attached to the pole, the main body can be removed by raising slightly and then pulling. 2. -
Page 25: Replacement Of The Blood Vessel Tube, Blood Vessel Connector And Iv Opisthenar Blood Vessel Tube
13. Replacement of the blood vessel tube, blood vessel connector and IV opisthenar blood vessel tube Blood vessel tube 1. Remove the old blood vessel tube from the gel bag and insert the new blood vessel tube deeply into the connector protruding from the gel bag. *When inserting the tube, maintain a grip on the base of the connector protruding from the gel bag as much as possible. -
Page 26: Specifications
14. Specifications Length Width Height Weight Arm main body Approx. 63 cm Approx. 10 cm Approx. 11 cm Approx. 3 kg Stand Approx. 60 cm Approx. 27 cm Approx. 68 cm Approx. 2 kg...
Need help?
Do you have a question about the LM-074 and is the answer not in the manual?
Questions and answers