Advertisement
Quick Links
Umbilical Cord Kit
LM-101D
Instruction Manual
Thank you for purchasing the Umbilical Cord Kit.
Please read this instruction manual carefully to ensure correct use of the product,
and store it in a safe place for easy access.
KOKEN CO., LTD.
1-4-14 Koraku, Bunkyo-ku, Tokyo 112-0004 JAPAN
URL:http://www.kokenmpc.co.jp
E-mail:customer@kokenmpc.co.jp
© 2013-2021 KOKEN CO.,LTD. C-1-1000-1-01-02
Advertisement

Related Manuals for KOKEN LM-101D


Summary of Contents for KOKEN LM-101D
- Page 1 Thank you for purchasing the Umbilical Cord Kit. Please read this instruction manual carefully to ensure correct use of the product, and store it in a safe place for easy access. KOKEN CO., LTD. 1-4-14 Koraku, Bunkyo-ku, Tokyo 112-0004 JAPAN URL:http://www.kokenmpc.co.jp E-mail:customer@kokenmpc.co.jp © 2013-2021 KOKEN CO.,LTD. C-1-1000-1-01-02...
- Page 2 Handling and Safety Precautions These precautions should be strictly observed in order to ensure safe, long-term use of the product. The following precautions should be observed particularly strictly: 1. The model is made with a special material to simulate the texture of human skin. We recommend that it be handled carefully, in the same manner as an actual person.
- Page 3 Handling and Safety Precautions These precautions should be strictly observed in order to ensure safe, long-term use of the product. Caring for the model after use 1. This model is washable. After washing, wipe off all the remaining water with a soft, dry gauze or cloth.
-
Page 4: Table Of Contents
Table of Contents 1. Outline and Features 2. Components and Configuration 3. Attaching the fetal and placenta models 3-1. Attaching the fetal model (LM-0633) and placenta model (LM-0634) 3-2. Attaching the fetal model (LM-114A) and placenta model (LM-114B) 3-3. Attaching the fetal model (LM-114A) and placenta model (LM-0634) 3-4. -
Page 5: Outline And Features
This umbilical cord model can be used to practice actual tying and cutting. It can be attached to Koken’s fetal model and placenta model to practice performing delivery without stopping the 1 1 , , 概 概 要 要 と と 特 特 長 長... -
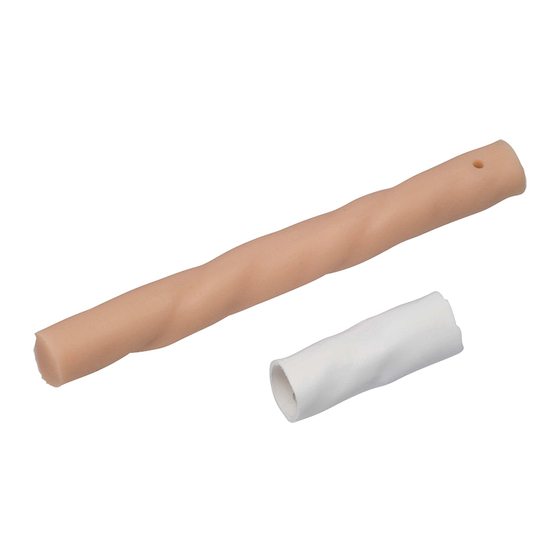
Page 6: Components And Configuration
2. Components and Configuration Umbilical cord connector Umbilical cord 3. Attaching the fetal and placenta models 3-1 Attaching the fetal model (LM-0633) and placenta model (LM-0634) 1) Take the umbilical cord contained in this Umbilical Cord Kit and roll down the end that has a hole in it until a string loop appears. - Page 7 3) Place the hook of the placenta model on the string loop of the umbilical cord contained in this Umbilical Cord Kit. Unfold the edges of the ends that were rolled down so that the end of the umbilical cord of the placenta model covers the end of the umbilical cord contained in this Umbilical Cord Kit.
- Page 8 5) Roll down the end of the umbilical cord connector with a clip until the clip is visible, then clamp it onto the umbilical cord contained in this Umbilical Cord Kit. After clamping them together, unfold the end of the umbilical cord connector and onto the umbilical cord contained in this Umbilical Cord Kit.
-
Page 9: Attaching The Fetal Model (Lm-114A) And Placenta Model (Lm-114B)
3-2 Attaching the fetal model (LM-114A) and placenta model (LM-114B) 3 3 - - 2 2 胎 胎 児 児 モ モ デ デ ル ル ( ( L L M M - - 1 1 1 1 4 4 A A ) ) と と 胎 胎 盤 盤 モ モ デ デ ル ル ( ( L L M M - - 1 1 1 1 4 4 B B ) ) に に 取 取 り り 付 付 け け る る 場 場 合 合 1) Take the umbilical cord contained in this Umbilical Cord Kit and roll back the end that has a 3... - Page 10 3) Roll back the end of the umbilical cord connector with a clip until the clip is visible, then clamp it onto the French knot on the placenta model's umbilical cord. After clamping them together, unroll the end of the umbilical cord connector that was rolled back so it covers the 3) 臍帯接続部品のクリップ側を捲り、クリップが見える状態にしてから胎盤モデルの臍帯玉留め...
- Page 11 6) 臍カバーを胎児モデルに取り付けます。 6) Attach the umbilical cover to the fetal model. 6) 臍カバーを胎児モデルに取り付けます。 6) 臍カバーを胎児モデルに取り付けます。 * Make sure the parts are not lubricated when attaching them together. If the parts are ※ ※ グ グ リ リ セ セ リ リ ン ン な な ど ど の の 潤 潤 滑 滑 剤 剤 が が つ つ い い て て い い る る 状 状 態 態 で で 取 取 り り 付 付 け け 作 作 業 業 を を 行 行 う う と と 、 、 臍 臍 カ カ バ バ ー ー が が 滑 滑 っ っ て て 取 取 れ れ や や す す く く lubricated with glycerin, etc.
- Page 12 3-3 Attaching the fetal model (LM-114A) and placenta model (LM-0634) 3 3 - - 3 3 胎 胎 児 児 モ モ デ デ ル ル ( ( L L M M - - 1 1 1 1 4 4 A A ) ) と と 胎 胎 盤 盤 モ モ デ デ ル ル ( ( L L M M - - 0 0 6 6 3 3 4 4 ) ) に に 取 取 り り 付 付 け け る る 場 場 合 合 1) Take the umbilical cord contained in this Umbilical Cord Kit and roll back the end that has a 3...
- Page 13 4) Remove the umbilical cover from the fetal model, and then thread the outer part of the 4) 胎児モデルから臍カバーを外し、臍帯結紮切断パーツ用臍帯に通します。 umbilical cord contained in this Umbilical Cord Kit through it. 4) 胎児モデルから臍カバーを外し、臍帯結紮切断パーツ用臍帯に通します。 4) 胎児モデルから臍カバーを外し、臍帯結紮切断パーツ用臍帯に通します。 5) Clamp the umbilical cord contained in this Umbilical Cord Kit in place using the clip attached 5) 胎児モデルのクリップで臍帯結紮切断パーツ用臍帯を挟みます。...
- Page 14 ※ ※ グ グ リ リ セ セ リ リ ン ン な な ど ど の の 潤 潤 滑 滑 剤 剤 が が つ つ い い て て い い る る 状 状 態 態 で で 取 取 り り 付 付 け け 作 作 業 業 を を 行 行 う う と と 、 、 臍 臍 カ カ バ バ ー ー が が 滑 滑 っ っ て て 取 取 れ れ や や す す く く ※胎児モデルと臍カバー接続部の内部構造...
-
Page 15: Attaching The Fetal Model (Lm-0633) And Placenta Model (Lm-114B)
3-4 Attaching the fetal model (LM-0633) and placenta model (LM-114B) 3 3 - - 4 4 胎 胎 児 児 モ モ デ デ ル ル ( ( L L M M - - 0 0 6 6 3 3 3 3 ) ) と と 胎 胎 盤 盤 モ モ デ デ ル ル ( ( L L M M - - 1 1 1 1 4 4 B B ) ) に に 取 取 り り 付 付 け け る る 場 場 合 合 * Two umbilical cord connectors are needed. - Page 16 3) Roll back the end of the umbilical cord connector with a clip until the clip is visible, then clamp it onto the French knot on the placenta model's umbilical cord. After clamping them together, unroll the end of the umbilical cord connector that was rolled back so it covers the 3) 臍帯接続部品のクリップ側を捲り、クリップが見える状態にしてから胎盤モデルの臍帯玉留め...
- Page 17 5) Roll back the end of the umbilical cord connector with a clip until the clip is visible, then clamp it onto the umbilical cord contained in this Umbilical Cord Kit. After clamping them together, unroll the end of the connector that was rolled back so it covers the end of the 臍帯接続部品のクリップ側を捲り、クリップが見える状態にしてから臍帯結紮切断パーツ用臍帯...
-
Page 18: Model Configuration Chart
4. Model Configuration Chart Umbilical Cord Kit (LM-101D) Quantity Quantity 1 1 Umbilical cord 1 1 Umbilical cord connector Quantity 1 1 Instruction Manual (this document) 1 1 1 Quantity Quantity ...
Need help?
Do you have a question about the LM-101D and is the answer not in the manual?
Questions and answers