Advertisement
Quick Links
EGD
(EsophagoGastroDuodenoscopy)
Simulator
LM-103
Instruction Manual
Thank you for purchasing this EGD Simulator.
Please read this instruction manual carefully to ensure correct use of the product,
and store it in a safe place for easy access.
KOKEN CO., LTD.
1-4-14 Koraku, Bunkyo-ku, Tokyo 112-0004 JAPAN
URL:http://www.kokenmpc.co.jp
E-mail:customer@kokenmpc.co.jp
©2013-2020 KOKEN CO., LTD. C-1-1008-1-01-05
Advertisement

Related Manuals for KOKEN LM-103


Summary of Contents for KOKEN LM-103
- Page 1 Thank you for purchasing this EGD Simulator. Please read this instruction manual carefully to ensure correct use of the product, and store it in a safe place for easy access. KOKEN CO., LTD. 1-4-14 Koraku, Bunkyo-ku, Tokyo 112-0004 JAPAN URL:http://www.kokenmpc.co.jp E-mail:customer@kokenmpc.co.jp ©2013-2020 KOKEN CO., LTD. C-1-1008-1-01-05...
- Page 2 The following precautions should be observed particularly strictly: ○ About “EGD Simulator LM-103” 1. This simulator is made of specialized silicone rubber, which achieves a similar texture as the human body, and may break when inappropriate force is used. Please handle it with the same care as when handling human beings.
- Page 3 1-2. Please use the Simulated Polyp as early as possible after it has been unsealed. KOKEN is not responsible for quality of Simulated Polyps that have already been unsealed. 1-3. When taking out the Simulated Polyp, please use clean tweezers etc.
-
Page 4: Table Of Contents
Table of Contents 1. Outline and Features 2. Components 3. Handling the Simulator 3-1 Application of lubricating jelly 3-2 Attachment of the separately sold option Simulated polyp (for polypectomy) LM-103A 3-3 Care for the Simulator 4. Simulator configuration table 5. Specifications... -
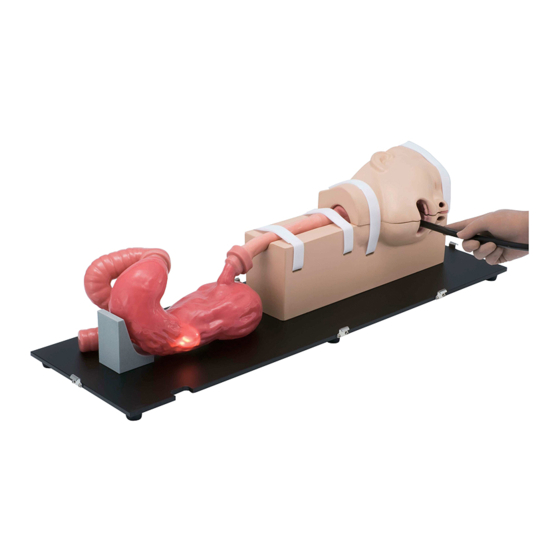
Page 5: Outline And Features
1. Outline and Features Outline This product is a simulator in which an endoscope can be inserted into the upper gastrointestinal tract to perform examination. Both transoral and transnasal insertion are available, and as an accessory, recreation of an ulcer and an observational polyp is included. - Page 6 2. Names of pieces and confi guration diagram Name of Components 1 Hypopharynx piece 2 Esophagus piece 3 Stomach 4 Half head piece 5 Main head piece 6 Duodenum piece 7 Nasal septum (deviated to the left) 8 Nasal septum (deviated to the right) 9 Simulated polyp (for polypectomy) conduction cable 10 Stand 11 Simulated polyp fixture Simulated polyps (for observation):Yamada classification types I to IV 13 Hard case (for the head side) ...
-
Page 7: Handling The Simulator
3. Handling the Simulator Usage Before using this simulator, apply lubricating jelly to each piece. Use any endoscopic ○ Before using this simulator, apply lubricating jelly to each piece. Use any endoscopic Usage Usage lubricating jelly in stock. lubricating jelly in stock. Before using this simulator, apply lubricating jelly to each piece. - Page 8 The nasal septum piece is available as both a right and left deviation type. Select one, and apply the The nasal septum piece is available as both a right and left deviation type. Select one, and apply the The nasal septum piece is available as both a right and left deviation type. Select one, and lubricating jelly.
- Page 9 After applying the lubricating jelly to the hypopharynx piece, attach it to the main head piece. After applying the lubricating jelly to the hypopharynx piece, attach it to the main head piece. Put the half head piece back on the main head and secure them with Velcro tape. Put the half head piece on the main head and secure them with Velcro tape.
- Page 10 Apply lubricating jelly to the inside of the esophagus piece. Apply lubricating jelly to the inside of the esophagus piece. Insert lubricating jelly into the esophagus piece from the hypopharyngeal and cardiac ends, Insert lubricating jelly into the esophagus piece from the hypopharyngeal and cardiac ends, and and spread the lubricating jelly to cover the entire inner side of the esophageal piece by spread the lubricating jelly to cover the entire inner side of the esophageal piece by kneading it from the outside.
- Page 11 To remove the stomach, remove the pyloric connector that connects the stomach to the duodenum To remove the stomach, remove the pyloric connector that connects the stomach to the piece after pulling the pyloric connector up and removing the stomach and duodenum piece from To remove the stomach, remove the pyloric connector that connects the stomach to the duodenum duodenum piece after pulling the pyloric connector up and removing the stomach and the pyloric fixing rod.
- Page 12 Apply lubricating jelly to the entire inside of the stomach. Apply lubricating jelly to the entire inside of the stomach. Apply lubricating jelly to the entire inside of the stomach. Insert lubricating jelly into the stomach from the cardiac and pyloric connectors, and spread it Insert lubricating jelly into the stomach from the cardiac and pyloric connectors, and spread it to the Insert lubricating jelly into the stomach from the cardiac and pyloric connectors, and spread it to the entire inner side of the main stomach by kneading it from the outside.
- Page 13 Apply lubricating jelly to the inside of the duodenum piece. Apply lubricating jelly to the inside of the duodenum piece. Insert lubricating jelly into the duodenum piece and apply lubricating jelly to the entire inner Insert lubricating jelly into the duodenum piece and apply lubricating jelly to the entire inner side of Apply lubricating jelly to the inside of the duodenum piece.
- Page 14 Select 1 of the 4 types of simulated polyp (for observation) , and insert it into the hole at the bottom of the stomach. (Yamada classification type I to IV) Main stomach epidermis Setting for the simulated polyp (for observation) Use the hard case (for the body side) as necessary. When not covered, the general location of the endoscope can be seen from the outside of the simulator with the endoscope light.
-
Page 15: Attachment Of The Separately Sold Option Simulated Polyp (For Polypectomy) Lm-103A
3-2 Attachment of the separately sold option Simulated polyp (for polypectomy) LM-103A * Always store the simulated polyp (for polypectomy) in the refrigerator (2ºC to 10ºC, do not freeze). The disposable return electrode is not included. The storage liquid has a unique odor due to ingredients included to maintain the conductive property of the preservative and the polyp. Keep the storage liquid out of the eyes and mouth. - Page 16 ○ Attachment of the simulated polyp (for polypectomy) Place the simulated polyp fi xture on top of the baffl e plate of the stand. Baffl e plate ジャマ板 Insert the simulated polyp (for polypectomy) into the ring side of the simulated polyp (for polypectomy) conduction cable.
- Page 17 Secure the simulated polyp and the stomach by wrapping them with Velcro tape. Ring of the conduction cable Epidermis of the stomach Simulated polyp fi xture Setting of the Simulated polyp (for polypectomy) Connect the cord to the return electrode. When it is covered with a hard case (for the body side), pull the cord from the cutout in the stand.
- Page 18 3-3 Caring for the simulator Clean the EGD simulator each time after it was used. Cleaning should be done by the 3-3 Care after use Clean the EGD simulator each time after it was used. Cleaning should be done by the following following steps. steps.
- Page 19 Let the water that remains after washing dry out sufficiently in a place where the pieces are Let the water that remains after washing dry out sufficiently in a place where the pieces are not not exposed to direct sunlight. exposed to direct sunlight Let the water that remains after washing dry out sufficiently in a place where the pieces are not exposed to direct sunlight...
-
Page 20: Simulator Configuration Table
4. Simulator configuration table Product name Quantity Stomach 1 pc Half head 1 pc Main head 1 pc Hypopharynx piece 1 pc Esophagus piece 1 pc Duodenum piece 1 pc Nasal septum (deviated to the left) 1 pc Nasal septum (deviated to the right) 1 pc Simulated polyp (for polypectomy) conduction cable 1 pc 1 pc Stand Simulated polyps(for observation): Yamada classification types I to IV 1 set Simulated polyp fixture 1 pc Hard case (for the head side) ...
Need help?
Do you have a question about the LM-103 and is the answer not in the manual?
Questions and answers