Advertisement
Cervical Cancer
Screening
Parts
LM-101K
Instruction Manual
Thank you for purchasing the Cervical Cancer Screening Parts.
Please read this instruction manual carefully to ensure correct use of the product,
and store it in a safe place for easy access.
KOKEN CO., LTD.
1-4-14 Koraku, Bunkyo-ku, Tokyo 112-0004 JAPAN
URL:http://www.kokenmpc.co.jp
E-mail:customer@kokenmpc.co.jp
© 2018-2019 KOKEN CO.,LTD. C-1-1034-1-01-01
Advertisement
Table of Contents

Related Manuals for KOKEN LM-101K


Summary of Contents for KOKEN LM-101K
- Page 1 Thank you for purchasing the Cervical Cancer Screening Parts. Please read this instruction manual carefully to ensure correct use of the product, and store it in a safe place for easy access. KOKEN CO., LTD. 1-4-14 Koraku, Bunkyo-ku, Tokyo 112-0004 JAPAN URL:http://www.kokenmpc.co.jp E-mail:customer@kokenmpc.co.jp © 2018-2019 KOKEN CO.,LTD. C-1-1034-1-01-01...
- Page 2 10000...
- Page 3 Handling and Safety Precautions These precautions should be strictly observed in order to ensure safe, long-term use of the product. The following precautions should be observed particularly strictly: 1. This model is made with a special silicone to simulate the texture of human skin. Please handle this model with the same care that you would exercise when working with a human body.
- Page 4 Table of Contents 1. Outline and Features 2. Components and Configuration 3. Usage 4. Caring for the Model 5. Specifications...
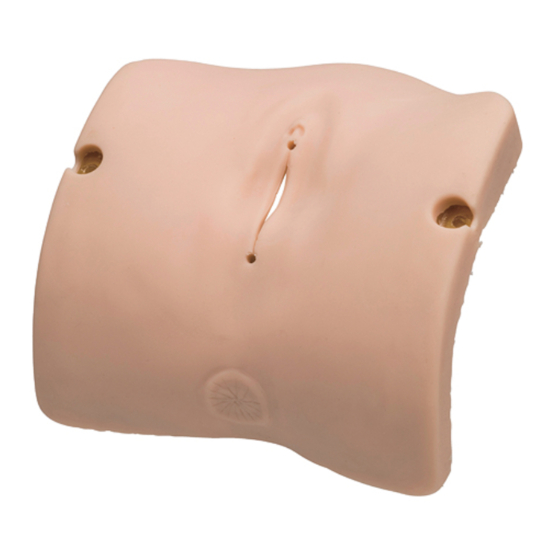
- Page 5 This optional part is for use with vaginal examination models used for practicing cervical cancer screening. It can be attached in place of the Uterus Dilation Model to a Koken vaginal examination model for use in practicing procedures and processes for cervical cancer screening.
- Page 6 3. Usage 1. Insert the product until it comes into contact with the vaginal examination model fixing plate. Align the line on the product with the line on the fixing plate, and then tighten the fixing screw to secure the product in place. * Secure it in place using the same method used to secure the Uterus Dilation Model in place.
- Page 7 * The uterine opening can be faced either to the “front” or “downward.” Align the applicable uterine opening mark with the line on the fixing plate to set the facing. ・To set the uterine opening ・To set the uterine opening facing forward facing downward...
- Page 8 4. Caring for the Model 1. To clean smudges or marks, wash with a neutral solvent or similar liquid. After washing, wipe off all the remaining water with a soft, dry gauze or cloth. *Do not clean the product with rubbing alcohol, thinners, benzine or other organic solvents. 2.
Need help?
Do you have a question about the LM-101K and is the answer not in the manual?
Questions and answers