
Related Manuals for Evolis KC PRIME


Summary of Contents for Evolis KC PRIME
- Page 1 USER GUIDE FOR SYSTEMS INTEGRATORS KC PRIME Evolis © 2021. All rights reserved. User-Guide_KSKC2_ENG_20210706...
-
Page 2: Table Of Contents
Physical attachment in a kiosk terminal Connecting the printer Installing the driver Ribbons Cards 2 - Servicing General Warranty Information Printer Cleaning Printer servicing Servicing the Print Head Maintenance of the dust filter Application development Appendix A Declarations of Conformity KC Prime... -
Page 3: Trademarks
All the information contained in this document is subject to change without prior notice. Evolis cannot be held liable for any errors that may be found in this manual, or for any loss or damage arising accidentally or as a result of dissemination or use of this manual. -
Page 4: About Your New Printer
ABOUT YOUR NEW PRINTER Using your new Evolis printer, you can create a wide variety of high-quality cards and personalized badges that can be printed and laminated in various thicknesses, colors, and styles. This printer uses consumables and accessories available from Evolis. For further details, visit our website at www.evolis.com. -
Page 5: Icons
The following icons are used in this manual to highlight important information: NOTE Information providing further details about certain points in the main text. Indicates that failing to take the recommended action is likely to damage your printer. KC PRIME A video showing the procedure is available on www.evolis.com website. -
Page 6: Getting Started Unpacking
KC PRIME Evolis takes great care over the quality of its packaging and we ask that you keep this packaging somewhere clean and dry. You will be asked for the full original packaging (outer box, inner wedges, and protective bags) in the event that the printer is returned. -
Page 7: Assembling The Accessories
ASSEMBLING THE ACCESSORIES Depending on the use context, you may need to assemble the accessories provided with your printer. Attaching the feet KC PRIME To attach the feet, please refer to the instructions provided with the feet kit. Attaching the dust cover... -
Page 8: Printer Options
Duplex activation Encoding stations (rear side) By default, the bezel emits a flashing light Please refer to the driver User Guides (www.evolis. com>Drivers&Support>printer>Manual and Documents) for all settings linked to signal when a card is inserted or a card is issued. -
Page 9: Printer Configurations
PRINTER CONFIGURATIONS Configuration #1 Front side Rear side KC PRIME Without output hopper Without bezel With connection ports Configuration #2 Front side Lateral side Rear side With 200-cards feeder extension With connection ports With bezel With output hopper Without connection ports... -
Page 10: Printer Functions: External Parts
PRINTER FUNCTIONS: EXTERNAL PARTS KC PRIME - Card feeder - Card thickness adjustment gauge - Output hopper/Reject box - DB9 port to connect an external encoding station (optional) - Control panel - Rear input/output slot - Lower reject slot... -
Page 11: Printer Functions: Connection Ports
PRINTER FUNCTIONS: CONNECTION PORTS Configuration #1 KC PRIME - Ethernet port - USB ports - Power cable socket Configuration #2 H I J NOTE If necessary and according to your on-premise installation, all connection ports are also available on the right side of the printer. -
Page 12: Printer Functions: Internal Parts
PRINTER FUNCTIONS: INTERNAL PARTS KC PRIME - Thermal print head - Serial number label - Dust Filter - Cleaning roller - Feeder Weight... -
Page 13: Installation
INSTALLATION Physical attachment in a kiosk terminal The KC PRIME printers can be attached to the terminal using screws. To do so: If necessary, remove the 4 rivet feet from the bottom plate by pressing on their top. There are 4 holes on the bottom plate to enable you to attach the printer to the terminal. -
Page 14: Connecting The Printer
SE: Apparaten skall anslutas till jordat uttag. DK: Printeren skal tilsluttes til en korrekt beskyttet og jordforbundet el-installtion. KC PRIME To do so: • Connect the power cable to the power supply unit, then plug the power cable jack into the printer •... -
Page 15: Installing The Driver
Installing the driver Your printer is delivered with a CD-ROM comprising the Evolis Premium Suite ® , which contains the print drivers for Windows and Mac OS platforms. The Evolis Premium Suite is an all-in-one driver software solution, which enhances the user experience by making the interactions between ®... -
Page 16: Ribbons
The use of third-party ribbons ® may damage your printer and will void the manufacturer's warranty for the printer. For optimum print quality, Evolis recommends that the printer is fully cleaned every time the ribbon is changed. See the Servicing chapter of this manual. Fitting the ribbon KC PRIME The printer automatically recognizes the ribbon inserted. -
Page 17: Cards
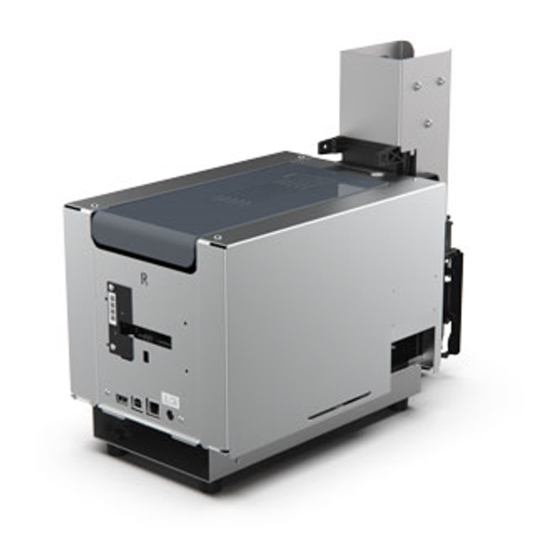
Cards For optimum quality, the cards used must be ISO 7810 certified. Use only the card types recommended by Evolis. Avoid touching the printable surface of the cards in order to preserve print quality. NOTE Do not use cards that have been damaged, folded, embossed, or dropped on the floor. - Page 18 Once the print cycle is complete, the printed and/or encoded card is issued by default through the slot on the rear (R) side of the printer (with or without bezel). KC PRIME To change the exit setting, launch the EPS driver on Windows or CUPS driver on Macintosh and open the Feeder/Hopper tab.
-
Page 19: Servicing
Any failure to follow the servicing procedures described in this chapter will void the print head warranty. Evolis declines any liability where there has been a failure to carry out required maintenance on the printer. The print head is a wear part and an extremely sensitive component of the printer. Its useful life can be seriously curtailed by the presence of dust, liquids or solids in the printer's immediate environment, on the print head or on the cards. -
Page 20: Printer Cleaning
The print head warranty is directly linked to routine cleaning of your printer. If you do not carry out this cleaning at the required times, the print head warranty will cease to be valid. KC PRIME Recommended cleaning cycle: whenever the ribbon is changed. - Page 21 Evolis provides an Evolis High Trust maintenance kit consisting of 2 adhesive cards, 2 pre-soaked "T" shaped cards, a cleaning pen, and a box of ® wipes. The "T" shaped cleaning card is used to clean the transport rollers and the magnetic encoder head. Please go through the following steps to validate cleaning.
- Page 22 Remove the cards from the feeder Remove the 200-card feeder extension (if the printer is equipped with it). KC PRIME Double click the control button, then insert the "T" shaped card in the feeder as shown. Cleaning starts. Once cleaning is finished, remove the "T" shaped card.
- Page 23 If the terminal is in a dusty environment, we recommend that you place a protective cover on the printer to limit exposure to dust, whether the printer is in operational mode or not. For more thorough cleaning, you can also carry out manual cleaning. The cleaning frequencies recommended by Evolis may be increased depending on the environment in which the terminal is located.
-
Page 24: Servicing The Print Head
To maintain the original print quality and to absorb excess ink on the print head, we recommend that you clean the print head regularly (at each ribbon change and periodic cleaning) using the cotton swabs provided by Evolis. You must also protect the print head and its components from any electrostatic discharge. -
Page 25: Maintenance Of The Dust Filter
Remove the filter by pulling it up and sliding to release it completely. Once the filter has been removed from its place, take one of the cleaning wipes supplied by Evolis. Clean the filter by wiping each side of it. -
Page 26: Application Development
In a Windows environment, we expressly recommend that you use the Premium SDK to develop the software application. The Premium SDK is designed for developers who want to communicate with one or several Evolis printers from their own software environment, while benefitting from the key functionalities of the Evolis Premium suite. -
Page 27: Declarations Of Conformity Kc Prime
Pursuant to Part 15.21 of the FCC Rules, any changes or modifications made to this equipment without Article 3.1 a: (electromagnetic compatibility protection requirement) the express, written consent of the company Evolis may cause harmful interference and void the FCC Safety standard applied EN62368-1 :2014 authorization to operate this equipment.
Need help?
Do you have a question about the KC PRIME and is the answer not in the manual?
Questions and answers