
Related Manuals for Evolis KC200


Summary of Contents for Evolis KC200
- Page 1 USER GUIDE KC200 KC200B Evolis © November 2019. All rights reserved. Ref. KU-KSC1-080-ENG-A4-B0...
-
Page 2: Warranty
All the information contained in this document is subject to change without prior notice. Evolis cannot be held liable for any errors that may be found in this manual, or for any loss or damage arising accidentally or as a result of dissemination or use of this manual. -
Page 3: Warranty Registration
As with all Evolis products, a great deal of care has been taken over this manual. Should you find an error, however, please let us know by emailing us at info@evolis.com. -
Page 4: Getting Started
Evolis reseller, who will tell you the procedure to follow. Evolis takes great care over the quality of its packaging and we ask that you keep this packaging somewhere clean and dry. You will be asked for the full original packaging (outer box, inner wedges, and protective bags) in the event that the printer is returned. -
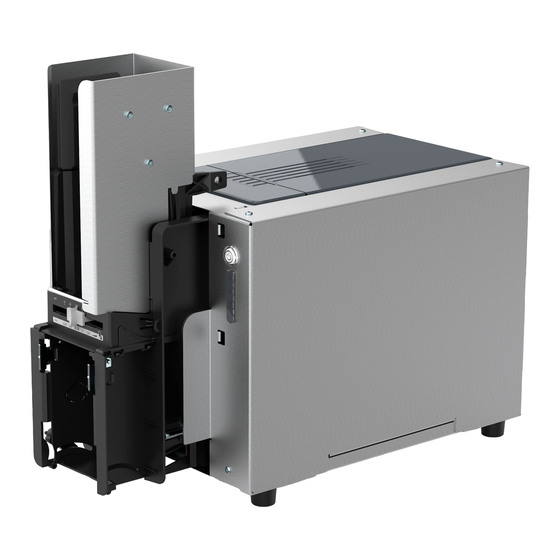
Page 5: Description Of The Printer And Its Functions
DESCRIPTION OF THE PRINTER AND ITS FUNCTIONS KC200 KC200 KC200B - Card feeder - Ethernet port - Card output - Power cable socket - Control panel - Ejector slot - USB port (type A) - Serial number label - USB port (type B) - Page 6 DESCRIPTION OF THE PRINTER AND ITS FUNCTIONS KC200B KC200 KC200B - Card feeder - Ethernet port - Reject hopper - Power cable socket - Control panel - Bezel (card insert and output) - USB port (type B) - Serial number label...
- Page 7 DESCRIPTION OF THE PRINTER AND ITS FUNCTIONS KC200 KC200B - Thermal print head - Card thickness adjustment gauge - Cleaning roller - Dust filter...
- Page 8 INSTALLATION IN A TERMINAL Physical attachment The KC200/KC200B printers can be attached to the terminal using screws. To do so: KC200 Unscrew the 2 screws at the top of each side panel. Set the side panels down. KC200B Remove the 4 rivet feet from the bottom plate by pressing on them.
-
Page 9: Connecting The Printer
INSTALLATION IN A TERMINAL Connecting the printer The printer must be connected to a properly protected and grounded electrical system. FI: Laite on liitettävä suojamaadoitus koskettimilla varustettuun pistorasiaan. KC200 NO: Apparatet må tilkoples jordet stikkontakt. KC200B SE: Apparaten skall anslutas till jordat uttag. -
Page 10: Fitting The Ribbon
The use of third-party ribbons ® may damage your printer and will void the manufacturer's warranty for the printer. For optimum print quality, Evolis recommends that the printer is fully cleaned every time the ribbon is changed. See the Servicing chapter of this manual. KC200... - Page 11 Cards For optimum quality, the cards used must be ISO 7810 certified. Use only the card types recommended by Evolis. Avoid touching the printable surface of the cards in order to preserve print quality. NOTE Do not use cards that have been damaged, folded, embossed, or dropped on the floor.
-
Page 12: Removing Printed Cards
Removing printed cards Once the print cycle is complete, the printed and/or encoded card is issued into the output hopper of the terminal. For the KC200B, it is returned directly through the bezel. KC200 KC200B Adjusting the card thickness The printer is equipped with a manual card thickness adjustment system, which can be reached at the printer feeder. -
Page 13: General Warranty Information
Any failure to follow the servicing procedures described in this chapter will void the print head warranty. Evolis declines any liability where there has been a failure to carry out required maintenance on the printer. The print head is a wear part and an extremely sensitive component of the printer. Its useful life can be seriously curtailed by the presence of dust, liquids or solids in the printer's immediate environment, on the print head or on the cards. - Page 14 ROUTINE PRINTER CLEANING (SN≥10000828147) For printers with SN serial numbers greater than or equal to 10000828147, please follow the cleaning procedure below. Printer servicing KC200 The print head warranty is directly linked to routine cleaning of your printer. KC200B If you do not carry out this cleaning at the required times, the print head warranty will cease to be valid.
- Page 15 Repeatedly passing the adhesive card through the printer cleans the cleaning roller in order to preserve print quality and increase the life of the print head. Remove the weight and remove all cards from the feeder. Remove the ribbon from the printer. Set the card thickness gauge to MAX position. KC200 Close the cover again. KC200B...
- Page 16 Remove the cleaning card. Replace the cassette at feeder level. KC200 KC200B Routine cleaning may also be launched from the Evolis Print Center by clicking on "Start cleaning." NOTE Before using your printer, remember to reset the gauge to the desired card thickness.
-
Page 17: Servicing The Print Head
To maintain the original print quality and to absorb excess ink on the print head, we recommend that you clean the print head regularly (at each KC200 ribbon change and periodic cleaning) using the cotton swabs provided by Evolis. You must also protect the print head and its components from KC200B any electrostatic discharge. - Page 18 ADVANCED CLEANING (SN≥10000828147) For even more thorough cleaning, we recommend advanced cleaning every 5 routine cleaning cycles. To do this, Evolis provides an Evolis High Trust maintenance kit consisting of 2 adhesive cards, 2 pre-soaked "T" shaped cards, a cleaning pen, ®...
- Page 19 Using the gauge, set the card thickness to the MAX position. Remove the cards from the feeder if necessary. Remove the feeder cassette. KC200 KC200B Double-click the control button before inserting the cleaning card. Take the "T" shaped cleaning card and insert it in the feeder as shown. Cleaning starts.
- Page 20 For more thorough cleaning, you can also carry out advanced cleaning systematically instead of regular cleaning. The cleaning frequencies recommended by Evolis may be increased depending on the environment in which the terminal is located.
-
Page 21: Routine Printer Cleaning
For printers with SN serial numbers less than 10000828147, please follow the cleaning procedure below. Printer servicing KC200 The print head warranty is directly linked to the periodic cleaning of your printer. If you do not carry out this cleaning at the required times, the print head warranty will cease to be valid. - Page 22 Repeatedly passing the adhesive card through the printer cleans the cleaning roller in order to preserve print quality and increase the life of the print head. Remove the weight and remove all cards from the feeder. Remove the ribbon from the printer. Set the card thickness gauge to MAX position. KC200 Close the cover again. KC200B...
- Page 23 Remove the film from the adhesive card (1) and insert the cleaning card into the feeder as shown, adhesive side up (2). Cleaning starts. Remove the cleaning card. KC200 KC200B Routine cleaning may also be launched from the Evolis Print Center by clicking on "Start cleaning." NOTE Before using your printer, remember to reset the gauge to the desired card thickness.
- Page 24 To maintain the original print quality and to absorb excess ink on the print head, we recommend that you clean the print head regularly (at each KC200 ribbon change and periodic cleaning) using the cotton swabs provided by Evolis. You must also protect the print head and its components from KC200B any electrostatic discharge.
-
Page 25: Advanced Cleaning
ADVANCED CLEANING (SN<10000828147) For even more thorough cleaning, we recommend advanced cleaning every 5 routine cleaning cycles. To do this, Evolis provides an Evolis High Trust maintenance kit consisting of 2 adhesive cards, 2 pre-soaked "T" shaped cards, a cleaning ®... - Page 26 Using the gauge, set the card thickness to the MAX position. Remove the cards from the feeder if necessary. KC200 KC200B Double-click the control button before inserting the cleaning card. Take the "T" shaped cleaning card and insert it in the feeder as shown. Cleaning starts.
- Page 27 For more thorough cleaning, you can also carry out advanced cleaning systematically instead of regular cleaning. The cleaning frequencies recommended by Evolis may be increased depending on the environment in which the terminal is located.
- Page 28 Remove the filter by pulling it up and sliding to release it completely. KC200 Once the filter has been removed from its place, take one of the cleaning wipes supplied by Evolis. KC200B Clean the filter by wiping each side of it.
-
Page 29: Application Development
We expressly recommend that you use the Premium SDK to develop the software application in a Windows environment. The Premium SDK is designed for developers who want to communicate with one or several Evolis printers from their own software environment, while benefitting from the key functionalities of the Evolis Premium suite. -
Page 30: Technical Specifications
• Feeder capacity: 200 cards (0.76 mm – 30 mil) or 100 cards (0.76 mm – 30 mil) without metallic cassette • Reject slots for faulty cards • KC200: cards returned in the terminal output tray • KC200B: - Manual insertion and return through the bezel - Capacity to recycle cards not collected •... - Page 31 - Evolis Print Center for the administration and configuration of the printer - Evolis Printer Manager for visual notification - 24/7 online support • Free Evolis Premium SDK for monitoring the printer remotely, facilitating and accelerating integration with IT systems Requires .net 4.0 client profile...
-
Page 32: Warranty Conditions
Warranty conditions • 1 year of warranty (printer and print head) • Optional extended warranty available Warranty subject to strict compliance with specific usage and maintenance conditions and use of Evolis High Trust ribbons ® Dimensions and weight KC200 • Dimensions (H x W x D):... -
Page 33: Power Supply
• Standby mode and reduced power consumption • CE, FCC, ICES, VCCI, CCC, KC, EAC • RoHS Power supply KC200 • Power supply unit: 100-240 volts AC, 50-60 Hz, 1.7 A KC200B • Printer: 24 volts DC, 2.7 A Environment •... -
Page 34: Declarations Of Conformity
Pursuant to Part 15.21 of the FCC Rules, any changes or modifications made to this equipment without Safety standard applied EN60950-1: 2006 + A11 + A1 + A12 + A2 the express, written consent of the company Evolis may cause harmful interference and void the FCC EN50364: 2010 authorization to operate this equipment. - Page 35 Pursuant to Part 15.21 of the FCC Rules, any changes or modifications made to this equipment without Safety standard applied EN60950-1: 2006 + A11 + A1 + A12 + A2 the express, written consent of the company Evolis may cause harmful interference and void the FCC EN50364: 2010 authorization to operate this equipment.
Need help?
Do you have a question about the KC200 and is the answer not in the manual?
Questions and answers