Table of Contents
Advertisement
Quick Links
One Technology Way • P.O. Box 9106 • Norwood, MA 02062-9106, U.S.A. • Tel: 781.329.4700 • Fax: 781.461.3113 • www.analog.com
Evaluating the
ADP8860/ADP8861
FEATURES
Arduino compatible
Backlight array
Keypad backlight array
Ambient light sensor
Dedicated reset button
2
Dedicated header for I
C communications
EVALUATION KIT CONTENTS
The ADP8860SHIELD-EVALZ or the ADP8861SHIELD-EVALZ
Connector jumpers
EQUIPMENT NEEDED
Micro USB to USB cable
EV-COG-AD3029LZ
and
EV-GEAR-EXPANDER1Z
Windows 7 or Windows 10 PC
EV-COG-BLEINTP1Z
(optional)
PLEASE SEE THE LAST PAGE FOR AN IMPORTANT
WARNING AND LEGAL TERMS AND CONDITIONS.
ADP8860SHIELD-EVALZ/ADP8861SHIELD-EVALZ
Charge Pump, 7-Channel Smart LED Driver with
2
I
C Interface
GENERAL DESCRIPTION
The ADP8860SHIELD-EVALZ and the ADP8861SHIELD-EVALZ
incorporate light emitting diodes (LEDs) for quick and easy
evaluation of the ADP8860 and the ADP8861. Note that only the
ADP8860SHIELD-EVALZ has dual light intensity sensors. The
ADP8860SHIELD-EVALZ and the ADP8861SHIELD-EVALZ
follow the form factor of a regular Arduino® shield to allow
compatibility with microcontroller boards that use the same
interface. These evaluation boards also incorporate a separate
header dedicated to I
The ADP8860 and the ADP8861 are 7-channel LED drivers
that utilizes a charge pump with selective gain for maximum
efficiency. The LEDs driven by either device are programmable for
maximum current and fade in and out times via the I
Only the ADP8860 has a programable light intensity threshold
that can be set via the I
can handle up to 30 mA (typical), except for the seventh channel,
which can handle 60 mA (typical). Each channel can be unified
to have the same fade in time and fade out time, or each channel
can have an individual fade in time and fade out time for
greater flexibility
For full details on the ADP8860 and the ADP8861, see the
ADP8860 and the ADP8861 data sheets, which should be
consulted in conjunction with this user guide when using
these evaluation boards.
Rev. 0 | Page 1 of 16
User Guide
2
C communications.
2
C interface of the device. Each channel
UG-1888
2
C interface.
Advertisement
Table of Contents

Subscribe to Our Youtube Channel
Related Manuals for Analog Devices ADP8860SHIELD-EVALZ


Summary of Contents for Analog Devices ADP8860SHIELD-EVALZ
-
Page 1: Features
(LEDs) for quick and easy Keypad backlight array evaluation of the ADP8860 and the ADP8861. Note that only the Ambient light sensor ADP8860SHIELD-EVALZ has dual light intensity sensors. The Dedicated reset button ADP8860SHIELD-EVALZ and the ADP8861SHIELD-EVALZ Dedicated header for I C communications follow the form factor of a regular Arduino®... -
Page 2: Table Of Contents
UG-1888 ADP8860SHIELD-EVALZ/ADP8861SHIELD-EVALZ User Guide TABLE OF CONTENTS Features ....................1 Evaluating the ADP8860SHIELD-EVALZ or the ADP8861SHIELD-EVALZ ...............5 Evaluation Kit Contents ..............1 Evaluation Summary..............5 Equipment Needed ................1 Windows Application ..............5 General Description ................. 1 ... -
Page 3: Evaluation Board Functional Block Diagrams And Photograph
ADP8861SHIELD-EVALZ Figure 1. Functional Block Diagram for Windows PC 5V USB EV-COG-AD3029LZ WITH ADP8860SHIELD-EVALZ/ SOURCE EV-GEAR-EXPANDER1Z ADP8861SHIELD-EVALZ ANDROID EV-COG-BLEINTP1Z SMARTPHONE Figure 2. Functional Block Diagram for Android Smartphones Figure 3. ADP8860SHIELD-EVALZ/ADP88601SHIELD-EVALZ Evaluation Board Rev. 0 | Page 3 of 16... -
Page 4: Evaluation Board Setup
(GUIs) for Windows® PC and Android® LEDs can be configured via the P15 to P34 headers smartphones via Bluetooth®. For the ADP8860SHIELD-EVALZ, light intensity sensing is Based on the schematics (see Figure 25 and Figure 26), the implemented by using two ambient light photosensors, connect... -
Page 5: Evaluating The Adp8860Shield-Evalz Or The Adp8861Shield-Evalz
Programmer 1.5.0, GUI installers for Windows and Android devices, and source code (hex file) for the embedded target are provided on the ADP8860SHIELD-EVALZ and the ADP8861SHIELD-EVALZ webpages. Before loading any new firmware to the EV-COG-AD3029LZ, clean and build the target and connect the EV-COG-AD3029LZ microcontroller to one Figure 6. - Page 6 Under the Dim tab within the BACKLIGHT main tab for Windows, users can configure the dim current for Day To connect the ADP8860SHIELD-EVALZ or the Dim, Office Dim, Dark Dim, and Off Timeout Dim (see ADP8861SHIELD-EVALZ to Windows, take the following Figure 10).
-
Page 7: Android App
(see Figure 15). Action: Program Under the File to download tab, browse and choose the source code (hex file) along with the downloaded files from the ADP8860SHIELD-EVALZ or the ADP8861SHIELD-EVALZ webpage. Click Start to flash the programmer to the EV-COG- AD3029LZ. - Page 8 Click START and navigate to the side menu. To use the Android app, take the following steps: Install the ADP886X_LDTA_v2.0.0.apk file, which can be downloaded from the ADP8860SHIELD-EVALZ or the ADP8861SHIELD-EVALZ webpage) on an Android smartphone that has Bluetooth 4.3 or higher.
- Page 9 ADP8860SHIELD-EVALZ/ADP8861SHIELD-EVALZ User Guide UG-1888 Scan for the ADP886X Demo and reset on the In the BACKLIGHT tab, users can select the following ADP8860SHEILD-EVALZ or the ADP8861SHEILD- (see Figure 20): EVALZ and the EV-COG-AD3029LZ if none have Brightness level and type of law scanned.
- Page 10 UG-1888 ADP8860SHIELD-EVALZ/ADP8861SHIELD-EVALZ User Guide In the Sink main tab, users can select sink independently In the Interrupt main tab, users can enable device protection as well as clearing interrupts when triggered (see Figure 22). and can configure sink Law, Current, On Time, Off Time, Fade In, and Fade Out (see Figure 21).
- Page 11 ADP8860SHIELD-EVALZ/ADP8861SHIELD-EVALZ User Guide UG-1888 In the A.L.S. main tab, users can enable the photosensor 10. All processes log in the Logs box (see Figure 24). and comparator with a threshold and hysteresis current configuration (see Figure 23). Note that this feature is only available for the ADP8860.
-
Page 12: Evaluation Board Schematics And Layout
UG-1888 ADP8860SHIELD-EVALZ/ADP8861SHIELD-EVALZ User Guide EVALUATION BOARD SCHEMATICS AND LAYOUT Figure 25. ADP8860SHIELD-EVALZ Schematic Rev. 0 | Page 12 of 16... - Page 13 ADP8860SHIELD-EVALZ/ADP8861SHIELD-EVALZ User Guide UG-1888 Figure 26. ADP8861SHIELD-EVALZ Schematic Rev. 0 | Page 13 of 16...
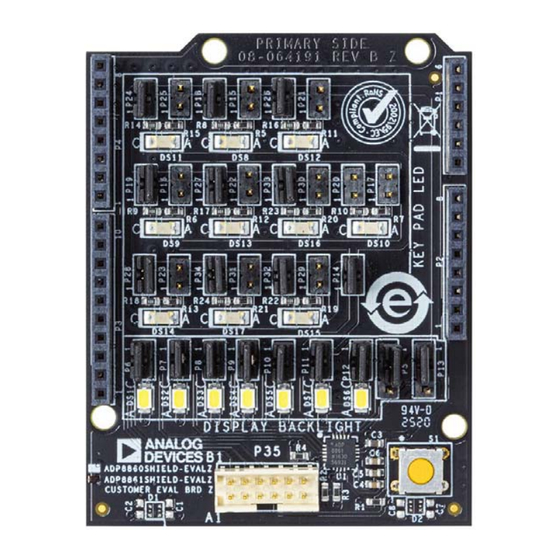
- Page 14 UG-1888 ADP8860SHIELD-EVALZ/ADP8861SHIELD-EVALZ User Guide Figure 27. ADP8860/ADP8861 Evaluation Board Primary Figure 28. ADP8860/ADP8861 Evaluation Board Secondary Rev. 0 | Page 14 of 16...
-
Page 15: Ordering Information
ADP8860SHIELD-EVALZ/ADP8861SHIELD-EVALZ User Guide UG-1888 ORDERING INFORMATION BILL OF MATERIALS Table 1. Bill of Materials for the ADP8860SHIELD-EVALZ Designators Description Part Number C1, C2, C7, C8 0.1 μF ceramic capacitors, 0603, X7R C0603C104K4RAC 10 μF ceramic capacitor, X5R C1608X5R1C106M080AB C4 to C6 1 μF ceramic capacitors, X7R... - Page 16 By using the evaluation board discussed herein (together with any tools, components documentation or support materials, the “Evaluation Board”), you are agreeing to be bound by the terms and conditions set forth below (“Agreement”) unless you have purchased the Evaluation Board, in which case the Analog Devices Standard Terms and Conditions of Sale shall govern. Do not use the Evaluation Board until you have read and agreed to the Agreement.
Need help?
Do you have a question about the ADP8860SHIELD-EVALZ and is the answer not in the manual?
Questions and answers