Table of Contents
Advertisement
Quick Links
Advertisement
Table of Contents

Summary of Contents for Ronix 8505
- Page 1 LOCK & LOAD 3.6V LI-ION CORDLESS SCREWDRIVER 8505...
-
Page 2: Technical Specifications
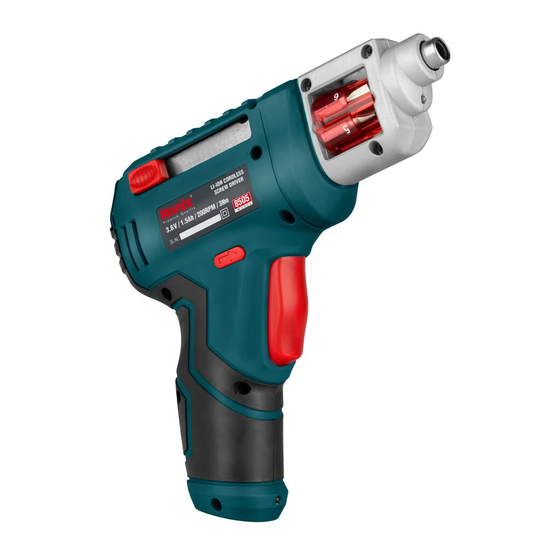
TECHNICAL SPECIFICATIONS Model 8505 Voltage 3.6V DC No Load Speed 200RPM Chuck capacity 6.35mm 1.5Ah Samsung Battery Li-Ion Charge time 3-5Hr Torque 3N.m Weight 0.56KG PART LIST Bit Loader Sliding Bit Bit Viewer Bit Cartridge Switches Loader Window Chamber Chuck... -
Page 3: General Safety Rules For All Battery Operated Tools
WARNING! For your personal safety, read and understand before using & keep this instruction manual for future reference. OPERATING INSTRUCTIONS Please read the operation instructions meticulously and pay particular attention to the safety instructions. CAUTION: Charging time should not exceed 10-12 hours. GENERAL SAFETY RULES FOR ALL BATTERY OPERATED TOOLS WARNING! -
Page 4: Personal Safety
- Keep cord away from heat, oil, sharp edges, or moving parts. Replace damaged cords immediately. Damaged cords may create a fire. APPLIES ONLY TO TOOLS WITH A SEPARABLE BATTERY PACK - A battery operated tool with integral batteries or a separate battery pack must be recharged only with the specified charger for the battery. - Page 5 Accessories that may be suitable for one tool may create a risk of injury when used on another tool. SERVICE - Tool service must be performed only by RONIX PLUS qualified repair personnel. Service or maintenance performed by unqualified personnel CORDLESS SCREWDRIVER...
-
Page 6: Safety Instructions
- When servicing a tool, use only identical replacement parts of RONIX PLUS after sales service centers. SAFETY INSTRUCTIONS WARNING! When using electric tools, basic safety precautions should always be followed to reduce the risk of tire, electric shock and personal injury, including the following. - Page 7 6) DON’T FORCE TOOL - It will do the job better and safer at the rate for which it was intended. 7) USE RIGHT TOOL - Don’t force small tools or attachments to do the job of a heavy duty tool.
- Page 8 14) DISCONNECT TOOLS - When not in use, before servicing, and when changing accessories such as blades, bits and cutters. 15) REMOVE ADJUSTING KEYS AND WRENCHES - Form the habit of checking to see that keys and adjusting wrenches are removed from tool before turning it on. 16) AVOID UNINTENTIONAL STARTING -Don’t carry plugged-in tool with finger on switch.
-
Page 9: Important Charging Notes
in this operating instruction or the original catalogue may present a risk of personal injury. 20) HAVE YOUR TOOT REPAIRED BY AN EXPERT - This electric appliance is in accordance with the relevant salty rules. Repairing of electric appliances may be carried out only by experts otherwise it may cause considerable danger for the user. -
Page 10: Operation
OPERATION CHARGING THE BATTERY WARNING! The charger and battery are specifically designed to work together so do not attempt to use any other devices. Never insert or allow metallic objects into your charger or battery pack connections because an electrical failure and hazard will occur. The charger is designed to use standard household 220volt 50Hz power. -
Page 11: Using The Tool
6) Leave the Cordless Screwdriver connected to the charger for up to 5 hours. 7) Red LED (8) will come on in charge mode and go off when battery is fully charged. Before using the tool, unplug the charger and disconnect the tool from the charger. - Page 12 3) Orient the bit cartridge with bits facing forward and press it into the bit chamber opening from the right side. Make sure the cartridge is secure and rotates easily inside the chamber. 4) To remove a bit cartridge, put the sliding bit loader in its full back and locked position.
-
Page 13: Maintenance
and locked position. 3. Select the desired driving bit by rotating the cartridge in the chamber in either direction while viewing the bits from either side of the chamber. Position the desired bit at the top of the chamber where it can be seen through the bit viewer window (See below image). - Page 14 - Never use water or chemical cleaners to clean your power tool. Wipe clean with a dry cloth. - Always store your power tool in a dry place. - Keep the motor ventilation slots clean. Keep all working controls free of dust.


Need help?
Do you have a question about the 8505 and is the answer not in the manual?
Questions and answers