Advertisement
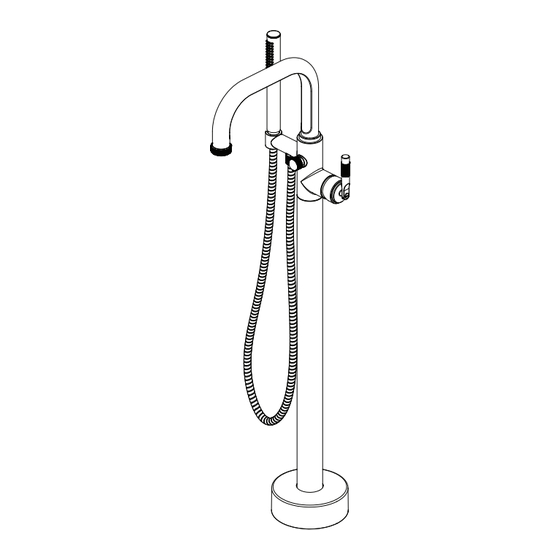
Floor Mounted Tub Filler With Hand Shower
NOTICE TO HOMEOWNER
We recommend that this product is installed by a qualified
•
professional plumber.
•
Please check this product immediately to ensure that it has
not been damaged and is complete. Before installation, please
make sure this product is the correct model and you have all
the parts required for installation and use.
•
Please flush the water system to ensure that no metal swarf,
solder, and other impurities can enter the product.
• Turn off water supply before commencing work.
Please read these instructions carefully and retain for future
•
reference.
BEFORE YOU BEGIN
•
You must observe all local plumbing laws and codes.
•
Do not install this valve if it does not meet local plumbing codes.
•
Shut off the main water supply.
Ver. 2.55
www.isenbergfaucets.com
Installation Manual
250.1170
Made For Responsible Luxury
Advertisement
Table of Contents

Related Manuals for Isenberg 250.1170


Summary of Contents for Isenberg 250.1170
- Page 1 Made For Responsible Luxury Installation Manual 250.1170 Floor Mounted Tub Filler With Hand Shower NOTICE TO HOMEOWNER We recommend that this product is installed by a qualified • professional plumber. • Please check this product immediately to ensure that it has not been damaged and is complete. Before installation, please make sure this product is the correct model and you have all the parts required for installation and use. • Please flush the water system to ensure that no metal swarf, solder, and other impurities can enter the product. • Turn off water supply before commencing work. Please read these instructions carefully and retain for future • reference. BEFORE YOU BEGIN • You must observe all local plumbing laws and codes. • Do not install this valve if it does not meet local plumbing codes. • Shut off the main water supply. Ver. 2.55 www.isenbergfaucets.com...
- Page 2 Made For Responsible Luxury Installation Manual 250.1170 Floor Mounted Tub Filler With Hand Shower www.isenbergfaucets.com...
- Page 3 Made For Responsible Luxury OPERATING SPECIFICATIONS WATER TEMPERATURE WATER PRESSURE This product is to be used with water at This product is to be used with a water pressure range of 15 PSI to 80 PSI ONLY a temperature range of 40˚F - 120˚F ONLY! If water pressure is greater than 80 PSI install a pressure reducing valve (PRV) This valve meets or exceeds ANSI A112.18.1 and ASSE 1016 CAUTION: - During mounting of this product extra care should be taken while drilling into the oor to avoid damaging any water supply hoses or copper lines that may exist beneath. - To avoid risk of injury do NOT use the tub ller as a support bar to enter or exit the bath.
- Page 4 Made For Responsible Luxury INSTALLATION PROCEDURE 100mm to 120mm Cut a section of oor to run the pluming as shown in the diagram. Ensure that the cut out is not CUT OUT DIMENSIONS accidentally bigger than the size of the escutcheon plate The distance between the center point of the valve inlet (hot, cold) to the oor and top of the valve is Mark holes for oor bolt installation.
- Page 5 Made For Responsible Luxury INSTALLATION PROCEDURE Connect the Hot and Cold Supply lines into the valve (1). The supplied plugs (2) should be used to block water output during installation. Use round connector (3) and screws (4) to hold plugs in place. Do not over tighten. Turn on water supply and check for leaks.
- Page 6 Made For Responsible Luxury INSTALLATION PROCEDURE Insert trim (1) onto the valve (2). Secure the trim (1) to the valve (2) using screws (4). Tighten screws with wrench provided. Then push round cover (5) and washer (6) to the base. Note: Ensure all screws are tight. Blue 360°...
- Page 7 Made For Responsible Luxury PROPER OPERATION Insert the spout (1) into Connect one end of the shower the faucet body (2). Rotate hose (2) to the mixer (1). Ensure that the spout (1) into the right a washer (3) is inserted into each position then tighten the end of the hose (2).
- Page 8 Made For Responsible Luxury Connect the shower hose (1) to the hand held (2). Ensure that the washer (3) is inserted into the end of the shower hose (1). www.isenbergfaucets.com...
Need help?
Do you have a question about the 250.1170 and is the answer not in the manual?
Questions and answers