Advertisement
Quick Links
Advertisement

Subscribe to Our Youtube Channel
Related Manuals for Creative Play PICNIC BENCH


Summary of Contents for Creative Play PICNIC BENCH
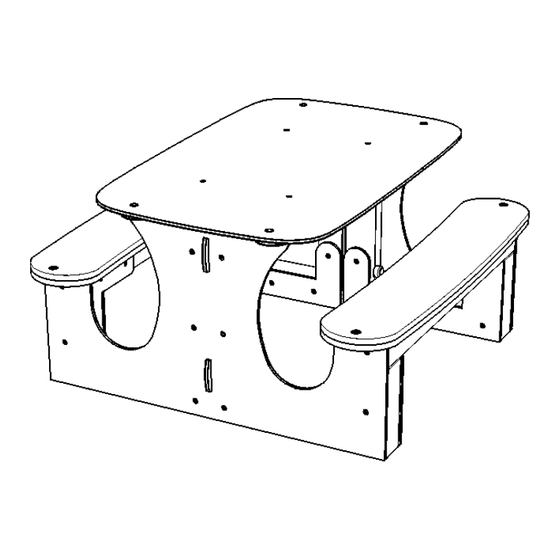
- Page 1 PICNIC BENCH Installation Instructions REF: PT101 - PICNIC BENCH pg 1 of 11...
-
Page 2: Parts Required
(90mm x 90mm) 525mm QTY x 2 PICNIC 2 QTY x 2 PICNIC 5 (90mm x 90mm) 972mm (120mm x 90mm) 275mm QTY x 2 PICNIC 3 (90mm x 90mm) 880mm pg 2 of 11 REF: PT101 - PICNIC BENCH... - Page 3 (PLAYTEC ‘L’ RIGHT ) (PLAYTEC PICNIC SIDES) (HEXBOARD SIT ‘A’) (HEXBOARD SIT ‘B’) (PLAYTEC TOP ‘B’ ) (PLAYTEC ‘U’ LEFT) (PLAYTEC ‘U’ RIGHT) (PLAYTEC TOP ‘A’ ) (PLAYTEC ‘T’ PART) (PLAYTEC MIDDLE PART) pg 3 of 11 REF: PT101 - PICNIC BENCH...
- Page 4 Parts required (FM80 ‘BRASS SCREW’) (M12 x 200 square cup hex bolt) (M12 NYLOC) (end caps) (TORK TAINERS) (400 THREAD BAR) 4 x 12/12/12 4 x 18/18 pg 4 of 11 REF: PT101 - PICNIC BENCH...
-
Page 5: Foundation Details
Foundation details pg 5 of 11 REF: PT101 - PICNIC BENCH... - Page 6 Attach Playtec MIDDLE piece to the TIMBERS (PICNIC1,PICNIC2) Using M12 CUP SQUARE BOLTS/THREAD BAR / NYLOCS / END CAPS Attach Playtec ’U’ left/right both sides to the TIMBERS (PICNIC1,PICNIC3,PICNIC5) Using FM80 BRASS SCREWS pg 6 of 11 REF: PT101 - PICNIC BENCH...
- Page 7 Assembly instructions Attach Playtec ’L’ left/right both sides to the TIMBERS (PICNIC4,PICNIC5) Using FM80 BRASS SCREWS Attach Playtec Picnic SIDES to the TIMBERS PICNIC1,PICNIC3,PICNIC4,PICNIC5) Using FM80 BRASS SCREWS pg 7 of 11 REF: PT101 - PICNIC BENCH...
- Page 8 Assembly instructions Attach Playtec TOP ‘A’ and ’B’ to the TIMBER (PICNIC2) Using FM80 BRASS SCREWS Attach Playtecs TOP ‘A’ , ‘B’ and ‘T’ piece Using TORKTAINERS pg 8 of 11 REF: PT101 - PICNIC BENCH...
- Page 9 Assembly instructions Attach Hexboard SIT ‘A’ and ’B’ to the TIMBER (PICNIC4) Using FM80 BRASS SCREWS Attach Attach Hexboard SIT ‘A’ to SIT’B’ Using TORKTAINERS and BRASS SCREW pg 9 of 11 REF: PT101 - PICNIC BENCH...
- Page 10 Assembly instructions (GAMES TOP) Attach Playtec top SIDES and Perspex to the PLAYTEC TOP ’C’ Using M8 SOCKET BUTTON BOLT AND NUT (M8 x 30 socket button bolt) (M8 ACORN NUT) pg 10 of 11 REF: PT101 - PICNIC BENCH...
-
Page 11: Additional Dimensions
Additional dimensions pg 11 of 11 REF: PT101 - PICNIC BENCH...
Need help?
Do you have a question about the PICNIC BENCH and is the answer not in the manual?
Questions and answers