
Related Manuals for Creative Play CLYDE ACTIVITY CENTRE AC103


Summary of Contents for Creative Play CLYDE ACTIVITY CENTRE AC103
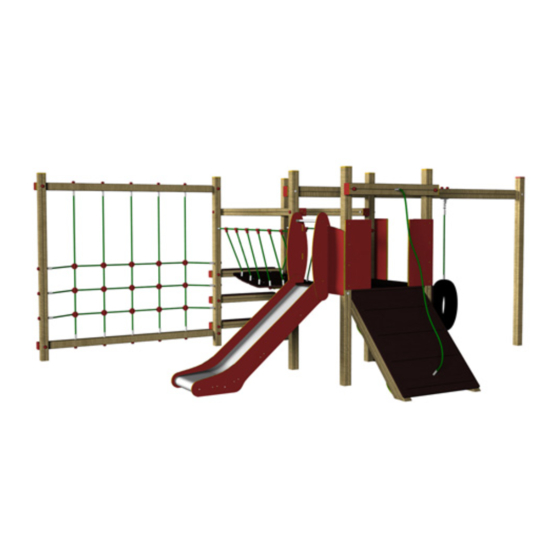
- Page 1 CLYDE ACTIVITY CENTRE Installation Instructions REF: AC103 - CLYDE ACTIVITY CENTRE pg 1 of 15...
-
Page 2: Parts Required
PARTS required LEFT (CLATTERBRIDGE) (SLIDE SIDE) (1m SLIDE) RIGHT (SLIDE SIDE) (CLATTERBRIDGE 90 x 90 FLOOR) (1m CLIMBING WALL) (TYRE +ROPE+ CHAIN) (ZENITH STANDARD FLOOR 90x90) (FLAT SIDES) (ROPE CLIMB) (GROOVED SIDES) (RAMP ROPE) REF: AC103 - CLYDE ACTIVITY CENTRE pg 2 of 15... - Page 3 PARTS required (RAMP Assembly) (HEXBOARD RAMP) (M8 Plastic Cover) (M12 x 70 Square Cup HEX bolt) (M12 x 100 Square Cup HEX bolt) (M12 x 150 Square Cup HEX bolt) (end caps) (FM40 ‘Brass screws’) (M12 x 200 Square Cup HEX bolt) (FM80 ‘Brass screws’) (M12 ‘NYLOC’) (M12 x 80 Eyebot)
- Page 4 TOOLS required TOOLS required NOTES: REF: AC103 - CLYDE ACTIVITY CENTRE pg 4 of 15...
-
Page 5: Foundation Details
Foundation Details FIG.1 600 Concrete + 150 Soil 350 Concrete + 150 Soil 1023 RAMP RAMP CLATTERBRIDGE SLIDE REF: AC103 - CLYDE ACTIVITY CENTRE pg 5 of 15... -
Page 6: Surfacing Details
Surfacing Details = MINIMUM SPACE = SURFACE AREA REF: AC103 - CLYDE ACTIVITY CENTRE pg 6 of 15... - Page 7 Installation Instructions Install the timbers AC101b/c , AC103a/b/c/d Follow fundation details AC101 AC101 AC101 AC101 Attach the floor to the timbers AC101b/c and place the Hexboard on top Using 4x @150mm M12 SQUARE CUP HEX BOLTS / 4x NYLOCS / 4x RED CAPS AC101 AC101 AC101...
- Page 8 Installation Instructions Attach the TIMBERS AC101o to the TIMBERS AC101b/c and AC103b/c Using 4x @200mm M12 SQUARE CUP HEX BOLTS / 4x NYLOCS / 4x RED CAPS AC101 AC101 AC101 AC101 AC101 Attach the timbers AC101m/k to the TIMBERS AC103b/c Using 6x @200mm M12 SQUARE CUP HEX BOLTS / 6x NYLOCS / 6x RED CAPS AC101 AC101...
- Page 9 Installation Instructions Attach the TIMBERS AC102e/f to the TIMBERS AC101b/c and AC103d Using 5x @200mm M12 SQUARE CUP HEX BOLTS / 5x NYLOCS / 5x RED CAPS AC101 AC101 AC101 Attach the HEXBOARD and AC103g to the TIMBERS AC101b/c and the TYRE to the TIMBER AC103e Using 8x FM80 ‘Brass Screws’...
- Page 10 Installation Instructions Attach the TIMBERS AC101p to the TIMBERS AC103a/b Using 4x @200mm M12 SQUARE CUP HEX BOLTS / 4x NYLOCS / 4x RED CAPS AC101 AC101 Attach the NET to the TIMBERS AC101p and AC103a/b Using 16x NYLOCS / 16x RED CAPS REF: AC103 - CLYDE ACTIVITY CENTRE pg 10 of 15...
- Page 11 Installation Instructions Attach the RAMP to the AC101c Using 2x @200mm M12 SQUARE CUP HEX BOLTS / 2x NYLOCS / 2x RED CAPS / 10x FM80 Brass Screws RAMP HOLE - 148mm from the top of the floor - 850mm from the ground -1412mm from the top REF: AC103 - CLYDE ACTIVITY CENTRE pg 11 of 15...
-
Page 12: Installation Instructions
Installation Instructions Attach the CLATTERBRIDGE to the EYEBOLTS , METAL FLOOR and to the TIMBERS AC101b and AC103b/c Using (2x @80mm) (2x @130mm) M12 EYEBOLT/ 6x NYLOCS / 6x RED CAPS / 4 QUICKLINKS AC101 AC101 Attach the RAMP ROPE to the ramp and AC103f Using 2x NYLOCS / 2x RED CAPS REF: AC103 - CLYDE ACTIVITY CENTRE pg 12 of 15... - Page 13 Installation Instructions Attach the SLIDE to the HEXBOARD FLOOR Using 3x ‘FM40 Brass Screws’ / 2x ‘FM80 Brass Screws’ AC101 AC101 Insert the SLIDE SIDES to the SLIDE and to the timbers P1 4x ‘FM80 Brass Screws’ AC101 AC101 REF: AC103 - CLYDE ACTIVITY CENTRE pg 13 of 15...
- Page 14 Installation Instructions Attach the RAMP and CLIMBING SIDE PANELS Using 14x ‘FM80 Brass Screws’ RAMP SIDE PANEL (4x Brass Screw holes) each panel LOG WALK SIDE PANEL (3x Brass Screw holes) each panel REF: AC103 - CLYDE ACTIVITY CENTRE pg 14 of 15...
-
Page 15: Additional Dimensions
Additional Dimensions REF: AC103 - CLYDE ACTIVITY CENTRE pg 15 of 15...
Need help?
Do you have a question about the CLYDE ACTIVITY CENTRE AC103 and is the answer not in the manual?
Questions and answers