Table of Contents
Advertisement
Quick Links
Advertisement
Table of Contents

Related Manuals for GHARiENi MO 1


Summary of Contents for GHARiENi MO 1
- Page 1 Instruction Manual Spa Table MO 1 Gharieni Group GmbH Gutenbergstraße 40 D - 47443 Moers ➢ Phone: +49 (0)2841/88300-0 ➢ Fax: +49 (0)2841/88300-999 ➢ Distribution department: +49 (0)2841/88300-300 ➢ E-mail: service@gharieni.com ➢ Web: www.gharieni.com...
-
Page 2: Table Of Contents
4. Intended use ............................11 5. Rating plate ............................. 12 6. QR Code ..............................13 7. Delivery of the MO 1 ..........................18 7.1 Installation ............................19 8. Upholstery of the MO 1 ........................20 9. Operation of the MO 1 ......................... 21 9.1 Characteristics .......................... - Page 3 21.5 Playback of music / iPhone, Bluetooth, USB, AUX..............71 21.6 Trouble shooting ........................... 73 22. Initialisation of the software of the MO 1 ..................75 23. Reset of the MO 1 ..........................76 24. Cleaning and maintenance of the MO 1 ................... 76 24.1 Cleaning and care of the PU upholstery ..................
- Page 4 24.3 Cover of the upholstery ........................ 78 25. Malfunctions ............................79 26. Repair of the MO 1..........................80 27. Optional equipment / Optional accessories ..................81 27.1 Foot control panel ......................... 81 27.2 Infrared remote control ........................ 81 27.3 Holder for (magnifying) lamps ....................82 27.4 LED magnifying lamp Circle .......................
-
Page 5: Safety Information
➢ MAKE SURE THAT THIS MANUAL IS AVAILABLE TO ANYONE USING THE GHARIENI SPA TABLE MO 1 AND MAKE SURE THAT IT HAS BEEN READ AND UNDERSTOOD PRIOR TO USING THE DEVICE. -
Page 6: Abbreviations
/ or can result in damages to the appliance. 2. All electrical work to connect the MO 1 to the mains must be carried out by a qualified professional. Do not modify the energy supply. - Page 7 RISK OF ELECTRIC SHOCK! 14. Do not place or store the MO 1 close to a bath, a shower, or a washbasin. There is danger that the MO 1 may meet splashed water. RISK OF ELECTRIC SHOCK!
- Page 8 MO 1. Should you spill any water, immediately pull the mains plug and dry the MO 1 thoroughly. RISK OF ELECTRIC SHOCK! 10. Never immerse any parts of the MO 1 in water. When cleaning the MO 1, make sure that no water penetrates the MO 1 or its housing.
- Page 9 Do not use attachments / accessories not recommended by the manufacturer. 17. Never operate the MO 1 if it has a damaged cord or plug, if it is not working properly, if it has been damaged or if it has become wet.
-
Page 10: General Information
IM is essential for its proper and confident use and will help you to operate the appliance to your entire satisfaction. Our MO 1 is very robust and has a long operating life if it is operated properly. Read the instructions very carefully and operate the appliance in its intended use as described only to protect you and your customers from danger. -
Page 11: Preliminary Remarks
❖ The MO 1 is a versatile Spa Table. You can use it for e.g. cosmetic applications or full body massages in dry rooms. No other use is permitted: it will affect your guarantee rights. -
Page 12: Rating Plate
5. Rating plate ❖ The rating plate is on the front below the headrest (s. fig. below). ❖ Do not make the rating plate illegible! Do not remove the rating plate! Non-compliance will expire the warranty! -
Page 13: Qr Code
(e.g. a smartphone). A form will then open via the Internet browser of your device, which already automatically contains the serial number of your MO 1. Please describe your problem there and enter your data. - Page 15 Figure shows form that opens in the Internet browser of the device after the QR code is scanned.
- Page 16 Figure shows form that opens in the Internet browser of the device after the QR code is scanned.
- Page 17 Figure similar: option window for adding a file. Appearance may vary depending on the device and operating system.
-
Page 18: Delivery Of The Mo 1
THE USE OF THE CARRYING AIDS IS MANDATORY AS FOLLOWS 1. To move the MO 1 from the pallet, you must raise it by 8 - 10 cm first. Plug it in to do this. Then press the corresponding function button (first button-line of the manual control panel which is on one side on a suspension unit / s. -
Page 19: Installation
- the handles are already installed on delivery. Now the MO 1 is ready for transport. You need 4 persons to move the MO 1 to its final site. If the ground is not even, you must adjust the stability with the adjustment screw. -
Page 20: Upholstery Of The Mo 1
(fig. similar: Colour and decor can vary depending on model) OFT UPHOLSTERY ❖ Optionally for an additional charge, it is possible to equip the MO 1 with an ergonomic soft upholstery (s. fig. below) made of PU. ❖ The extra soft upholstery is anatomically shaped. -
Page 21: Operation Of The Mo 1
DISINTEGRATION! RISK OF INJURY! 9.1 Characteristics ❖ The MO 1 is a versatile Spa Table. You can use it for e.g. cosmetic applications or full body massages in dry rooms. ❖ All adjustment functions [except castors (optional available), arm and headrest are operated electrically. -
Page 22: Model Versions / Number Of Actuators
MALL EDIUM ARGE ❖ The Gharieni MO 1 is a wellness bed equipped with up to seven actuators that allow you to adjust the bed flexibly according to your wishes via a manual control panel. ➢ FOUR ACTUATORS: Working height, backrest, inclination of the seat area and the leg section are electrically adjustable. -
Page 23: Storage Space Options
9.2.1 Storage space options The following storage space options are available for our MO 1: • Completely closed base, s. fig. A (except for the compartment for the manual castors mechanism, . chapter 11. EXTENDABLE RETRACTABLE CASTORS • Base open at head end and foot end (without illustration) •... - Page 24 Fig. A Fig. B Fig. C...
-
Page 25: Before Initial Use
➢ The dedicated safety socket must be grounded properly and must meet the proper voltage (230 V AC). Before installation provide sufficient free space for the MO 1. The required minimum free space is 300*180 cm. -
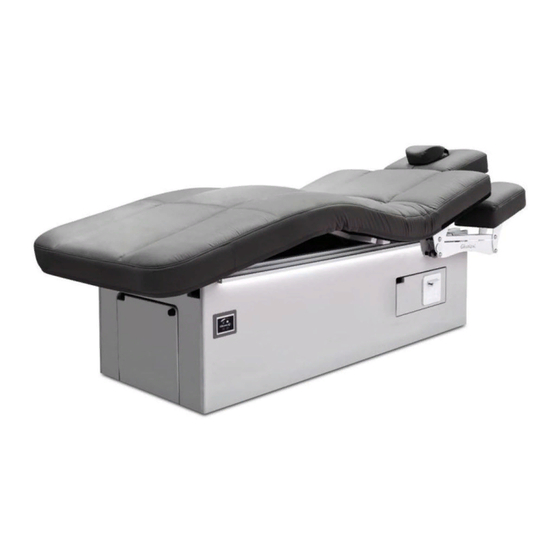
Page 26: View
9.4 View (fig. similar: colour, decor, and upholstery may vary depending on the model) (supporting structure) BASE LYING SURFACE ➢ Backrest, leg section and the inclination of the seat section are fully electrically adjustable. HEADREST ➢ Manually adjustable. ➢ Incl. nose slot. ➢... -
Page 27: Headrest
(instructions are not depending on the adjustment of the lying surface). Failure to do so can cause permanent damage to the construction of the MO 1. RISK OF TIPPING! RISK OF DISINTEGRATION! RISK OF INJURY! ❖ The headrest is fully adjustable manually (s. fig. 1, 2 and 3 below). -
Page 28: Multifunctional Headrest
❖ Using a gel cushion (s. fig. 5, optional available at Gharieni) on the headrest upholstery can additionally support the face of the person to be treated (s. also chapter 27.5 G EL CUSHION FOR NOSE SLOTS Fig. 4 Fig. 5 NOTICE! Do not lean, stand, or sit on the headrest;... -
Page 29: Armrests
❖ Use the lever of the relevant side and press lightly to adjust the armrests freely; so the MO 1 is the optimal solution for back massages (s. fig. 6). As you can swivel the armrests you are closer to the head of the person to be treated when carrying out cosmetic or facial massages. -
Page 30: Electrically Adjustable Armrests (Optional Equipment)
RISK OF DAMAGE! 9.7 Leg section ❖ The leg section of the MO 1 can be adjusted fully electrically (s. chapter 10.6 DJUSTMENT OF THE LEG SECTION ❖ The leg section can be adjusted separately from the backrest using the manual... -
Page 31: Backrest
OF THE INCLINATION OF THE SEAT SECTION 9.8 Backrest ❖ The backrest of the MO 1 can be adjusted fully electrically (s. chapter 10.4 DJUSTMENT OF THE BACKREST ❖ Adjust the inclination of the backrest using the relevant button of the manual control panel, the infrared remote control, and / or the foot control panel. - Page 32 (changing between level 1 and level 2) HIFT BUTTON ➢ S (resets the MO 1 to the basic position / in level 2 only) TART BUTTON ➢ S (you can set the hotkeys M1 - M8 to any desired position using...
- Page 33 ➢ Buttons for switching the fragrance generator on or off (optional equipment). TART BUTTON LEVEL BUTTON GREY LETTERING ➢ The resets the MO 1 to the basic position. START BUTTON ➢ The basic position is not changeable. ➢ Available in level 2 only. EY LOCK BUTTON LEVEL BUTTON BLACK LETTERING ➢...
-
Page 34: Key Lock
➢ In level 2 the LED above the shift button is on, in level 1 the LED is off. For safety reasons, the MO 1 moves only while pressing a button of the MCP. When you stop pressing, all moving-operation will stop immediately. -
Page 35: Adjustment Of The Backrest
❖ The horizontal work height of the MO 1 / standard upholstery is fully adjustable from approx. 50 cm up to 82 cm. ❖ The horizontal work height of the MO 1 / soft upholstery is fully adjustable from approx. 55 cm up to 87 cm; due to the thicker upholstery. -
Page 36: Memory Functions Of The Mcp
10.7 Memory functions of the MCP ❖ The manual control panel of the MO 1 is equipped with eight memory positions (memory functions on level 2: M1 / M2 / M3 / M4 / M5 / M6 / M7 / M8). -
Page 37: Extendable / Retractable Castors
11. Extendable / Retractable castors The MO 1 is equipped with retractable castors. The retractable castors can be extended to change the site of the MO 1. The castors at the head side are pivoting, the castors at the foot side are fixed. - Page 38 MO 1. Do not extract the castors if any person is on the MO 1. Do not move the MO 1 on its castors if any person or load is on the MO 1; otherwise you damage the substructure or castors.
-
Page 39: Infrared Remote Control (Optional Equipment)
For safety reasons, the MO 1 moves only while pressing a button of the IRC. When you stop pressing, all moving-operation will stop immediately. - Page 40 3. Press the button. SAVE 4. Press the desired hotkey M1 - M8. M1 - M8 5. After successful saving you will hear an acoustic signal. ELECTING A PREVIOUSLY SAVED POSITION 1. Press the button. SHIFT 2. Press and hold the desired hotkey M1 - M8 until the position has M1 - M8 been reached.
- Page 41 MO 1. Do not extend the castors if any person is on the MO 1. Do not move the MO 1 on its castors if any person or load is on the MO 1; otherwise you damage the substructure or castors.
-
Page 42: Foot Control Panel (Optional Equipment)
13. Foot control panel (optional equipment) The FCP (s. fig. 10) can be connected additionally and optionally together with the MCP or IRC. The FCP is equipped with a left and a right footswitch-unit, which are connected by an electric connector (s. fig. 11) with 6 diodes on it. Fig. -
Page 43: Aroma Therapy / Fragrance Generator (Opt. Equipment)
AVING OF THE MEMORY POSITIONS 1. Set the desired position as usual. 2. Press button R 2 of the right footswitch-unit until the lower diode on the connector goes on (s. fig. 8). 3. Press button R 1. 4. Select the relevant save button L 1 (memory 1) or L 2 (memory 2) of the left footswitch-unit and press until you hear an acoustic signal. - Page 44 If the fragrance generator is switched on, the diodes above the buttons on the manual control panel light up, and the diode on the fragrance generator also lights The fragrance generator is located on the underside of the lying surface, in the chest area, see illustration below.
-
Page 45: Breast Contouring System (Optional Equipment)
15. Breast Contouring System (optional equipment) The Breast Contouring System provides additional support for female clients in the prone position. It increases lying comfort. The Breast Contouring System is air-controlled and is integrated into the upholstery (see illustration below). Before your client lies down on the bed, the system must be closed so that no air can escape from the pad. - Page 46 Fig. shows valve with closed system.
-
Page 47: Led „Spa Ambience Light" (Optional Equipment)
Fig. shows valve with open system. 16. LED „Spa Ambience Light“ (optional equipment) ❖ Our LED „Spa Ambience Light“ is optionally available for your MO 1. ❖ Put your MO 1 in the right light! There are two LED light strips underneath the lying surface (see illustration below). - Page 48 Operation: 1. If necessary, pull the plastic strip out of the battery slider. This is located at the bottom of the back of the remote control. 2. Sleep mode of the color wheel: To prolong battery life, the color wheel will enter sleep mode after a few seconds.
- Page 49 4. 4 zones: By using the buttons 1 and 2, you can switch the LED bars on and off. Press the respective key once briefly to switch on the LED strips. Keep it pressed to switch off the LED strips. Both LED strips are always activated.
-
Page 50: Smart Thermo 2 (Optional Equipment)
The parameters of the heater can be programmed and saved if desired. Check the current temperature before using the MO 1. Disconnect the MO 1 from the mains when it is not used for a longer period, e.g. during the night. -
Page 51: Operation Of The Heater Smart Thermo 2
Thermo function by pressing the OFF-button on the HCP to avoid heat accumulation. 4. Disconnect the MO 1 from the mains when it is not used for a longer period, e.g. during the night. WARNING! The cables of the models with Smart Thermo and / or Vibro Wellness are between the upholstery and metal rack (depending on model). - Page 52 : -ON- UTTON : -OFF- UTTON EMPERATURE SELECTION BUTTON IME SELECTION BUTTON 2 blue LEDs...
- Page 53 2 green LEDs 2 yellow LEDs 2 orange LEDs 2 red LEDs UTTON ❖ Press this button to switch on the Smart Thermo 2. 1. When the Smart Thermo 2 is switched on, it starts heating at the maximum heating / power level for 5 minutes (level 5: the 2 red LEDs (E) are illuminated). 2.
- Page 54 Level 3 Medium power = medium temperature Level 4 Heating / power level between medium and maximum power Level 5 Maximum power = high temperature The selected heating / power level will be displayed on the LEDs above the operating buttons: Level 1 blue LEDs (A) Press button...
- Page 55 XAMPLE You wish to set a medium heating / power level (level 3) of 30 minutes. Please proceed as follows: 1. Switch on the Smart Thermo 2 by pressing the button -ON- 2. Then select the . Press this button TEMPERATURE SELECTION BUTTON repeatedly until the two yellow LEDs (C) are illuminated (s.
-
Page 56: Audio-Relax Headrest (Optional Accessory)
❖ The Smart Thermo 2 is equipped with a memory function, which enables the previous settings automatically after power up. 18. Audio-Relax headrest (optional accessory) This option supports optimal relaxing of your customers and adds an individual touch to your massages. Two speakers laterally-installed in the headrest support the massage by a unique experience of sound without harassing your customer. -
Page 57: Vibro Manual Control Panel
1. Do not use the option Smart-Thermo when your customer ➢ has got a pacemaker. ➢ is pregnant. ➢ is affected by thrombosis. ➢ suffers from pain due to unknown reasons. 2. Apply to healthy people only. WARNING! Do not open the housing of the manual control panel! Failure to do so will expire the guarantee. - Page 58 (fig. similar / fig. serves as an example only) Fig. 12 Fig. 13 FF BUTTON NDIVIDUAL BUTTON ULSE MASSAGE BUTTON ULSE BUTTON ELLNESS MASSAGE BUTTON AVE BUTTON NTENSITY BUTTONS SHOULDER AREA BACK AREA NTENSITY BUTTONS FUSELAGE AREA BACK AREA NTENSITY BUTTONS PELVIC AREA BACK AREA NTENSITY BUTTONS...
-
Page 59: Operation
19.2 Operation TARTING OF A MASSAGE ➢ You can start a massage by pressing the FOLLOWING BUTTONS FF BUTTON ❖ When the massage unit is operated for the first time, the setting INDIVIDUAL activated. ❖ All massage motors operate in the manufacturer`s setting (intensity level 2 / medium intensity). - Page 60 ➢ The levels are indicated on the LED-display as follows. Level 0 ( Level 1 Level 2 Level 3 LED O LED O ➢ When the lowest intensity (level 1) has been reached, press one of the (5) - (9) again to switch off the relevant motor. INTENSITY BUTTONS ➢...
-
Page 61: Triple Airback Incl. Heater (Optional Equipment)
❖ Please note: The will be restarted in the manufacturer´s WELLNESS MASSAGE setting. INISHING OF A MASSAGE ❖ A timer finishes a massage after 15 minutes automatically. ❖ If you want to stop the massage before, press the O (1). FF BUTTON The motor of the V becomes louder when operating the... -
Page 62: Scope Of Delivery
20.1 Scope of delivery ➢ Control unit on mounting panel ➢ 3 control buttons for adjusting of the air cushions ➢ 3 connection wires for the heating elements ➢ Heater control unit for Smart Thermo 2 (optional) 20.2 Installation information The grounding of the mounting panel is carried out via the permanently attached power cable. - Page 63 Air cushion 1 (lumbar spine) Air cushion 2 (lumbar spine) Air cushion 3 (thigh section) For deflating the air, air chambers are opened. ➢ Nevertheless, you must apply direct manual pressure. For pumping the cushion. ❖ You can operate the heating system Smart Thermo 2 using the 4 buttons (s.
-
Page 64: Heating
3. When the treatment is stopped prematurely, cancel the Smart- Thermo function by pressing the OFF-button on the HCP to avoid heat accumulation. 4. Disconnect the MO 1 from the mains when it is not used for a longer period, e.g. during the night. 20.5 Heating UTTON ❖... -
Page 65: Programming
UTTON ❖ Press this button to switch off the Smart Thermo 2. 20.5.1 Programming ❖ The heating / power level and the heating time of the Smart Thermo 2 can be changed at any time by using the corresponding buttons. EMPERATURE SELECTION BUTTON ❖... - Page 66 Level 1 blue LEDs (A) Press button one time Level 2 green LEDs (B) Press button two times Level 3 yellow LEDs (C) Press button three times Level 4 orange LEDs (D) Press button four times Level 5 red LEDs (E) Press button five times ➢...
- Page 67 3. The appliance is now set to medium heating / power level (level 3). 4. Then select the TIME SELECTION BUTTON 5. Press this button repeatedly until three of the ten LEDs are illuminated (two blue LEDs and one green LED / s. fig. below). 6.
-
Page 68: Multimedia-Sound-System (Optional Accessory)
21. Multimedia-Sound-System (optional accessory) ❖ The integrated M (MMU) offers a modern interface between ULTIMEDIA various playback devices and your Spa Table. ❖ The speaker, which is integrated in the Spa Table, enables you to relax to your own favourite music. ❖... -
Page 69: Control Panel
12. Children under the age of 13 should only operate the MMU under supervision. 21.3 Control panel (fig. similar: modifications are possible) UNCTIONS ➢ Switch on / switch off the MMU. ➢ Press to switch from iPhone mode to mode, mode or mode. -
Page 70: Compatibility
➢ Press to play the previous track. ➢ Press and hold = rewind in the current track. ➢ Displays the different play modes. DISPLAY CONNECTIONS USB / iPhone etc. / AUX The bed has an integrated subwoofer that can be switched on by pressing the button (6) on the MMU. -
Page 71: Playback Of Music / Iphone, Bluetooth, Usb, Aux
21.5 Playback of music / iPhone, Bluetooth, USB, AUX NOTICE! When music is playing on the MMU using your mobile phone, incoming calls will immediately interrupt the music playback so that you answer the call. / iP / iP PLAYING MUSIC USING THE HONE 1. - Page 72 You can use the quick pairing function if your enabled BLUETOOTH device has a Near Field Communication (NFC). Turn on the NFC function on your device and then close the lid of the docking area (A / s. illustration below). Your device will now automatically connect to the MMU.
-
Page 73: Trouble Shooting
➢ The MMU is not plugged in properly. If the MMU is plugged in properly but The MMU cannot be switched on. you cannot operate it, please contact Gharieni Group GmbH. ➢ Unplug the MMU and then plug in again. The MMU does not work at all. - Page 74 ➢ Do not press too hard. ➢ If a touch button no longer responds, the Control touch buttons do not MMU must be replaced. work. In this case, please contact our customer service. ➢ Switch off all other devices paired with the Bluetooth appliance and scan for Bluetooth again.
-
Page 75: Initialisation Of The Software Of The Mo 1
22. Initialisation of the software of the MO 1 If a previously-saved position is no longer properly set, you may have to reinstall the software. To correct the differences of position, you must carry out the following steps: NITIALIZING 1. Press and hold the two buttons on the top of the MCP until you hear an acoustic signal. -
Page 76: Reset Of The Mo 1
FIRE! WARNING! Always ensure that water or other liquids cannot get into the housing and the fittings of the MO 1 or into the MCPs or the FCPs. RISK OF ELECTRIC SHOCK! RISK OF FIRE! ❖ Do not wear any arm and finger decoration such as rings or bracelets while carrying out any cleaning or maintenance operations. -
Page 77: Cleaning And Care Of The Pu Upholstery
Mikrozid Sensitive (see chapter 28. UPHOLSTERY CARE AND CLEANING AGENTS). WARNING! Always ensure that water or other liquids cannot get into the housing and the fittings of the MO 1 or into the MCPs or FCPs. RISK OF ELECTRIC SHOCK! RISK OF FIRE! -
Page 78: Cover Of The Upholstery
24.3 Cover of the upholstery ❖ The standard upholstery surface of the MO 1 is made of PU (polyurethane). ❖ We recommend the use of suitable to keep the lying surface PROTECTIVE COVERS in good condition. ❖ See also chapter 27.9 P... -
Page 79: Malfunctions
25. Malfunctions ALFUNCTION OSSIBLE CAUSE ROUBLESHOOTING LL MOTORS DO NOT WORK 1. No connection to the mains. 1. Check the connection status. 2. The power supply cable is damaged. 2. Power supply cable must be replaced (please contact the customer service). 3. -
Page 80: Repair Of The Mo 1
2. Repairs and modifications must be carried out by Gharieni Group GmbH or a person authorized by Gharieni Group GmbH. 3. The electrical installation of the room the MO 1 is installed in must meet the current legal regulations at the site where the MO 1 is operated. -
Page 81: Optional Equipment / Optional Accessories
Our team is happy to help! 27.1 Foot control panel ❖ A for the MO 1 is also optionally available for an FOOT CONTROL PANEL additional charge. ❖ The is equipped with a memory function and serves for FOOT CONTROL PANEL the controlling of the basic functions and memory positions. -
Page 82: Holder For (Magnifying) Lamps
Designed to fit the Circle LED magnifying lamp it simply disappears under the bed when not in use. 27.4 LED magnifying lamp Circle ❖ The magnifying lamp Circle is available as an option for the MO 1; for an additional charge. 27.5 Gel cushions for nose slots ❖... -
Page 83: Plexi Shield
(see illustration below) is optionally available for post- LEXI HIELD installation on the bed frame of the MO 1 at an extra charge. ❖ The Plexi Shield is intended to prevent respiratory air (droplets) from reaching the client or the person giving treatment during a facial treatment. -
Page 84: Towels For Nose Slots (Disposable Cloths)
NOTICE! Please follow our installation instructions for the Plexi Shield. 27.7 Towels for nose slots (disposable cloths) ❖ D for the nose slot of the headrest of the MO 1 (s. fig. ISPOSABLE CLOTHS below) are optionally available for an additional charge. -
Page 85: Neck Rest -Dentalax
27.8 Neck rest -Dentalax- ❖ A D (s. fig below) for the MO 1 is optionally available for ENTALAX NECK REST an additional charge. ❖ During treatment, this neck rest supports the cervical spine effectively. ❖ The D is available in white or in colour. -
Page 86: Protective Covers Made Of Pu
(fig. similar: fig. serves as an example only) 27.9.2 Protective covers made of PU ❖ P (PU) for Spa Tables (s. fig. ROTECTIVE COVERS MADE OF POLYURETHANE below) are optionally available for an additional charge. ❖ P PU are suitable for massages including a small ROTECTIVE COVERS MADE OF amount of oil. -
Page 87: Protective Foot Cover
27.9.3 Protective foot cover ❖ A (s. fig. below) for the MO 1 is optionally available PROTECTIVE FOOT COVER for an additional charge. ❖ The is made of stable, transparent plastic. PROTECTIVE FOOT COVER ❖ The protects the foot section of your Spa Table from dirt and soiling (e.g. -
Page 88: Upholstery Care And Cleaning Agents
28. Upholstery care and cleaning agents ® 28.1 mikrozid sensitive (alcohol-free) ® ❖ We recommend mikrozid sensitive for gentle and thorough care and cleaning of the upholstery. ® ❖ mikrozid sensitive removes bacteria, fungi and viruses (e.g. HBV, Rota, Vaccinia etc.). ®... -
Page 90: Skai Cleaner
28.2 Skai cleaner ❖ For gentle and thorough care and cleaning of the artificial leather upholstery we additionally recommend Skai cleaner. ❖ Skai cleaner is available in a 200 ml spray bottle. ❖ Especially suitable for cleaning artificial leather. Skai cleaner Item number: 79427... -
Page 91: Conditions Of Transport, Storage, And Operation
29.1 Transport ❖ Carry the MO 1 by its base (supporting structure) during transport only. ❖ Never carry the MO 1 by its lying / sitting surface or its armrests during transport; otherwise you can damage the MO 1 seriously. -
Page 92: Technical Data
30. Technical data 30.1 MO 1 ENERAL DATA Total Length 205 cm Total Width S 76 cm Total Width M 85 cm Total Width L 92 cm Base (L*W) 138 cm*62 cm Adjustable height (standard upholstery) approx. 50 cm - 82 cm Adjustable height (soft upholstery) approx. -
Page 93: Triple Airback Incl. Heater
30.2 Triple Airback incl. heater ENERAL Power of transformer (primary) 230 V AC / 50 Hz / 100 VA max. Power of transformer (secondary) 12 V AC / 100 VA max. Protection (primary) 1.6 AT (slow acting) ❖ Technical modification reserved. AINS CONNECTION Power supply 230 V AC / 50 Hz... -
Page 94: Multimedia Unit
1. While unpacking, the packaging materials (polythene bags, polystyrene pieces, etc.) should be kept away from children and pets. CHOKING HAZARD! 2. Do not dispose of the MO 1 together with your domestic waste. Old and unused appliances must be sent for disposal to the responsible recycling centre for electric appliances. -
Page 95: Warranty
32. Warranty The following warranty conditions apply to new goods worldwide: Gharieni Group GmbH grants on all spa tables of the MO 1 series: → 10 years warranty on metal frames, → 5 years warranty on actuators and → 3 years warranty on other components. -
Page 96: Ec-Declaration Of Conformity
33. EC-Declaration Of Conformity EC-Declaration of Conformity Gharieni Group GmbH Gutenbergstr. 40 D-47443 Moers / Germany hereby declare, in sole responsibility, that, due to its design and construction, the device named below complies with the relevant, fundamental safety and health requirements of the EU. -
Page 97: Status Of Edition
OWNING COMPANY. THE POWER TO PROTECT ITS RIGHTS IS RESERVED AND OFFENDERS SHALL BE PROSECUTED. RODUCTION PICK ISTRIBUTION AND HOWROOM AND REPAIR Gharieni Group GmbH Gharieni Group GmbH Gutenbergstraße 40 Am Schürmannshütt 24 D - 47443 Moers / Germany D - 47441 Moers / Germany...
Need help?
Do you have a question about the MO 1 and is the answer not in the manual?
Questions and answers