Table of Contents
Advertisement
INSTRUCTION MANUAL
Multifunction Unit
Read this manual thoroughly before using the instrument to
ensure proper and safe operation.
Contact Tomey Corporation or our local distributor if you
have any questions or you encounter any problems during
operation.
■ Always follow the operation procedures
described in this manual.
■ Keep this manual in a readily accessible place
while operating this instrument.
■ Contact our local distributor if you lose this
manual.
MR-6000
28AA9090-10
Advertisement
Table of Contents

Subscribe to Our Youtube Channel
Related Manuals for Tomey MR-6000


Summary of Contents for Tomey MR-6000
- Page 1 MR-6000 Read this manual thoroughly before using the instrument to ensure proper and safe operation. Contact Tomey Corporation or our local distributor if you have any questions or you encounter any problems during operation. ■ Always follow the operation procedures described in this manual.
-
Page 3: How To Read This Manual
i. How to read this manual Outline This manual is structured as follows. 1. PRIOR TO USE Describes safety precautions and important information to be understood before installing and using the instrument. 2. NAMES AND FUNCTIONS Describes names and functions of each section of the instrument. -
Page 4: Symbols Used In This Manual
Symbols used in this manual Sentences accompanied with the symbols below indicate the following: ■ This is a precaution that, if unheeded, will result in a hazardous situation where there is an imminent danger of serious injury or death. ■ This is a precaution that, if unheeded, could result in a hazardous situation where there is a possibility of serious injury or death. -
Page 5: Table Of Contents
ii. Contents How to read this manual ......................1 Outline ............................1 Symbols used in this manual ......................2 Contents ............................ 1 PRIOR TO USE ........................1-1 1.1 Safety precautions ....................... 1-1 1.1.1 General ......................... 1-1 1.1.2 Installation........................1-5 1.1.3 Laser light safety ......................1-6 1.1.4 Electrical safety ...................... - Page 6 measurement) ........................3-10 3.2.3 Measuring intraocular pressure and corneal thickness ..........3-11 3.2.4 Measuring corneal shape ................... 3-13 TECHNICAL INFORMATION ....................4-1 INSPECTION AND MAINTENANCE ..................5-1 5.1 Warranty ..........................5-1 5.2 Operation life ........................5-2 5.3 Inspection ..........................5-2 5.4 Routine maintenance......................
-
Page 7: Prior To Use
1. PRIOR TO USE ■ Only allow qualified operators to use the instrument. ■ This instrument is a diagnostic/measuring device specially designed for ophthalmology. Never use the instrument for other purposes. ■ Check that the guarantee certificate has all the necessary details on it, and store it in a safe place. - Page 8 ■ Do not place any other objects on this instrument. Any foreign objects entering the instrument may cause an electric shock or failure. ■ Do not block the vent. The temperature in the instrument will rise, resulting in failure. ■ Do not lean on the instrument, press or pull the instrument from the top.
- Page 9 ■ Be sure to set the nozzle limiter for every intraocular pressure examination to ensure the safety of the patient. Otherwise, the nozzle may come into contact with the patient, resulting in injuries. ■ Check the distance between the eye and nozzle from the side when setting the nozzle limiter so that the nozzle does not come into contact with the patient.
- Page 10 the previous patient may be included. ■ Ask the patient to look at the fixation target. If the patient looks in a different direction or moves, alignment may not be conducted correctly. ■ The Auto Alignment function may not work correctly when eyelids and eyelashes cover the cornea.
-
Page 11: Installation
■ Turn power off and place the dust cover over the instrument when not being used. The measurement accuracy will deteriorate significantly if the optical section in the instrument becomes dirty. Disconnect the power plug from the outlet when not being used for long periods. Dust may accumulate on the plug, resulting in fire. -
Page 12: Laser Light Safety
■ When taking the instrument out of the box, pull the outer box upward and then remove the packing materials. Do not hold the head, chinrest, forehead pad, joystick, or cables when lifting the instrument. Doing so may cause failure or damage to the instrument. ■... -
Page 13: Electrical Safety
■ Use the power cord and fuses provided with the instrument or specified by Tomey to ensure safety. Also, do not use the accessories provided with the instrument for other equipment. -
Page 14: External Devices Or Network
■ Be sure to turn off the power of this instrument and all instrumens which are connected to it, when connecting a cable from an external device to the connector on the instrument. Failure may occur. 1.1.5 External devices or network ■... -
Page 15: Cleaning And Sterilization
1.1.7 Cleaning and sterilization ■ Peel off the top sheet of chin paper and clean the sections that the patient may touch directly such as the forehead pad with a cloth dampened with ethanol for disinfection before measuring the next patient. -
Page 16: Checks Of Measured Values
1.1.8 Checks of measured values ■ Fully examine the measured data taken by this instrument, in particular if the difference between measurement values for the left and right eyes is large or any problem is found during the preliminary exmination. When using the data taken by this instrument to select intraocular lenses, thoroughly determine the selection by also examining cataract surgery methods and other inspections. - Page 17 ■ This instrument calculates intraocular pressure based on the Goldman applanation tonometer. However, recommended take measurements using the Goldman applanation tonometer if more accurate measurements are needed. ■ This instrument adopts optical measurements for corneal thickness. It is reported that measurements of corneal thickness may vary depending on measurement methods including ultrasonic type measurement.
-
Page 18: Precautions For Wireless Waves
Tomey or our local distributor for measures to avoid interference (installation of the partition etc.). ■ If you have any other problems such as wireless frequency interference... -
Page 19: Checking Package Contents
1.2 Checking package contents Open the package and check that the required quantity of the following items is included and they are not damaged. If any item is missing or damaged, contact our local distributor as soon as possible. Main unit Chinrest paper 100 sheets Power cord... -
Page 20: Glossary
1.3 Glossary [AA] : Auto Alignment [AS] : Auto Shot [Auto Alignment] : Function to automatically align the sight in the up / down / right /left / focus directions [Auto Shot] : If the center of the cornea is in the Auto Shot zone, then automatic measurement will be performed. -
Page 21: Outline
1.4 Outline 1.4.1 Application purpose This instrument is designed to measure the objective refractometry, corneal curvature, intraocular pressure, (contactless measurement), corneal thickness and radius of corneal curvature by corneal shape of the patient's eyes. 1.4.2 Operational Principle This device operates measurement alignment and measurement based on the operational principles below. - Page 22 by analyzing the shape and size of the ring generated by infrared laser and refracted from the retina of the patient. Corneal curvature Project the ring light by the visible light LED to the corneal anterior surface of the patient’s eye and receive the reflection light shape with the photodetector.
-
Page 23: Symbols Used For Marking
1.5 Symbols used for marking If a mark is damaged or becomes illegible, please contact us or our local distributor. Refer to instruction manual. Power standby B-type attachment section Grounding (earth) Caution Manufacturer and manufacturing month Wireless communication devices Wired communication devices Fuse 1-17 ■... - Page 24 This page is intentionally left blank. ■ 1-18...
-
Page 25: Names And Functions
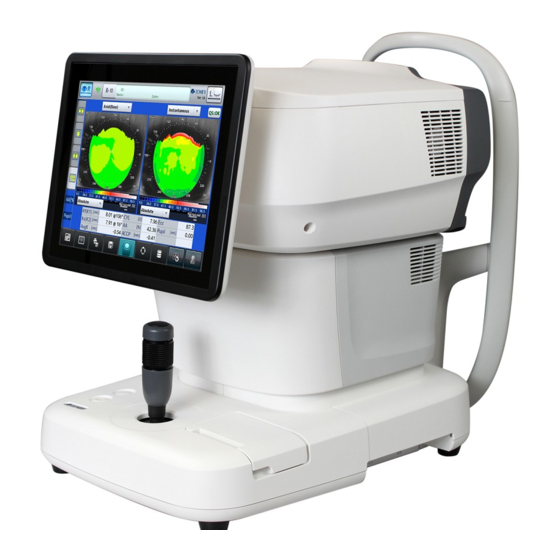
2. NAMES AND FUNCTIONS 2.1 Physician's side (fig.1) 1: Head 2: Touch panel 3: Joystick 4: Joystick button 5: Power lamp Light up in yellow-green during power-on. 6: Chinrest up/down button 7: Eye level mark 8: Built-in printer ■... -
Page 26: Patient's Side
2.2 Patient's side (fig.1) 1: Forehead pad 2: Measurement window Switches according to measurement mode.*1 3: Chinrest 4: Power switch 5: Power socket (REF / KRT / Topo Mode) (Tono / Pachy Mode) ■... -
Page 27: Side Of Main Unit
2.3 Side of main unit (fig.1) 1: USB-H connector 2: LAN connector 3: Maintenance switch This is used for maintenance. Never touch this switch. ■... -
Page 28: Screen
2.4 Screen a) Indications on screen (15) (14) (12) (13) (11) (16) (10) (1) Subject’sInspected eye button The head moves to the corresponding side when the button is tapped. (2) View button Measurement results are displayed. (3) Setup button Displays the System Setup screen and allows you to make various settings for the instrument. - Page 29 (8) Database button The patient list screen is displayed. (9) Retake button Hold this button briefly when retaking measurement. Measurement is performed again. (10) New patient button Hold this button briefly before taking measurement for the next patient. (11) “AA” (Auto Alignment) button Green when Auto Alignment is available.
- Page 30 This page is intentionally left blank. ■...
-
Page 31: Operation Procedures
3. OPERATION PROCEDURES 3.1 Preparation before use 3.1.1 Connection diagram of the system Be sure to connect with the external printer and ID input device that conforms to IEC60601-1 or equivalent safety requirements. Or connect with devices that conform to IEC60950-1 and whose power source is insulated with an isolation transformer. - Page 32 Connection Device Connection Purpose Network Hub LAN Connector Output the measurement data into the network. External printer USB Connector Print the measurement data. ID Input Device USB Connector Input the patient’s ID. USB Stick USB Connector Save the measurement data. ■...
-
Page 33: Connecting The Power Cord And Each Cable
3.1.2 Connecting the power cord and each cable. Connect the power cord and each cable as below. [Power cord] AC Power (fig.1) input [USB Cable] [LAN Cable] ・External Printer ・Network into the hospital ・ID Input Device ・USB Stick ■... -
Page 34: Starting/Shutting Down The Instrument
3.1.3 Starting/shutting down the instrument a) Startup 1) Press the power button. 2) The startup screen and then the measurement screen appear. b) Shutdown 1) Press the power button. The measurement head and chinrest automatically move to the lower dead center and the system closes. 3.1.4 Adjusting the monitor angle The angle of the monitor can be adjusted according to the view height and/or illumination. -
Page 35: Positioning By Touch Alignment
3.1.5 Positioning by Touch Alignment When moving an element up, down, left and right using Touch Alignment, touch the panel and release your finger immediately. Do not press the panel continuously. Use Touch Alignment or the joystick to position the patient's eye on the screen. Lightly touch the pupil center of the patient’s eye displayed on the screen. -
Page 36: Positioning By The Joystick
3.1.6 Positioning by the joystick This instrument is designed to perform measurement in Auto mode to ensure higher accuracy through standard operation. However, Auto Alignment may not be particularly effective when insufficient light is reflected due to deformation or inflammation of the cornea. In this case, conduct measurement manually. -
Page 37: Measurement
3.2 Measurement Refer to the measurement procedure for each examination. Capture the examination data on the measurement screen. 3.2.1 Basic flow of examination (1) Entering the patient data The patient list screen appears when the instrument is started, measurement is newly taken, the ID button is touched, or the new patient button is touched, and allows you to select a patient. - Page 38 Peel off the top sheet of chin paper and clean the forehead pad with a clean cloth before capturing images for the next patient. Clean the forehead pad with a cloth dampened with ethanol disinfection as needed. Have the patient place their chin on the chinrest. Adjust the chinrest height so that the height of the corner of the eye is aligned with the eye level mark.
- Page 39 because of a shortage of reflection light due to deformation and/or inflammation of the cornea In this case, switch to manual alignment. (7) Capturing Perform alignment and take measurements with the joystick or the joystick button on the measurement screen. If Auto Shot is turned on, measurement starts automatically after alignment is complete.
-
Page 40: Measuring Refractive Power And Corneal Curvature Radius
3.2.2 Measuring refractive power and corneal curvature radius (Ref- Keratometer measurement) When using the data taken by this instrument to select intraocular lenses, thoroughly determine the selection by also examining cataract surgery methods and other inspections. If incorrect measurement data is used to select intraocular lenses, further surgery might be required. -
Page 41: Measuring Intraocular Pressure And Corneal Thickness
<Measurement procedures> 1) Switch the measurement mode to "REF/KRT." * Touch the “KRT” button when conducting keratometric measurement only and the “REF” button when conducting refractormeter measurement only. 2) Perform alignment and take measurements with the joystick or the joystick button the measurement screen. If Auto Shot is turned on, measurement will start after alignment completes. - Page 42 measurement results into consideration when using this instrument. When using the intraocular pressure adjustment function, set appropriate parameters for the adjustment formula. The adjusted intraocular pressure to be calculated is a reference value. Explain to the patient that a pull of air will be expelled when measuring intraocular pressure...
-
Page 43: Measuring Corneal Shape
3.2.4 Measuring corneal shape When treating or performing a refractive correction operation using a topographic color map, it is necessary to use careful judgment, such as checking the ring image (Mire image), performing multiple measurements, performing other examinations. Light blockage eyelashes eyelids,... - Page 44 <Measurement procedures> 1) Change the measurement mode to "Topo." * Touch the mode selector button to select “Topo.” 2) Perform alignment and take measurements with the joystick or the joystick button the measurement screen. If Auto Shot is turned on, measurement starts automatically after alignment is complete.
-
Page 45: Technical Information
4. TECHNICAL INFORMATION <Correction of intraocular pressure by corneal thickness> It is said that measurement of intraocular pressure represented by the Goldman applanation tonometer is strongly affected by the cornea. This influence can be adjusted with the corneal center thickness (CCT) to some extent. The reported correction formulae are as shown below. - Page 46 This page is intentionally left blank. ■...
-
Page 47: Inspection And Maintenance
Tomey, not to a product whose serial number or batch number is removed, altered or effaced. -
Page 48: Operation Life
5.2 Operation life This instrument is designed to have an operation life of 8 years when operated in an appropriate environment and adequately inspected and serviced. 5.3 Inspection ■ When measuring the model eyes, check that there is no dust or stains on them. -
Page 49: Routine Maintenance
5.4 Routine maintenance This section details the daily care of MR-6000 itself. Clean each devicie connected by this instrument in accordance with each operation manual. ■ Be sure to turn off the relevant devices and disconnect the power plug from the outlet to ensure safety before starting cleaning. -
Page 50: Replacing Consumables
5.5 Replacing consumables 5.5.1 Fuses ■ Disconnect the power cord from the outlet when replacing fuses. Otherwise, you may get an electric shock, resulting in death or serious injuries. ■ Use fuses specifically designed for this instrument and replace two fuses at the same time. Using another type of fuse may result in failure or fire. -
Page 51: Printer Paper
5.5.2 Printer paper ■ Always use genuine TOMEY paper for the printer. Using other types of paper may cause printer failure. (fig.1) 1) Push the printer cover notch (1) upward and open it. 2) Remove the old printer paper roll and install a new roll. If the paper roll is installed in the wrong direction, nothing will be printed. -
Page 52: Storing
5.6 Storing Disconnect the power cord and place the dust cover over the instrument. Store the instrument under the following environmental conditions. - Ambient temperature range: -20 ~ +60°C - Relative humidity range: 10 ~ 95% - Location not in direct sunlight - Location free from water or chemicals - Location not influenced by air containing dust, salt and/or sulfur - Leveled and stable location free of vibration or mechanical impact. -
Page 53: Troubleshooting
6. TROUBLESHOOTING Check the following first when you encounter any problems. If the problem is not solved even after checking the applicable item listed below, contact our local distributor and let them know the serial number of the instrument and symptoms. -
Page 54: Error Messages And Solutions
6.2 Error messages and solutions There is an error message list included in this device. Implement the respective solution and continue operation. If the problem is not solved, contact your local distributor and inform them of the serial number of this instrument and error code Error message Solution An error occurred internally. - Page 55 Error message Solution An error occurred with the Joy stick. Restart this Restart this machine. machine. If the same message comes up after restarting, please check the error code and contact your local distributor. An error occurred with the Chinrest. Restart this Restart this machine.
- Page 56 This page is intentionally left blank. ■...
-
Page 57: Consumables And Optional Equipment
The following consumable parts are available from your local distributor. Contact your local distributor to order them. ●Built-in printer paper Specify the paper type as "Built-in printer paper for MR-6000." ●Chinrest paper (100 sheets/set) ●Fuse Specify the fuse type as "Fuse for MR-6000."... - Page 58 This page is intentionally left blank. ■...
-
Page 59: Specifications
8. SPECIFICATIONS 8.1 Measurement performance 8.1.1 Refractive power measurement ● Spherical refractive power (S) Measurement range -30.00 D to +25.00 D (at VD = 12.0 mm) Display unit 0.01 D / 0.12 D / 0.25 D steps ● Cylindrical refractive power (C) Measurement range 0 D to +/-12.50 D (at VD = 12.0 mm) Display unit... -
Page 60: Corneal Shape Measurement
8.1.5 Corneal shape measurement ● Corneal curvature radius Measurement range 5.50 mm to 10.00 mm Display unit 0.01 mm step ● Corneal astigmatic axis Measurement range 0° to 180° Display unit 1° step 8.2 Other measurements 8.2.1 Interpupillary distance measurement Measurement range 20 mm to 85 mm Display unit... -
Page 61: Device Classification
Store and/or transport the instrument in the instrument's box under the following environmental conditions. ● Temperature -20°C to +60°C ● Humidity 10% to 95% 8.5 Device classification ● Type of protection against electric shock Class-I equipment ● Degree of protection against electric Device with B-type attachment shock section (forehead pad, chinrest) -
Page 62: Lan Communication Format
8.8 LAN Communication Format Data (Character code: ASCII) Contents Details Unit maximum Tag Name Description number of characters [POWER_R] S, C, A Value of SPH value Signed decimal Right eye (-30.00 to +25.00) When 2 digit is 0, blank is filled up by changing field position. -
Page 63: Declaration Of Conformity To Emc
MR-6000 if the equipment is located closer. Do not use the MR-6000 adjacent to or stacked on other equipment. If it needs to be adjacent to or placed on other equipment, it must be confirmed that MR-6000 operates correctly in such location. - Page 64 <EMISSIONS> Compliance Test Standard HOME HEALTHCARE ENVIRONMENT Conducted Emissions CISPR 11 Group 1 Class B Radiated Emissions CISPR 11 Group 1 Class B Harmonic distortion IEC 61000-3-2 Harmonic Class A Voltage fluctuations and IEC 61000-3-3 Complies flicker <IMMUNITY> Table 1【ENCLOSURE PORT】 IMMUNITY TEST LEVELS Test Standard...
- Page 65 Table 2【Test specifications for ENCLOSURE PORT IMMUNITY to RF wireless communications equipment】 Test Maximum IMMUNITY Band Distance frequency Service Modulation power TEST LEVEL (MHz) (MHz) (V / m) Pulse 380 - 390 TETRA 400 modulation 18Hz GMRS 460, 430 - 470 土5kHz deviation 。...
- Page 66 Table 3【Input a.c. power PORT】 IMMUNITY TEST LEVELS Test Standard HOME HEALTHCARE ENVIRONMENT Electrical fast IEC 61000-4-4 土 2kV transients / bursts 100kHz repetition frequency Surges IEC 61000-4-5 土0.5 kV,土1 kV Line-to-line Surges IEC 61000-4-5 土0.5 kV,土1kV,土2kV Line-to-ground Conducted IEC 61000-4-6 disturbances induced 0.15MHz - 80MHz by RF fields...
- Page 67 This page is intentionally left blank. ■...
- Page 69 Fax: +81 52-561-4735 EC-Representative Tomey GmbH Wiesbadener Straße 21 90427 Nürnberg, Germany Tel: +49 911-9385462-0 Fax: +49 911-9385462-20 AUTHORIZED TOMEY SERVICE CENTERS Headquarters, Pacific Rim Tomey Corporation 2-11-33 Noritakeshinmachi Nishi-ku, Nagoya 451-0051 JAPAN Tel: +81 52-581-5327 Fax: +81 52-561-4735 Europe Tomey GmbH Wiesbadener Straße 21...
- Page 70 0120...
Need help?
Do you have a question about the MR-6000 and is the answer not in the manual?
Questions and answers