Riello DB 4 SM CO1 A0 FS1 T150 Installation, Use And Maintenance Instructions
Industrial gas burners
Hide thumbs
Also See for DB 4 SM CO1 A0 FS1 T150:
- Installation, use and maintenance instructions (60 pages) ,
- Installation, use and maintenance instructions (44 pages)
Table of Contents
Advertisement
Available languages
Available languages
Quick Links
Istruzioni per installazione, uso e manutenzione
Installation, use and maintenance instructions
安装、使用以及维护说明书
Bruciatori industriali di gas
I
Industrial gas burners
GB
强制通风燃气燃烧器
CN
Funzionamento bistadio progressivo o modulante
Progressive two-stage or modulating operation
平滑二段火运行或比例调节
CODICE - CODE - 代码
20080068
20075270
MODELLO - MODEL - 型号
DB 4 SM CO1 A0 FS1 T150
DB 6 SM CO1 A0 FS1 T150
TIPO - TYPE - 类型
80068X
75270X
20075535 (2) - 10/2013
Advertisement
Chapters
Table of Contents

Subscribe to Our Youtube Channel
Related Manuals for Riello DB 4 SM CO1 A0 FS1 T150


Summary of Contents for Riello DB 4 SM CO1 A0 FS1 T150
- Page 1 Progressive two-stage or modulating operation 平滑二段火运行或比例调节 CODICE - CODE - 代码 MODELLO - MODEL - 型号 TIPO - TYPE - 类型 20080068 DB 4 SM CO1 A0 FS1 T150 80068X 20075270 DB 6 SM CO1 A0 FS1 T150 75270X 20075535 (2) - 10/2013...
- Page 3 Avvertenze generali Informazioni sul manuale Questo manuale costituisce parte integrante del prodotto e non va da esso separato. Leggerlo attentamente in quanto fornisce importanti indicazioni riguardanti l'installazione, l'uso e la manutenzione del bruciatore; conservarlo con cura per ogni ulteriore consultazione. Destinatari Questo manuale è...
-
Page 4: Table Of Contents
Indice CAPITOLO Introduzione ....pagina 3 Descrizione codice di selezione ....3 Specifica del tipo e codifica bruciatori . -
Page 5: Introduzione
Introduzione Descrizione codice di selezione Specifica del tipo e codifica bruciatori TIPO CODICE M CO DB 6 TC A-0 DB 4 SM CO1 TC 20080068 Alimentazione aria DB 6 SM CO1 TC 20075270 comburente A-0 = dal basso A-90 = da destra A-180 = dall’alto A-270 = da sinistra Testa... -
Page 6: Descrizione Del Bruciatore
Descrizione del bruciatore Dati tecnici Modello DB 4 SM CO1 A0 DB 6 SM CO1 A0 Tipo 80068X 75270X Capacità Min./Max. gas naturale [kW] 1200/3000 ÷ 5000 1400 ÷ 7800 Regolazione potenza Modulante Combustibile Gas naturale (G 20) - PCI 10 Gas naturale (G 25) - PCI 8,6 kWh/Nm Temperatura aria comburente Max. -
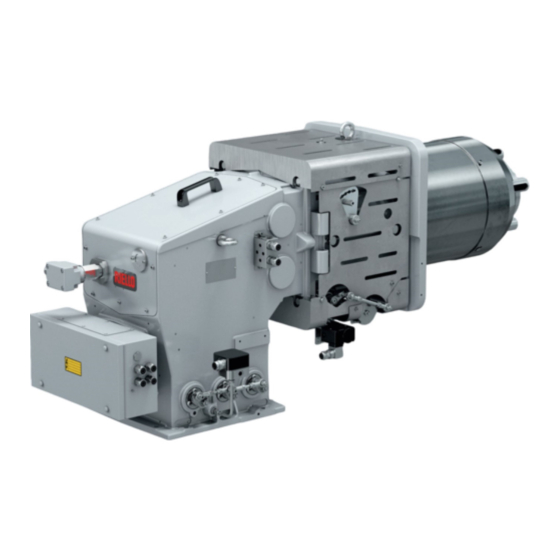
Page 7: Componenti Del Bruciatore
CAPITOLO Descrizione del bruciatore Componenti del bruciatore 20076243 Fig. 2 Legenda 12 Pressostato aria Cassa d’aria 13 Pressostato gas di massima con presa di pressione Coperchio 14 Flangia attacco gas Servomotore 15 Otturatore Cassetta con morsettiera per collegamenti elettrici 16 Leva per movimento testa di combustione Flangia di attacco alla caldaia 17 Leva comando serrande aria Testa di combustione... -
Page 8: Dimensioni Di Ingombro
CAPITOLO Descrizione del bruciatore Dimensioni di ingombro 20076244 Fig. 3 DB 4 1550 1024 ø 312 DB 6 1518 1024 ø 363 DIMENSIONI FLANGE DB4 SM Collegamento canale aria Fissaggio alla caldaia Alimentazione gas 3 5 0 6 5 , 5 D7549 1 4 5 4 5 3... - Page 9 CAPITOLO Descrizione del bruciatore DIMENSIONI FLANGE DB6 SM Collegamento canale aria Fissaggio alla caldaia Alimentazione gas 3 8 0 1 6 0 D7549 4 9 5 DN 80 D8325 D3974 Fig. 8 Fig. 9 Fig. 7...
-
Page 10: Perdite Di Carico Lato Aria
CAPITOLO Descrizione del bruciatore Perdite di carico lato aria (rilevata a monte serranda con apertura completa) D12215 3000 4000 5000 6000 7000 8000 Potenza bruciatore Pb [kW] Fig. 10 Le curve di pressione si riferiscono alle condizioni di regolazione della testa di combustione secondo grafico di pag. 13. Vedere Paragrafo 5.1. -
Page 11: Perdite Di Carico Lato Gas
CAPITOLO Descrizione del bruciatore Perdite di carico lato gas La pressione del gas in funzio- Perdite testa di combustione D7541 ne della potenza massima svi- luppata dal bruciatore è data dalle curve di Fig. 11. Rappresenta la perdita di carico della testa di combustione. -
Page 12: Installazione
Installazione Rimozione viti di blocco dell’otturatore Prima di montare il bruciatore sulla caldaia rimuovere le viti e i dadi 1)- 2)(Fig. 13). Sostituirli con le viti 3) M12x16 fornite a corredo. Lunghezza boccaglio La lunghezza del boccaglio va scelta secondo le indicazioni del costrut- D12015 tore della caldaia e, in ogni caso, deve essere maggiore dello spessore della porta della caldaia, completa di refrattario. -
Page 13: Alimentazione Al Bruciatore
Alimentazione al bruciatore Schema generale di alimentazione gas (esempio) D7543 max. 500 mbar 0,5 ÷ 4 bar Fig. 16 Legenda Giunto antivibrante PGm Pressostato gas di minima Filtro gas Farfalla gas HPG Regolatore alta pressione gas Valvola limitatrice di pressione con scarico in atmosfera Regolatore bassa pressione gas Ventilatore Manometro... -
Page 14: Collegamenti Elettrici
CAPITOLO Alimentazione al bruciatore Collegamenti elettrici D9854 Fig. 17 Morsettiera bruciatore Pressostato aria PGM Pressostato gas di massima Servomotore Fotocellula UV Trasformatore di accensione Terra bruciatore... -
Page 15: Preparazione All'avviamento
Preparazione all’avviamento Regolazione della testa di combustione Allentare la vite 1) e ruotare il settore graduato 2) in funzione del diagramma Fig. 19. Il sistema permette una regolazione ottimale anche al minimo del campo di lavoro. È possibile variare l’apertura della testa di combustione spostando la leva sui fori da 0 a 6, Fig. -
Page 16: Posizione Elettrodi
CAPITOLO Preparazione all’avviamento Posizione elettrodi Controllare che la sonda e l’elettrodo siano posizionati come in Fig. 20. 20076847 Fig. 20... -
Page 17: Regolazione Servomotore
CAPITOLO Preparazione all’avviamento Regolazione servomotore 1 - 4 : Camma di fine corsa (max apertura serranda aria) : Camma di fine corsa (chiusura serranda aria) 3 - 5 : Camma di posizione portata minima (e di accensione) : Indice di lettura posizionamento : Sblocco servomotore Il servomotore regola contemporaneamente, tramite rinvii, portata e pressione dell’aria, e portata del combustibile in uso. - Page 18 CAPITOLO Preparazione all’avviamento Procedura per la taratura del bruciatore • Portare il commutatore AUTO / MAN, posto sul pannello di controllo, nella posizione MAN (manuale). • Accendere il bruciatore. Se l’accensione non avviene può essere che il gas non arrivi alla testa di combustione entro il tempo di sicurezza di 3 s. Aumentare allora la portata di gas all’accensione.
-
Page 19: Taratura Dei Pressostati
CAPITOLO Preparazione all’avviamento Taratura dei pressostati Pressostato aria Eseguire la regolazione del pressostato aria dopo aver effettuato tutte le altre regolazioni del bruciatore con il pressostato aria regolato a inizio scala (Fig. 23). Con il bruciatore funzionante alla potenza MAX aumentare la pressione di regolazione girando lentamente in senso orario l'apposita manopolina fino al blocco del bruciatore. -
Page 20: Controllo Presenza Fiamma
CAPITOLO Preparazione all’avviamento Controllo presenza fiamma La corrente minima per un corretto funzionamento è di 70 µA. Se il valore è inferiore può dipendere da: • cellula esaurita; • tensione bassa (inferiore a 187 V); • cattiva regolazione del bruciatore. Per la misura usare un microamperometro da 100 D1143 µA c.c., collegato in serie alla cellula, secondo lo... -
Page 21: Manutenzione
Manutenzione Problemi e procedure di risoluzione Quando si verifica un malfunzionamento del bruciatore occorre prima di tutto: controllare che i collegamenti elettrici siano stati eseguiti correttamente; accertarsi che vi sia la disponibilità della portata di combustibili; controllare che tutti i parametri di regolazione (per es. temperatura acqua caldaia o pressione vapore caldaia) siano tarati cor- rettamente. - Page 22 CAPITOLO Manutenzione Inconveniente Causa probabile Rimedio consigliato Il bruciatore continua a ripetere il • La pressione del gas in rete è vicina al valore ..Ridurre la pressione d’intervento del ciclo di avviamento senza sul quale è regolato il pressostato gas di min..pressostato gas di min. blocco Il calo di pressione repentino che segue.
- Page 23 General warnings Informations about the This handbook is a supplement to the burner and must always be kept handbook with it. It should be read carefully as it supplies important information for installation, use and maintenance; it should be kept in a safe place for future consultation.
- Page 24 Index CHAPTER Introduction ..... page 3 Selection code description ..... . 3 Specification of the burner type and coding .
- Page 25 Introduction Selection code description Specification of the burner type and coding TYPE CODE DB 6 TC A-0 DB 4 SM CO1 TC 20080068 Combustive air DB 6 SM CO1 TC 20075270 supply A-0 = from below A-90 = from the right A-180 = from above A-270 = from the left Combustion head...
- Page 26 Burner description Technical data Model DB 4 SM CO1 A0 DB 6 SM CO1 A0 Type 80068X 75270X Capacity Min./Max. natural gas [kW] 1200/3000 ÷ 5000 1400 ÷ 7800 Output adjustment Modulante Fuel Natural gas (G 20) - Net calorific value 10 kWh/Nm Natural gas (G 25) - Net calorific value 8.6 kWh/Nm Combustive air temperature Max.
- Page 27 Burner description CHAPTER Burner components 20076243 Fig. 2 14 Gas connection flange Air box 15 Shutter Cover 16 Lever for moving combustion head Servomotor 17 Air damper command lever Control box base for electrical connections 18 Gas butterfly valve command lever Boiler attachment flange 19 Variable profile cam Combustion head...
- Page 28 CHAPTER Burner description Overall dimensions 20076244 Fig. 3 DB 4 1550 1024 ø 312 DB 6 1518 1024 ø 363 FLANGE DIMENSIONS DB4 SM Air duct connection Fixing to the boiler Gas supply 3 5 0 6 5 , 5 D7549 1 4 5 4 5 3...
- Page 29 CHAPTER Burner description FLANGE DIMENSIONS DB6 SM Air duct connection Fixing to the boiler Gas supply 3 8 0 1 6 0 D7549 4 9 5 DN 80 D8325 D3974 Fig. 8 Fig. 9 Fig. 7...
- Page 30 CHAPTER Burner description Air side pressure drop (taken upstream from the completely open air damper) D12215 3000 4000 5000 6000 7000 8000 Burner output Pb [kW] Fig. 10 The pressure curves refer to the different adjustment conditions for the combustion head in accordance to the graphic on page 13. Refer to Paragraph 5.1.
- Page 31 CHAPTER Burner description Gas side pressure drop Gas pressure on the basis of Head pressure drop D7541 the maximum output developed by the burner is given by the curves in Fig. 11. It represents the pressure drop in the combustion head. Natural gas G 20 - Net calorific value = 10 kWh/Nm mbar...
- Page 32 Installation Removal of the locking screws from the shutter Remove the screws and the nuts 1) and 2)(Fig. 13), before installing the burner on the boiler. Replace them with the screws 3) M12x16 supplied with the burner. Blast tube length D12015 The length of the blast tube must be selected according to the indications provided by the manufacturer of the boiler, and in any case it must be...
- Page 33 Fuel supply General gas supply layout (example) D7543 max. 500 mbar 0.5 ÷ 4 bar Fig. 16 Anti-vibration joint PGm Minimum gas pressure switch Gas filter Gas butterfly valve HPG High gas pressure regulator Pressure limiting valve with outlet into the environment Low gas pressure regulator Pressure gauge Leak detection control device...
- Page 34 CHAPTER Fuel supply Wiring diagrams D9854 Fig. 17 Burner terminal strip Air pressure switch PGM Maximum gas pressure switch Servomotor UV Cell Ignition transformer Burner earth...
- Page 35 Preparation for start up Combustion head setting Loosen the screw 1) and turn the graduated sector 2) according dia- grams Fig. 19. The system allows an optimal setting even at a minimum firing rate. Combustion head opening can be varied by moving the lever onto holes from 0 to 6, Fig.
- Page 36 CHAPTER Preparation for start up Position of electrodes Make sure that the electrode and the probe are positioned as shown in Fig. 20. 20076847 Fig. 20...
- Page 37 CHAPTER Preparation for start up Servomotor adjustment 1 - 4 : Limit switch cam (max. air damper opening) : Limit switch cam (air damper closed) 3 - 5 : Minimum delivery (and ignition) position cam : Positioning reading indicator : Servomotor release The servomotor contemporarily regulates, by transmission, air delivery and pressure and delivery of the fuel being used.
- Page 38 CHAPTER Preparation for start up Procedures for setting the burner • Turn the AUTO / MAN selection switch on the control panel to MAN (manual). • Turn the burner on. If it does not ignite, it could mean that the gas does not reach the combustion head within the safety time period of 3 s. In this case increase the ignition gas delivery level.
- Page 39 CHAPTER Preparation for start up Pressure switches setting Air pressure switch Adjust the air pressure switch after having performed all other burner adjustments with the air pressure switch set to the start of the scale (Fig. 23). With the burner operating at max. output, increase adjustment pressure by slowly turning the relative knob clockwise until the burner locks out.
- Page 40 CHAPTER Preparation for start up Flame present check Minimum current for correct working is 70 µA. If the value is lower, it could be due to: • exhausted photocell; • low current (lower than 187 V); • bad regulation of the burner. In order to measure the current, use a microammeter of 100 A c.c., connected in series to the photocell, as in the scheme, with a capacitor of 100 F - 1V c.c.
- Page 41 Maintenance Problems and remedies If the burner does not work properly, first you must: check that the electric connections have been correctly performed; ensure that the fuel is delivered correctly; check that all the adjustment parameters (e.g. boiler water temperature or boiler steam pressure) are correctly set. In the event of a burner lockout, more than two consecutive burner reset operations could cause damage to the installation.
- Page 42 CHAPTER Maintenance Fault Possible cause Recommended remedy The burner repeats the starting • Mains gas pressure is near the value to which ..Reduce operating pressure cycle without lock out the min. gas pressure switch gas is adjusted..of minimum gas pressure switch. The repeated drop in pressure which follows .
- Page 43 一般提示 关于本手册 本手册随燃烧器附带提供并且不允许与燃烧器分离,安装、使 用和维护燃烧器前须认真阅读,并妥善保管以备查阅。 手册使用者 本手册给具有燃油及燃气燃烧器工作经验的有关人员提供。 本手册包括下列相关信息: - 安装; - 使用; - 维护; - 安全注意事项。 本手册的使用人员必须具有操作这类燃烧器的资质及丰富的现 场工作经验。 相关文件 - 燃气阀组 - 控制面板接线图 - 出力调节器 ( 比例调节 )
- Page 44 目录 第 章简介 ... . 页码 命名规则说明 ......3 燃烧器型号及编码.
-
Page 45: 命名规则说明
简介 命名规则说明 燃烧器型号及编码 型号 编码 DB 6 TC A-0 DB 4 SM CO1 TC 20080068 DB 6 SM CO1 TC 20075270 助燃空气供应方向 A-0 = 从底部 A-90 = 从右侧 A-180 = 从上部 A-270 = 从左侧 燃烧头 TC = 标准燃烧头 TL = 加长燃烧头 TXL = 特殊燃烧头... -
Page 46: 技术数据
技术数据 技术数据 型号 DB 4 SM CO1 A0 DB 6 SM CO1 A0 类型 80068X 75270X 出力大小 天然气 [kW] (最小 / 最 1200/3000 ÷ 5000 1400 ÷ 7800 大) 调节方式 比例调节 燃料 天然气 (G 20) - 净热值 10 kWh/Nm 天然气 (G 25) - 净热值 8.6 kWh/Nm 助燃空气温度... -
Page 47: 燃烧器部件
第 章 燃烧器描述 燃烧器部件 20076243 图 2 图例 13 带压力测试点的最大燃气压力开关 空气室 14 燃气管路连接法兰 盖板 15 调节内筒 伺服电机 16 燃烧头调节杆 控制盘接线底座 17 风挡调节控制杆 锅炉连接法兰 18 燃气蝶阀控制杆 燃烧头 19 可变外形凸轮 燃烧头燃气压力测试点 20 燃烧头压力测试点 点火电极 21 设备运输过程中的调节风筒锁定螺丝(将其更换为随燃烧 风道连接法兰 器附带的螺丝 M12x16). 10 火焰检查窗 11 UV 电眼 12 空气压力开关... -
Page 48: 外观尺寸
第 章 燃烧器描述 外观尺寸 20076244 图 3 DB 4 1550 1024 ø 312 DB 6 1518 1024 ø 363 法兰尺寸 DB4 SM 风道连接法兰 锅炉连接法兰 燃气管路连接法兰 3 5 0 6 5 , 5 D7549 1 4 5 4 5 3 1 8 5 D7884 D7885 图... - Page 49 第 章 燃烧器描述 法兰尺寸 DB6 SM 风道连接法兰 锅炉连接法兰 燃气管路连接法兰 3 8 0 1 6 0 D7549 4 9 5 DN 80 D8325 D3974 图 8 图 9 图 7...
- Page 50 第 章 燃烧器描述 空气侧的压力降 ( 在上游风档完全开启的情况下 ) D12215 3000 4000 5000 6000 7000 8000 燃烧器出力 Pb [kW] 图 10 根据第 13 页之表格,上图压力曲线分别对应燃烧头的不同调节状况。参见 5.1。 若空气温度高于 20°C 且 / 或海拔高度高于 100 m. a.s.l. 时,实际的压力降为上图中所示的燃烧头处的压力降乘以由下表中查出的 修正系数 K 得出。 海拔高度 空气温度 °C m. a.s.l. 0.920 0.988 1.021...
-
Page 51: 燃气侧的压力降
第 章 燃烧器描述 燃气侧的压力降 燃烧器最大出力时,其燃气压力 燃烧头压力降 D7541 为图 11 中曲线给出。 该曲线代表了燃烧头的压力降。 天然气 G 20 - 净热值 = 10 kWh/Nm 该曲线在以下条件下得出: 燃气蝶阀下游的压力开关的 mbar 压力测试点处的压力; 燃烧室背压为 0 mbar ; • 燃烧器运行在最大出力。 燃气蝶阀全开时的压力降如图 12。 Pb ( 燃烧器出力 ) [kW] 图 11 燃气蝶阀压力降 D8328 mbar 1000 2000... -
Page 52: 从调节筒上拆下锁紧螺栓
安装 从调节筒上拆下锁紧螺栓 图 在安装燃烧器到锅炉上之前,先拆下螺栓和螺母 1) 和 2)( 。用随 燃烧器供应的螺栓 3) M12x16 代替它们拧在原来的位置上。 燃烧筒长度 燃烧筒的长度必须根据锅炉制造商提供的说明书来选择,任何情况下,燃 D12015 烧筒长度都必须大于锅炉炉门加装炉衬后的总厚度。对于装有前烟箱 1) 或 中心回焰式锅炉,必须在锅炉炉衬 2) 与燃烧头 4) 间插入由耐火材料制成 的防护炉衬 5)。 但此防护炉衬不能影响燃烧筒的拆卸。如果锅炉有前水冷 图 13 壁,则不需要耐火炉衬 2)-5)( 图 14),除非锅炉制造商明确要求这样做。 耐火材料 R E FR ATTAR IO 左图表示如何将燃烧器安装到不带前水冷壁的锅炉上。燃烧头超过锅炉前 墙不要大于 200 mm。 在任何情况下,带炉衬的锅炉前墙均不能超过燃烧头的末端。... -
Page 53: 燃气总供给示意图 ( 举例 )
燃料供应 燃气总供给示意图 ( 举例 ) D7543 最大 500 mbar 0.5 ÷ 4 bar 图 16 图例 减震接头 PGm 最低燃气压力开关 燃气过滤器 燃气蝶阀 HPG 高压燃气调节器 带释放口的燃气压力限制阀 低压燃气调节器 风机 压力表 气体泄漏检测控制装置 最低空气压力开关 燃气压力调节电磁阀 PGM 最高燃气压力开关 燃气安全电磁阀... -
Page 54: 电气接线图
第 章 燃料供应 电气接线图 D9854 图 17 燃烧器接线端子 空气压力开关 PGM 最高燃气压力开关 伺服电机 UV 电眼 点火变压器 燃烧器接地... - Page 55 启动前的准备 燃烧头设置 如图 19 所示,松开螺钉 1) 并旋转有刻度的部分 2)。 可对该系统进行优化设置,即使在燃烧率最小时也不例外。 可以通过将杆移动到孔 0 至 6 ( 图 18) 改变燃烧头的开度。 根据图表 ( 图 19) 按照所需的最大输出功率来确定所要选择使用的 孔 (0 至 6)。出厂前预设定在最大功率位置 ( 孔 6)。当锅炉背压较 高时,如果在风门挡板全开状态下,送气量仍不足的话,可使用不同 于图表 ( 图 19) 所示的设置, 移动拉杆到数值更大的下一个支点孔, 这样可以增加燃烧头的开启程度,从而增加送气量。 D8299 图 18 孔...
-
Page 56: 电极位置
第 章 启动前准 电极位置 认电极及探针位置如图 20. 所示。 . 20076847 图 20... -
Page 57: 调整伺服马达
第 章 启动前准 调整伺服马达 : 凸轮限制开关 ( 风门挡板全开 ) 1 - 4 : 凸轮限制开关 ( 风门挡板全关 ) : 最小出力 ( 和点火 ) 位置凸轮 3 - 5 : 凸轮位置指示器 : 伺服马达离合器 伺服马达可通过传动装置同时调节风量、风压以及所用燃料的流量。 伺服马达的可调整凸轮的编号与其选择开关的编号相同。 D1500 凸轮 位置 1: 伺服马达全开限制位置。 凸轮 位置 2: 伺服马达限位开关... - Page 58 第 章 启动前准 燃烧器调试步骤 将控制面板上的自动 / 手动选择开关置于 MAN ( 手动 ) 处。 启动燃烧器。 如果点火不成功,则说明燃气没有在 3 秒的安全时间内到达燃烧头。此时,可增加燃气的流量。若此时燃烧器点火成功,就可以对 其进行完整的设置和调整。 最大出力 燃烧器的最大出力必须在图 1 所示的出力范围内。 最大燃气量的调节 逐渐增大燃烧器的出力,同时检查不要超过最大燃气输送量,将伺服马达设置为 130° 且将空气凸轮调至最大位置。此时,将燃气 蝶阀全开 (90°),同时调节压力调节器,或调节燃气凸轮上的调节螺栓 (2) 图 22 和 / 或燃气阀组上的调节阀,使燃气量达到所需 的最大值。 最大风量的调节 通过调节螺栓 (2) 图 22,调整空气凸轮的最终轮廓线。请勿仅调节一个螺栓,需要调节与该螺栓相邻的螺栓,以达到凸轮曲线的 平滑。 最小出力...
- Page 59 第 章 启动前准 压力开关设定 空气压力开关 在风压开关设定在刻度盘起始位置下 (图 23)完成燃烧器调试的所有工作后,调节空气 压力开关。 使燃烧器处于最大出力运行,顺时针缓慢旋转压力调节旋钮,增加空气压力开关的数值至 燃烧器锁定。然后逆时针旋转旋钮设置值的 20% ,重新启动燃烧器以确燃烧器正常启 动。 如果燃烧器再次锁定,将旋钮向逆时针方向再调节一些。 注意 : 规则规定, 空气压力开关必须起到将烟气中 CO 的排放量限制在 1% (10.000 ppm) 以内的作用。为此需在烟道内安装烟气分析仪以进行检测,缓慢关小风机进风口 ( 如使 D2215 用纸板将风机入口挡住 ),然后检查燃烧器是否在烟气中 CO 排放浓度超过 1% 前锁定。 图 23 最高燃气压力开关 在最高燃气压力开关设定在刻度盘末端位置下 (图 24)完成燃烧器调试的所有工作后, 调节最高燃气压力开关。...
-
Page 60: 定期检查
第 章 启动前准 火焰检查 正常运行时的最小感应电流为 70 µA。 如果低于此数值,则有可能为: 电眼失效; 低电压 ( 低于 187 V) ; 燃烧器调试不正确。 为了测量电流,应在电眼的检测回路中串联一量程为 100 A c.c. 的微安计,如图所示,应在装置的同一位置安装 100 F - 1V c.c. 的电容器。 D1143 图 26 定期检查 建议进行如下检查: 月检项目 1 检查火焰检测装置,保证其未被损坏及保持清洁。 2 检查点火装置,如需要可进行清洁。 3 检查燃料及空气的压力是否正确。 4 检查风门挡板及设置及运行是否正确,同时检查提升组件。... - Page 61 维护 故障及其解决方案 如果燃烧器不能正常工作,首先要做如下检查: 检查电气连接是否正确; 确保燃料输送正确; 检查所有调整参数 ( 如锅炉内水温或锅炉压力 ) 设置是否正确。 在燃烧器锁定的情况下,连续进行两次以上燃烧器复位操作会导致设备损坏。 第三次锁定时,请联系售后服务部门。 如果出现更多锁定或燃烧器故障,只能由具备相应资格且经过授权的人员来维修,并且要遵循本手册的指示和遵守 警告 现行的法律法规。 建议解决方案 故障 可能的原因 燃烧器不能启动 • 无电源 ....闭合所有开关 - 检查电气连接 •...
- Page 62 第 章 维护 建议解决方案 故障 可能的原因 燃烧器反复重新启动不锁定 供气管道中燃气压力非常接近于最低燃气 ..减少最低燃气压力开关设置值 压力开关的设置值。在阀门打开后的压力 或更换燃气过滤器。 突然减小导致压力开关断开,阀门立即关 闭,燃烧器停机。压力再次提高,压力开 关再次闭合,并且重复进行点火周期。 • 压力开关故障 ....更换 运行期间锁定停机 •...
- Page 64 RIELLO S.p.A. I-37045 Legnago (VR) Tel.: +39.0442.630111 http:// www.riello.it http:// www.rielloburners.com Con riserva di modifiche - Subject to modifications - 修订版...
Need help?
Do you have a question about the DB 4 SM CO1 A0 FS1 T150 and is the answer not in the manual?
Questions and answers