TP-Link DeltaStream DS-P7001-08 Installation Manual
Gpon optical line terminal
Hide thumbs
Also See for DeltaStream DS-P7001-08:
- Installation manual (36 pages) ,
- Installation manual (24 pages)
Table of Contents
Advertisement
Advertisement
Table of Contents

Related Manuals for TP-Link DeltaStream DS-P7001-08


Summary of Contents for TP-Link DeltaStream DS-P7001-08
- Page 1 Installation Guide DeltaStream GPON Optical Line Terminal...
- Page 2 Remind to take notice. The note contains the helpful information for a better use of the product. Related Document The related documents of the product are provided on Download Center. To obtain the latest product information, visit the official website: https://www.tp-link.com.
-
Page 3: Table Of Contents
Contents Chapter 1 Introduction ——————————— 2 Product Overview ............2 Appearance ...............3 Chapter 2 Installation ——————————— 6 Package Contents ............6 Safety Precautions ............6 Installation Tools ..............8 Product Installation ............8 Chapter 3 Connection ——————————— 10 Port Connection ..............10 Verify Installation .............11 Power On ................11 Initialization ................13 Chapter 4 Configuration ——————————... -
Page 4: Introduction
DeltaStream GPON Optical Line Terminal Chapter 1 Introduction Product Overview TP-Link GPON OLT (Optical Line Terminal) products are designed to provide business-class solutions for ISP’s access networks, and they are scalable and reliable for deploying services to meet various demands of ISP’s customers. -
Page 5: Appearance
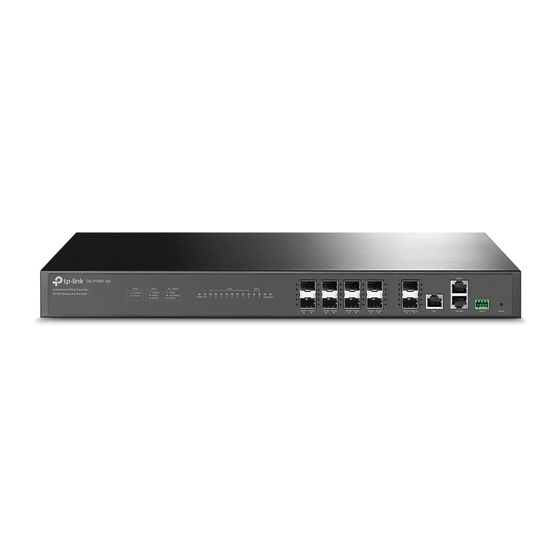
DeltaStream GPON Optical Line Terminal Appearance Front Panel ■ The front panel of DS-P7001-08 is shown as the following figure. The figure is for demonstration purposes only. Your device may differ in appearance from the depicted. Reset LEDs MGMT SFP+ Console Alarm The front panel of... - Page 6 DeltaStream GPON Optical Line Terminal LEDs Indication On: The device is powered on. Off: The device is powered off or power supply is abnormal. Flashing: Power supply is abnormal. On: The device works properly. Off: The device works improperly. Flashing Slowly and Then Quickly: The reset button is pressed and held and then the device is reset to the default settings.
- Page 7 PE (Protecting Earth) cable of AC cord or with Ground Cable. For detailed lightning protection measures, refer to the Lightning Protection Guide from the website: https://www.tp-link.com/us/configuration-guides/lightning_protection_guide/. Kensington Security Slot Secure the lock (not provided) into the security slot to prevent the device from being stolen.
-
Page 8: Chapter 2 Installation
DeltaStream GPON Optical Line Terminal Chapter 2 Installation Package Contents Make sure that the package contains the following items. Please contact your distributor, if any of the listed items is damaged or missing. The figures are for demonstration only. The actual items may differ in appearance and quantity from the depicted. - Page 9 DeltaStream GPON Optical Line Terminal Keep the equipment room at an appropriate level of temperature and humidity. Too much or too little humidity may lead to bad insulation, leakage of electricity, mechanical property changes, and corrosion. High temperatures may accelerate aging of the insulation materials, significantly shortening the service life of the device.
-
Page 10: Installation Tools
■ Note: For detailed lightning protection measures, refer to the Lightning Protection Guide from the website: https://www.tp-link.com/us/configuration-guides/lightning_protection_guide/. Installation Site When installing the device on a rack or a flat workbench, attach much importance to the following items: The rack or workbench is flat, stable, and sturdy enough to support the weight of 5.5 kg at least. - Page 11 DeltaStream GPON Optical Line Terminal Rack Caution: Leave 5 to 10 cm gaps around the devices for air circulation. ■ Avoid placing heavy things on the device. ■ Place the device with its bottom facing downwards. ■ Mount devices in sequence from the bottom to top of the rack and ensure a certain clearance ■...
-
Page 12: Chapter 3 Connection
DeltaStream GPON Optical Line Terminal Chapter 3 Connection Port Connection Connect the ports of OLT to the devices and networks according to your needs. Some options for port connection are demonstrated in the following figure. We take DS-P7001-08 as an example of OLT devices. -
Page 13: Verify Installation
DeltaStream GPON Optical Line Terminal Verify Installation After completing the installation, verify the following items: There should be 5 to 10 cm of clearance around the device for ventilation and make sure the air flow ■ is adequate. The voltage of the power supply meets the requirement of the input voltage of the device. ■... - Page 14 DeltaStream GPON Optical Line Terminal and negative poles of the device, and that the power supply meets the requirement of the input. An all-pole mains switch in accordance with EN 62368-1 2014 Annex L shall be incorporated in the electrical installation of the building. And the disconnect device shall have a contact separation at least 1.5mm.
-
Page 15: Initialization
DeltaStream GPON Optical Line Terminal Grounding Terminal Equipotential Bonding Cable Ground Cable (18-14 AWG) Grounding Bar Caution: The product can be powered by a DC power source such as accumulator cell and a power ■ supply server. The DC power supply should comply with EN 62368-1 2014 clause 5.4.2.3.2.3, and the transient voltage shall be no more than 2500 V peak For DC power supply, please note that the power wires and disconnecting device are not... -
Page 16: Chapter 4 Configuration
DeltaStream GPON Optical Line Terminal Chapter 4 Configuration The device supports three configuration options: Via the MGMT Port ■ Via the SFP+/GE Port ■ Via the Console Port ■ Note: For the detailed configurations, refer to the User Guide of the device. We take DS-P7001-08 as an example of OLT devices in the following figures. -
Page 17: Via The Console Port
DeltaStream GPON Optical Line Terminal 2. Set the IP address of the PC as 192.168.0.x/24 (x is a number between 2 and 254). 3. You can access the device using the Web UI or the CLI. Using the Web UI: Open the web browser on the PC. Enter 192.168.0.1 in the address bar to open ■... -
Page 18: Appendix A Troubleshooting
Appendix A Troubleshooting Q1. What could I do if I forgot the username and password of the device? You can reset the device by holding the reset button for more than 5 seconds. Note that all the configurations will be lost after resetting the device. Q2. -
Page 19: Appendix B Specifications
Appendix B Specifications Item Content IEEE 802.3, IEEE 802.3i, IEEE 802.3u, IEEE 802.3ab, IEEE 802.3ad, Standards IEEE 802.3ae, IEEE 802.3z, IEEE 802.3x, IEEE 802.1p, IEEE 802.1q, IEEE 802.1d, IEEE 802.1s, IEEE 802.1w, IEEE 802.1ah, ITU G.984, ITU G.988 10BASE-T: UTP category 3 or above cable (maximum 100 m), EIA/TIA-568 100Ω STP (maximum 100 m) 100BASE-TX: UTP category 5 or above cable (maximum 100 m), EIA/TIA- 568 100Ω... - Page 20 The original EU Declaration of Conformity may be found at https://www.tp-link.com/en/support/ce/ UK Declaration of Conformity TP-Link hereby declares that the device is in compliance with the essential requirements and other relevant provisions of the Electromagnetic Compatibility Regulations 2016 and Electrical Equipment (Safety) Regulations 2016.
Need help?
Do you have a question about the DeltaStream DS-P7001-08 and is the answer not in the manual?
Questions and answers