Table of Contents
Advertisement
Quick Links
Reference Manual
Business Computer
VPC-3100-G Series
CONTENTS
Introduction .................................................................. 5
Safety Precautions .................................................... 11
Product Nomenclature and Function ............... 17
Hardware Setup ........................................................ 32
BIOS Set up ................................................................. 44
Software RAID Setup ............................................... 70
Hardware RAID Setup ............................................. 84
Appendix ................................................................... 100
Replacement Parts for Maintenance .............. 110
Customer Support and Inquiry ......................... 112
Advertisement
Table of Contents
Troubleshooting

Related Manuals for Contec VPC-3100-G Series


Summary of Contents for Contec VPC-3100-G Series
- Page 1 Reference Manual Business Computer VPC-3100-G Series CONTENTS Introduction ..............5 Safety Precautions ............ 11 Product Nomenclature and Function ....17 Hardware Setup ............32 BIOS Set up ..............44 Software RAID Setup ..........70 Hardware RAID Setup ..........84 Appendix ..............100 Replacement Parts for Maintenance ....
-
Page 2: Table Of Contents
Table of Contents Introduction ............... 5 1. Related Manuals ..............................6 2. About the Product ..............................7 3. Features ..................................8 4. Supported OS................................9 5. Product Configuration List ..........................10 Safety Precautions ............11 1. Safety Information............................... 12 2. Handling Precautions ............................13 1. - Page 3 Table of Contents 2. Setting the Expansion Card ........................36 3. Setting the Storage ............................37 4. Replacing the Fan Filter ..........................39 5. Replacing the Front Fan ..........................40 6. Setting the Brackets ............................. 41 7. Installation Requirements .......................... 42 BIOS Set up ...............
- Page 4 Table of Contents 3. Exiting Rapid Storage Technology ......................79 4. Rebuilding Mirroring ........................... 80 5. For the Error ..............................81 6. Confirming the Error Log ........................... 82 7. RAID Setup When Replacing the Storage (OS) ................. 83 Hardware RAID Setup ............. 84 1.
-
Page 5: Introduction
Introduction This section provides necessary information of the product such as the outline, bundled items and manuals before actual use. - 5 -... -
Page 6: Related Manuals
— — Introduction VPC-3100-G Series Reference Manual 1. Related Manuals The manuals related to the product are listed below. Read them as necessary along with this document. ◆ Must Read the Following Manuals. Name Purpose Contents How to get Product Guide... -
Page 7: About The Product
— — Introduction VPC-3100-G Series Reference Manual 2. About the Product This product is a BTO industrial computer that is equipped with an 8th generation Intel® Core™ processor series. The Intel® Q370 chipset with DDR4 memory (8GB-32GB) provides advanced computing and graphical performance. -
Page 8: Features
— — Introduction VPC-3100-G Series Reference Manual 3. Features ◼ Compatible with Intel ® Core™ processor series Coffee Lake This product is equipped with the 8th-generation Intel ® Core ™ processor and greatly realizes lower-power consumption while ensuring fine performance of operation tasks and drawing. Adopting embedded-type CPU contributes to a stable supply. -
Page 9: Supported Os
— — Introduction VPC-3100-G Series Reference Manual 4. Supported OS Windows 10 IoT Enterprise 2019 LTSC 64bit (Japanese / English / Chinese / Korean) ⚫ - 9 -... -
Page 10: Product Configuration List
Name Plate Product Guide *1 The configuration and parts of this product as shown below. *2 The user's manual for this product is available as a PDF file through CONTEC’s Web site. 3 types of Cable Tie DVI-analog RGB Product... -
Page 11: Safety Precautions
Safety Precautions Understand the following definitions and precautions to use the product safely. Never fail to read them before using the product. - 11 -... -
Page 12: Safety Information
— — Safety Precautions VPC-3100-G Series Reference Manual 1. Safety Information This document provides safety information using the following symbols to prevent accidents resulting in injury or death and the destruction of equipment and resources. Understand the meanings of these labels to operate the equipment safely. -
Page 13: Handling Precautions
— — Safety Precautions VPC-3100-G Series Reference Manual 2. Handling Precautions WARNING Always check that the power supply is turned off before connecting or disconnecting power ⚫ cable. Do not modify the product. ⚫ Always turn off the power before inserting or removing the cables. - Page 14 Always disconnect the power cable from the receptacle before mounting or removing the ⚫ expansion card, before connecting or disconnecting any connector. CONTEC reserves the right to refuse to service a product modified by the user. ⚫ In the event of failure or abnormality (foul smells or excessive heat generation), unplug the ⚫...
-
Page 15: Fcc Part 15 Class A Notice
— — Safety Precautions VPC-3100-G Series Reference Manual 1. FCC PART 15 Class A Notice NOTE This equipment has been tested and found to comply with the limits for a Class A digital device, pursuant to part 15 of the FCC Rules. These limits are designed to provide reasonable protection against harmful interference when the equipment is operated in a commercial environment. -
Page 16: Security Warning
— — Safety Precautions VPC-3100-G Series Reference Manual 3. Security Warning When connecting to the network, be aware of security-related problems. See the examples of Security measures below and set up the product properly along with the network devices. 1. Information Security Risks Unauthorized access from the outside through a network could cause the system halt, data ⚫... -
Page 17: Product Nomenclature And Function
Product Nomenclature and Function This section describes product component names and their functions, pin assignment of each connector. - 17 -... -
Page 18: Nomenclature Of Product Components
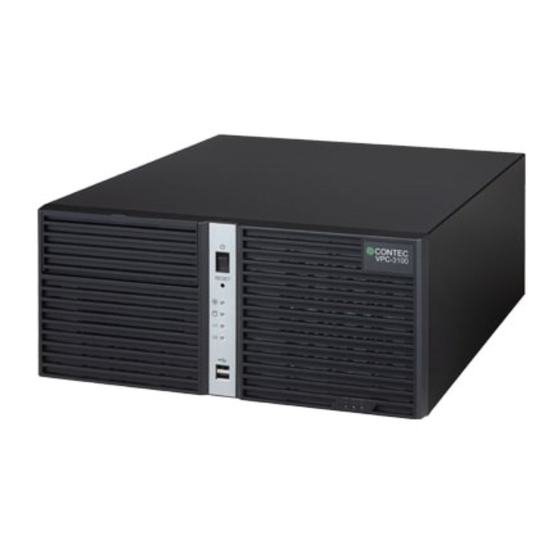
— — Product Nomenclature and Function VPC-3100-G Series Reference Manual 1. Nomenclature of Product Components Component names of the product are shown in the figure below. 1. Front View Name Function Optical drive DVD super multi drive (When setting up the product, this can be decided to be used for the shadow bay storage.) - Page 19 — — Product Nomenclature and Function VPC-3100-G Series Reference Manual Name Function RESET SW System reset switch POWER LED Power LED HDD LED SATA device LED USER LED 1 User LED 1 (This LED can light up with the hardware RAID monitoring tool* or by command of your software.)
-
Page 20: Rear View
— — Product Nomenclature and Function VPC-3100-G Series Reference Manual 2. Rear View Name Function COM A RS-232C/RS-422A/RS-485 (9pin D-SUB Connector (female)) 1 port COM B/C/D/E RS-232C (9pin D-SUB Connector (female)) 4 port Terminal for frame ground AC INLET 100 - 240VAC power input connector... -
Page 21: Description Of Product Components
— — Product Nomenclature and Function VPC-3100-G Series Reference Manual 2. Description of Product Components Components such as connectors, switches are described. 1. LED: Access, Drive, POWER, HDD, User There are seven LEDs on the front of this product. LED name... -
Page 22: Mic In Interface: Mic In
— — Product Nomenclature and Function VPC-3100-G Series Reference Manual 6. MIC IN Interface: MIC IN The product is equipped with a connector for microphone input. As such, a microphone can be connected for voice input. 7. Frame Ground: FG The product has FG for functional earth. -
Page 23: Giga Bit-Ethernet: Lan A, B, C
— — Product Nomenclature and Function VPC-3100-G Series Reference Manual 8. Giga bit-Ethernet: LAN A, B, C This product is equipped with 3 ports of giga bit-Ethernet. Network type : 1000BASE-T/100BASE-TX/10BASE-T ⚫ Transmission speed* : 1000M/100M/10M bps ⚫ Max. network path length : 100m/segment ⚫... -
Page 24: Serial Port Interface: Serial A, B, C, D, E
Note that the I/O addresses and interrupts displayed on BIOS may not match the I/O addresses and interrupts displayed on OS. (Addresses and interrupts are automatically assigned as BIOS specifications). SERIAL I/O Addresses and Interrupts Reference Display on BIOS * Display on CONTEC recovery OS (Windows) * SERIAL I/O address Interrupt I/O address Interrupt... -
Page 25: Dvi-I Interface: Dvi-I
— — Product Nomenclature and Function VPC-3100-G Series Reference Manual 10. DVI-I Interface: DVI-I The product is equipped with a connector for DVI connections. DVI connector Connector used on the product DVI connector 29 Pin (FEMALE) Pin No. Signal name Pin No. -
Page 26: Hdmi Interface: Hdmi
— — Product Nomenclature and Function VPC-3100-G Series Reference Manual 11. HDMI Interface: HDMI The product is equipped with a connector for HDMI connections. HDMI connector Connector used on the product HDMI 19Pin Pin No. Signal name Pin No. Signal name... -
Page 27: Displayport Interface: Displayport
— — Product Nomenclature and Function VPC-3100-G Series Reference Manual 12. DisplayPort Interface: DisplayPort The product is equipped with a connector for DisplayPort connections. DisplayPort connector Connector used on the product Display Port 20 Pin Pin No. Signal name Pin No. -
Page 28: Usb 3.2 Gen1(Usb3.0) Ports: Usb3.2 Gen1
— — Product Nomenclature and Function VPC-3100-G Series Reference Manual 13. USB 3.2 Gen1(USB3.0) Ports: USB3.2 Gen1 This product is equipped with 4 channels for USB 3.2 Gen1(USB3.0) interface. USB3.2 Gen1 Connector Pin No. Signal Name USB_VCC DATA- DATA+ SSRX-... -
Page 29: Digital I/O Interface: Jdio1, Jdio2
— — Product Nomenclature and Function VPC-3100-G Series Reference Manual 15. Digital I/O interface: JDIO1, JDIO2 For digital I/O, the JDIO1 and JDIO2 connectors are used to provide four inputs and two outputs. Among the eight DIO pins, two output pins (O2, O3) are used for the user LED on the front. - Page 30 — — Product Nomenclature and Function VPC-3100-G Series Reference Manual ◆ Digital I/O Internal Equivalent Circuit Diagram ◆ Remote Power, Remote Reset Internal Equivalent Circuit Diagram - 30 -...
-
Page 31: Audio Port Interface: Audio
— — Product Nomenclature and Function VPC-3100-G Series Reference Manual 16. Audio Port Interface: AUDIO The product is equipped with 3 ports for line in, line out and mic in. Audio connector (Rear) Pin No. Signal Name Blue LINE IN... -
Page 32: Hardware Setup
Hardware Setup This section describes how to install, connect, and set up the product. - 32 -... -
Page 33: Before Using The Product For The First Time
— — Hardware Setup VPC-3100-G Series Reference Manual 1. Before Using the Product for the First Time Follow the next steps to set up this product: STEP1 By referring to the information in this section, install, connect, and set up this product. -
Page 34: Hardware Setup
— — Hardware Setup VPC-3100-G Series Reference Manual 2. Hardware Setup Before you start, be sure that the power is turned off. ⚫ When setting up the built-in hard disk, handle with care so as not to give a shock. - Page 35 — — Hardware Setup VPC-3100-G Series Reference Manual Remove the expansion card bracket. CAUTION If you tighten the screw with a tightening torque greater than specified, the hole may be damaged. The specified tightening torque is 5 - 6 N·m...
-
Page 36: Setting The Expansion Card
— — Hardware Setup VPC-3100-G Series Reference Manual 2. Setting the Expansion Card Loosen the screws and remove the slot cover from the back of the chassis. Set the expansion card. CAUTION If you tighten the screw with a tightening torque greater than specified, the hole may be damaged. -
Page 37: Setting The Storage
— — Hardware Setup VPC-3100-G Series Reference Manual 3. Setting the Storage Slot-in SATA storage is available. Push the lock to loosen and pull the arm toward you, then, remove the case from the drive bay. Set the storage into the removed case. - Page 38 — — Hardware Setup VPC-3100-G Series Reference Manual Put the removable case back into the drive bay until the lock clicks. CAUTION Using the storage other than the optional product cannot satisfy this product specification and is outside the scope of the warranty.
-
Page 39: Replacing The Fan Filter
— — Hardware Setup VPC-3100-G Series Reference Manual 4. Replacing the Fan Filter Loosen the screws holding the fan unit, open the fan unit toward you and remove the fan filter. After replacing the fan filter, set it back by following the reverse order of Replacing the Fan Filter. -
Page 40: Replacing The Front Fan
— — Hardware Setup VPC-3100-G Series Reference Manual 5. Replacing the Front Fan Open the fan unit toward you. Remove the fan cable and the fan connector. While pushing the lock on the bottom, pull it toward you, and take the fan out. -
Page 41: Setting The Brackets
— — Hardware Setup VPC-3100-G Series Reference Manual 6. Setting the Brackets Place the brackets on the bottom of the chassis and secure them with the supplied truss-head screws. [ Horizontal installation ] [ Vertical installation ] - 41 -... -
Page 42: Installation Requirements
— — Hardware Setup VPC-3100-G Series Reference Manual 7. Installation Requirements In order to enjoy reliable use of the VPC-3100 series, maintain the following conditions. Installation Orientation Space between the main unit and its surroundings The main unit of the VPC-3100 series is equipped with air vents and fans for regulating temperature. - Page 43 — — Hardware Setup VPC-3100-G Series Reference Manual CAUTION Note that even if the ambient temperature is within the usage range, if devices that generate high temperatures are near the main unit, it may become hot due to the effect of the radiated heat and may consequently exhibit poor operation.
-
Page 44: Bios Setup
BIOS Setup This section describes AMI’s Setup program built into the FLASH ROM BIOS. - 44 -... -
Page 45: Introduction
— — BIOS Setup VPC-3100-G Series Reference Manual 1. Introduction This section discusses AMI’s Setup program built into the FLASH ROM BIOS. The Setup program allows users to modify the basic system configuration. This special information is stored in FLASH ROM so that it retains the Setup information when the power is turned off. -
Page 46: Using Setup
— — BIOS Setup VPC-3100-G Series Reference Manual 2. Using Setup In general, you use the arrow keys to highlight items, press <Enter> to select, use the “+” and “-” keys to change entries, press <F1> for help and press <Esc> to quit. The following table provides more detail about how to navigate in the Setup program using the keyboard. -
Page 47: Main Menu
— — BIOS Setup VPC-3100-G Series Reference Manual 2. Main Menu Once you enter the Aptio Setup Utility, the Main Menu will appear on the screen. By pressing the left or right arrow keys, you will be able to move the tab of each item. -
Page 48: Main
— — BIOS Setup VPC-3100-G Series Reference Manual 3. Main Use this menu to check basic system configuration. The following items are displayed. Display item in the main menu Item Options Description Project Version This item displays the BIOS version. -
Page 49: Advanced
— — BIOS Setup VPC-3100-G Series Reference Manual 4. Advanced Use this menu to set the detailed functions configurable to your system. The following items are available: Aptio Setup Utility - Copyright (C) 20xx American Megatrends, Inc. Main Advanced Chipset... -
Page 50: Cpu Configuration
— — BIOS Setup VPC-3100-G Series Reference Manual 1. CPU Configuration Use this menu to check the CPU Configuration.. Aptio Setup Utility - Copyright (C) 20xx American Megatrends, Inc. Advanced CPU Configuration Type Intel(R) Core(TM) I7-8700T CPU @ 2.40GHz 0x906EA... -
Page 51: Sata Configuration
— — BIOS Setup VPC-3100-G Series Reference Manual 2. SATA Configuration Use this menu to check the SATA controller configuration. Aptio Setup Utility - Copyright (C) 20xx American Megatrends, Inc. Advanced SATA Configuration SATA Controller(s) [Enabled] SATA Mode Selection [AHCI]... -
Page 52: Pch-Fw Configuration
— — BIOS Setup VPC-3100-G Series Reference Manual 3. PCH-FW Configuration Use this menu to check the firmware version of Intel ME. Aptio Setup Utility - Copyright (C) 20xx American Megatrends, Inc. Advanced ME FW Version xx.x.xx.xxxx ME Firmware Mode... -
Page 53: Trusted Configuration
— — BIOS Setup VPC-3100-G Series Reference Manual 4. Trusted Configuration Use this menu to check TPM settings. Aptio Setup Utility - Copyright (C) 20xx American Megatrends, Inc. Advanced TPM2.0 Device Found Firmware Version: 403.1 Vendor: INTC Security Device Support... -
Page 54: Acpi Setting
— — BIOS Setup VPC-3100-G Series Reference Manual 5. ACPI Setting Use this menu to check the ACPI settings. Aptio Setup Utility - Copyright (C) 20xx American Megatrends, Inc. Advanced ACPI Setting Enable ACPI Auto Configuration [Disabled] Enable Hibernation [Enabled]... -
Page 55: Smart Setting
— — BIOS Setup VPC-3100-G Series Reference Manual 6. SMART Setting Use this to check the SMART settings. Aptio Setup Utility - Copyright (C) 20xx American Megatrends, Inc. Advanced SMART Setting SMART Self Test [Disabled] →←:Select Screen ↑↓:Select Item Enter:Select +/-:Change Opt. -
Page 56: Super Io Configuration
— — BIOS Setup VPC-3100-G Series Reference Manual 7. Super IO Configuration Use this to check the Super IO configuration. Aptio Setup Utility - Copyright (C) 20xx American Megatrends, Inc. Advanced Super IO Configuration Super IO Chip NCT6116D ▶ Serial Port 1 Configuration ▶... - Page 57 — — BIOS Setup VPC-3100-G Series Reference Manual Serial Port 2 Configuration Item Options Description Configure the operation settings for serial Serial Port Disabled / Enabled port. Auto / Change Settings Do not change this setting. IO=2F8h; IRQ=3 Other Serial Port 3 Configuration...
-
Page 58: Hardware Monitor
— — BIOS Setup VPC-3100-G Series Reference Manual 8. Hardware Monitor Use this to check hardware monitor information such as the CPU temperature. Aptio Setup Utility - Copyright (C) 20xx American Megatrends, Inc. Advanced PC Health Status : +xx ℃... -
Page 59: Network Stack Configuration
— — BIOS Setup VPC-3100-G Series Reference Manual 9. Network Stack Configuration Use this menu to check the Network Stack configuration. Aptio Setup Utility - Copyright (C) 20xx American Megatrends, Inc. Advanced Network Stack [Disabled] →←:Select Screen ↑↓:Select Item Enter:Select +/-:Change Opt. -
Page 60: Chipset
— — BIOS Setup VPC-3100-G Series Reference Manual 5. Chipset Use this menu to check the detailed features of chipset. The following items are available: Aptio Setup Utility - Copyright (C) 20xx American Megatrends, Inc. Main Advanced Chipset Security Boot Save &... -
Page 61: System Agent (Sa) Configuration
— — BIOS Setup VPC-3100-G Series Reference Manual 1. System Agent (SA) Configuration Use this menu to check the System Agent configuration. Aptio Setup Utility - Copyright (C) 20xx American Megatrends, Inc. Chipset System Agent (SA) Configuration ▶ Memory Configuration ▶... -
Page 62: Pch-Io Configuration
— — BIOS Setup VPC-3100-G Series Reference Manual 2. PCH-IO Configuration Use this to check the PCH-IO configuration. Aptio Setup Utility - Copyright (C) 20xx American Megatrends, Inc. Chipset PCH-IO Configuration ▶ USB Configuration ▶ HD Audio Configuration DeepSx Power Policies... -
Page 63: Usb Configuration
— — BIOS Setup VPC-3100-G Series Reference Manual 3. USB Configuration Use this to check the USB configuration. Aptio Setup Utility - Copyright (C) 20xx American Megatrends, Inc. Advanced USB Configuration J47 Rear usb2.0 ports under LAN [Enabled] i211 J52 Rear USB3.1 Gen2 ports under... -
Page 64: Security
— — BIOS Setup VPC-3100-G Series Reference Manual 6. Security Use this menu to check the security of the system settings. The following items are available. Aptio Setup Utility - Copyright (C) 20xx American Megatrends, Inc. Main Advanced Chipset Security Boot Save &... -
Page 65: Secure Boot
— — BIOS Setup VPC-3100-G Series Reference Manual 1. Secure Boot Use this menu to check the Secure Boot. The following items are available: Aptio Setup Utility - Copyright (C) 20xx American Megatrends, Inc. Security System Mode Setup Secure Boot... -
Page 66: Key Management
— — BIOS Setup VPC-3100-G Series Reference Manual 2. Key Management Use this to check the Key Management. The following items are available: Aptio Setup Utility - Copyright (C) 20xx American Megatrends, Inc. Security Vender Keys Valid Factory Key Provision [Disabled] ▶... -
Page 67: Boot Configuration
— — BIOS Setup VPC-3100-G Series Reference Manual 7. Boot Configuration Use this to check boot devices and other devices. Aptio Setup Utility - Copyright (C) 20xx American Megatrends, Inc. Main Advanced Chipset Security Boot Save & Exit Boot Configuration... -
Page 68: Save & Exit
— — BIOS Setup VPC-3100-G Series Reference Manual 8. Save & Exit Load/save setup items and exit the setup menu. The following items are available: Aptio Setup Utility - Copyright (C) 20xx American Megatrends, Inc. Main Advanced Chipset Security Boot Save &... -
Page 69: Setting To Turn On Power (At Operation) With Ac Power On
— — BIOS Setup VPC-3100-G Series Reference Manual 1. Setting to Turn On Power (AT operation) with AC Power On If you want to activate by direct input of AC (AT operation), refer to the following items and change. The factory setting is ATX operation. -
Page 70: Software Raid Setup
Software RAID Setup This section describes software mirroring (RAID1) setup. - 70 -... -
Page 71: Outline
— — Software RAID Setup VPC-3100-G Series Reference Manual 1. Outline This section describes software mirroring (RAID1) setup. We only support mirroring. We do not support operation for other RAIDs (RAID0, RAID5, and RAID10). Be aware that functions not supported are outside the scope of the warranty. -
Page 72: Software Raid Setup In The Bios
— — Software RAID Setup VPC-3100-G Series Reference Manual 2. Software RAID Setup in the BIOS When using software RAID, it is possible to create RAID volume (mirroring) by the following procedure. * 1 Please perform system recovery after RAID volume creation. - Page 73 — — Software RAID Setup VPC-3100-G Series Reference Manual Use "Save Changes and Reset" to save the changed setup contents and restart the operating system. After the operating system restarts, enter the BIOS menu. Select the "Intel(R) Rapid Storage Technology" menu in the "Configuration" menu, and then create the RAID volume.
- Page 74 — — Software RAID Setup VPC-3100-G Series Reference Manual Change the "RAID Level" item to "RAID 1 (Mirror)". Select the target drive under the "Select Disks" item, and then select "Create Volume." Aptio Setup Utility - Copyright (C) 20xx American Megatrends, Inc.
- Page 75 — — Software RAID Setup VPC-3100-G Series Reference Manual Software RAID configuration information Aptio Setup Utility - Copyright (C) 20xx American Megatrends, Inc. Main Advanced Chipset Security Boot Save & Exit RAID VOLUME INFO Volume Actions ▶ Delete NAME: Volume1...
-
Page 76: Delete Raid Volume
— — Software RAID Setup VPC-3100-G Series Reference Manual 3. Delete RAID Volume This section describes the procedure for deleting a RAID volume (RAID1(Mirror)). Follow the steps below to delete the RAID volume. CAUTION When an existing RAID drive is deleted, data may be lost. Back up the data on a RAID drive before deleting it if the data is important. -
Page 77: Raid Setup When Replacing The Storage
— — Software RAID Setup VPC-3100-G Series Reference Manual 4. RAID Setup When Replacing the Storage While creating RAID 1 and replace the storage, you need to rebuild the mirroring RAID drive. Follow the steps below to setup RAID. CAUTION RAIDs in this product are not hot-swappable. -
Page 78: Software Raid Monitoring Tool
— — Software RAID Setup VPC-3100-G Series Reference Manual 5. Software RAID Monitoring Tool Software RAID monitoring tool (Rapid storage technology) can monitor the existing RAID volume or monitor the information and conditions of HDD that configures RAID volume. In addition, RAID volume can be built, deleted, or reconfigured with this tool as necessary. -
Page 79: Exiting Rapid Storage Technology
— — Software RAID Setup VPC-3100-G Series Reference Manual 3. Exiting Rapid Storage Technology You can exit Rapid storage technology by clicking “×” on the upper right corner of the window. - 79 -... -
Page 80: Rebuilding Mirroring
— — Software RAID Setup VPC-3100-G Series Reference Manual 4. Rebuilding Mirroring Data on mirrored drives is compared, and if a difference is found, data on the drives will be copied between storage and data on the mirrored drives will be automatically unified. -
Page 81: For The Error
— — Software RAID Setup VPC-3100-G Series Reference Manual 5. For the Error If an error occurs in a RAID drive or storage, you can check the status of the Array, the mirroring- configured RAID drive, and the storage using Rapid storage technology. Each status can be checked through the “Status”... -
Page 82: Confirming The Error Log
— — Software RAID Setup VPC-3100-G Series Reference Manual CAUTION RAID errors cannot be detected by the application. Therefore, check for errors using the icon displayed in the status bar. 6. Confirming the Error Log When an error occurs in a RAID drive, it is logged into the Windows-standard “Event Viewer”. -
Page 83: Raid Setup When Replacing The Storage (Os)
— — Software RAID Setup VPC-3100-G Series Reference Manual 7. RAID Setup When Replacing the Storage (OS) This product is installed with a RAID-1 Array created. However, if storage is replaced, you must reconfigure the mirroring RAID drive in the Array. -
Page 84: Hardware Raid Setup
Hardware RAID Setup This section describes hardware mirroring (RAID1) setup. - 84 -... -
Page 85: Outline
— — Hardware RAID Setup VPC-3100-G Series Reference Manual 1. Outline This section describes hardware mirroring (RAID1) setup. We only support mirroring. We do not support operation for other RAIDs (RAID0, RAID5, and RAID10). Be aware that functions not supported are outside the scope of the warranty. -
Page 86: Functional Specifications
— — Hardware RAID Setup VPC-3100-G Series Reference Manual 2. Functional Specifications 1. Option Mirror Card Specifications Item Description Model Name SVRC-C600SA Number of connected drives RAID level Storage capacity Max. 4TB Cache memory size Host interface Serial ATA 3.0 Transfer mode 6.0Gb/s, 3.0Gb/s (Auto or fixed into 3.0Gb/s) -
Page 87: Locations And Settings Of Connectors And Switch
— — Hardware RAID Setup VPC-3100-G Series Reference Manual 2. Locations and Settings of Connectors and Switch Once you have turned the top cover and the front fan, you will be able to see the connectors and switches as illustrated below. -
Page 88: Switch Settings
— — Hardware RAID Setup VPC-3100-G Series Reference Manual 3. Switch Settings Dip switch: S1 Function Normal state (Factory default setting) Switches 1- 3 OFF / Remaining Switches OFF Setting 1 (mirroring configuration information initialization) Switches 1, 3 ON, Switch 2 OFF / Remaining Switches OFF... -
Page 89: Led Status
— — Hardware RAID Setup VPC-3100-G Series Reference Manual 4. LED Status Drive 1 Access LED Drive 2 Front bezel Operation Access LED Drive LED Boot up Green lighting Green lighting Normal performance Green lighting *1 Green lighting *1 Faulty... -
Page 90: Mirror Card Operation
— — Hardware RAID Setup VPC-3100-G Series Reference Manual 3. Mirror Card Operation You can use the mirror card LEDs to monitor the status of the existing storages in the mirroring configuration. For details on the mirror card LEDs, see “LED Status (page89)”. - Page 91 — — Hardware RAID Setup VPC-3100-G Series Reference Manual Status Explanation Abnormality A reading error occurred at the copy source during rebuilding. Data that causes a reading error to occur is written to the copy destination. - 91 -...
-
Page 92: Error Occurrence
— — Hardware RAID Setup VPC-3100-G Series Reference Manual 2. Error Occurrence If an error occurs in a storage in the mirroring configuration, you can use the mirror card LEDs to check the status of the storage. Perform storage replacement or other appropriate operations according to the error status. -
Page 93: Raid Setup During Storage Replacement
— — Hardware RAID Setup VPC-3100-G Series Reference Manual 3. RAID Setup During Storage Replacement This section describes the setup when replacing a storage in the mirroring configuration. Perform setup according to the number of storages to replace. CAUTION When replacing a storage, prepare a new one that is the same model and has the same capacity. -
Page 94: Hot-Swapping
CAUTION After it is set up, the product status becomes the same as when the product was shipped from CONTEC. The data on the good storages that you have prepared will be erased. 4. Hot-Swapping Hot-swapping is possible with this mirror card, enabling the user to replace storages while the OS is up and running. -
Page 95: Os Recovery Settings
— — Hardware RAID Setup VPC-3100-G Series Reference Manual 4. OS Recovery Settings This section lists the precautions regarding OS recovery with the mirror card connected. Usually, you should perform recovery using recovery media after connecting two storages to the mirror card. -
Page 96: Faq And Troubleshooting
— — Hardware RAID Setup VPC-3100-G Series Reference Manual 5. FAQ and Troubleshooting This section consists of FAQ and troubleshooting related to mirror cards. When you run into trouble, refer to the relevant items. 1. FAQ ◆ I am not sure in which direction the data between storage are copied. -
Page 97: Troubleshooting
— — Hardware RAID Setup VPC-3100-G Series Reference Manual 2. Troubleshooting ◆ The OS does not start. Check whether switches 1 to 8 of (DIP switch) S1 are all set to OFF. ⚫ If they are not, set them all to OFF, and turn the power ON again. - Page 98 — — Hardware RAID Setup VPC-3100-G Series Reference Manual ◆ Both storages are damaged. Prepare two good storages, and then perform recovery. ◆ Rebuilding failed (with a reading error) The reading of data from the copy source might fail during rebuilding. Perform repair in accordance with the procedure described below.
- Page 99 — — Hardware RAID Setup VPC-3100-G Series Reference Manual ◆ Error skip rebuild This error skip rebuild state indicates that the copy source storage has unreadable sectors and then completed to rebuild by skipping unreadable sectors. If unreadable sectors presence on copy source storage, unreadable data is recorded to same sectors on destination storage and keep on rebuilding.
-
Page 100: Appendix
Appendix This section lists the specifications and the physical dimensions of the product, and the details of model name. - 100 -... -
Page 101: System Reference
— — Appendix VPC-3100-G Series Reference Manual 1. System Reference 1. Specifications Function Specifications (1/3) Item Description Intel® Celeron® G4900 Processor 3.1GHz [Selection] Intel® Core™ i5 8500 Processor 3.0GHz Intel® Core™ i7 8700 Processor 3.2GHz Chip set Intel ® Q370 BIOS BIOS (mfd. - Page 102 — — Appendix VPC-3100-G Series Reference Manual Function Specifications (2/3) Item Description Interface External DVI-I x 1, HDMI x 1, DisplayPort x 1, Supports three displays display (HDMI and DisplayPort: 4K output, DVI: 1080p) A-TYPE connector Front : USB2.0 x 2 ports, Inside : USB2.0 x 2, Rear : USB3.2 Gen1(USB3.0) x 4 ports, USB2.0 x 2 ports...
- Page 103 — — Appendix VPC-3100-G Series Reference Manual Function Specifications (3/3) Item Description Power supply 400W FlexATX power supply (50/60Hz Input auto switching) Rated input voltage 100 - 240VAC Range of input 90 - 264VAC voltage Power consumption 100 - 240VAC, 3.8 - 1.6A (Max.)
- Page 104 — — Appendix VPC-3100-G Series Reference Manual Environment Requirements Item Description Operating ambient 5 - 40°C temperature Non-operating ambient -20 - +60°C temperature Operating ambient humidity 20 - 80%RH (No condensation) Non-operating ambient humidity 20 - 80%RH (No condensation) Floating dust particles...
-
Page 105: Physical Dimensions
— — Appendix VPC-3100-G Series Reference Manual 2. Physical Dimensions 1. Horizontal Installation 2. With the Brackets for Horizontal Orientation (Horizontal Installation) - 105 -... -
Page 106: With The Brackets For Horizontal Orientation (Vertical Installation)
— — Appendix VPC-3100-G Series Reference Manual 3. With the Brackets for Horizontal Orientation (Vertical Installation) - 106 -... -
Page 107: Commodity Model
— — Appendix VPC-3100-G Series Reference Manual 3. Commodity Model VPC-3100 Type Rule Model Name VPC-3100-G (AC power specifications) Type Name 1 3 2 0 3 4 H 0 ① ② ③ ④ ⑤ ⑥ ⑦ ⑧ Type Item Description Name ①... -
Page 108: Battery Disposal
— — Appendix VPC-3100-G Series Reference Manual 4. Battery Disposal 1. Battery Specification The product contains one battery, and the details are as follows: Item Description Lithium primary battery Type BR2032 Model Panasonic Maker Nominal Voltage 200mAh Nominal capacity 1g or less... -
Page 109: Dispose Of The Battery
— — Appendix VPC-3100-G Series Reference Manual 2. Dispose of the Battery WARNING When disposing of a used battery, follow the disposal procedures stipulated under the relevant laws and municipal ordinances. Removing the battery Follow the instruction described below to remove the battery. -
Page 110: Replacement Parts For Maintenance
Replacement Parts for Maintenance This section lists replacement parts for maintenance of the product. - 110 -... -
Page 111: Replacement Parts For Maintenance
CAUTION If a product other than our replacement parts one is used, the normal operation may be impaired or the functions may be limited. Visit the CONTEC website for the latest replacement parts for maintenance. https://www.contec.com/ Website - 111 -... -
Page 112: Customer Support And Inquiry
Customer Support and Inquiry CONTEC provides the following support services for you to use CONTEC products more efficiently and comfortably. - 112 -... -
Page 113: Services
— — Customer Support and Inquiry VPC-3100-G Series Reference Manual 1. Services CONTEC offers the useful information including product manuals that can be downloaded through the CONTEC website. Download https://www.contec.com/download/ You can download updated driver software, firmware, and differential manuals in several languages. Membership registration (myCONTEC) is required to use the services. - Page 114 No part of this document may be copied or reproduced in any form by any means without ⚫ prior written consent of CONTEC CO., LTD. CONTEC CO., LTD. makes no commitment to update or keep current the information contained ⚫ in this document.
- Page 115 3-9-31, Himesato, Nishiyodogawa-ku, Osaka 555-0025, Japan https://www.contec.com/ No part of this document may be copied or reproduced in any form by any means without prior written consent of CONTEC CO., LTD. VPC-3100-G Series Reference Manual NA07862 (LYZA751) [12142020] December 2020 Edition...
Need help?
Do you have a question about the VPC-3100-G Series and is the answer not in the manual?
Questions and answers