Table of Contents
Advertisement
Quick Links
Advertisement
Table of Contents

Related Manuals for Contec VPC-500


Summary of Contents for Contec VPC-500
- Page 1 FA-PC VPC Series VPC-500 User’s Manual CONTEC CO., LTD.
-
Page 2: Check Your Package
Check Your Package Thank you for purchasing the CONTEC product. The product consists of the items listed below. Check, with the following list, that your package is complete. If you discover damaged or missing items, contact your retailer. ■Product Configuration List... - Page 3 (1) No part of this document may be copied or reproduced in any form by any means without prior written consent of CONTEC CO., LTD. (2) CONTEC CO., LTD. makes no commitment to update or keep current the information contained in this document. The information in this document is subject to change without notice.
-
Page 4: Table Of Contents
Web Site ............................2 How to Obtain Service ........................2 Liability ............................... 2 Safety Precautions ..........................3 ◆Safety Information........................3 ◆Caution on the VPC-500 Series....................3 SYSTEM REFERENCE Specification ............................7 Physical Dimensions ........................... 9 HARDWARE SETUP Before Using the Product for the First Time ..................13 Hardware Setup .......................... - Page 5 ◆Power Control Configuration ....................43 ◆TPM Configuration ........................ 45 ◆Super IO Configuration ......................46 ◆H/W Monitor .......................... 47 ◆Serial Port Console Redirection ..................... 48 Security ............................. 49 Boot ..............................50 Save & Exit ............................52 APPENDIX Battery ............................... 53 VPC-500 Series User’s Manual...
-
Page 6: Introduction
RAM ■The wireless LAN of the conformity IEEE802.11b/g/n (Only in VPC-500R-76412B) It is the conformity IEEE802.11b/g/n and copes with coding security such as WEP, WPA. ◆Supported OS ・ Windows Embedded Standard 7 SP1 32bit Japanese VPC-500 Series User’s Manual... -
Page 7: Customer Support
You can download updated driver software and differential files as well as sample programs available in several languages. Note! For product information Contact your retailer if you have any technical question about a CONTEC product or need its price, delivery time, or estimate information. How to Obtain Service For replacement or repair, return the device freight prepaid, with a copy of the original invoice. -
Page 8: Safety Precautions
・ When transporting or moving this product, be sure to use the original packaging in which it was shipped from CONTEC or other equivalent packaging in order to prevent vibrations, impacts, and static electricity. ・ Do not modify the product. - Page 9 ・ To prevent corruption of files, always shutdown the OS before turning off this product. ・ CONTEC reserves the right to refuse to service a product modified by the user. ・ In the event of failure or abnormality (foul smells or excessive heat generation), unplug the power cord immediately and contact your retailer.
- Page 10 ・ This product's specifications allow the device to be rebooted from the BIOS screen during startup. This has no effect on operation after the OS boots. CAUTION The object of the standard of this product become only a main body. VPC-500 Series User’s Manual...
- Page 11 1. Introduction VPC-500 Series User’s Manual...
-
Page 12: System Reference
Power management setup via BIOS, Power On by Ring / Wake On LAN, Supports PC98/PC99 ACPI Power management Support OS Windows Embedded Standard 7 SP1 32bit Japanese *1 If the display cable is connected after the PC turns on, BIOS is not displayed. VPC-500 Series User’s Manual... - Page 13 (JIS C60068-2-6 compliant, IEC60068-2-6 compliant) 98m/s2 (10G) / 11ms / half-sine shock for 3 times in x, y, and z directions Impact resistance (JIS C60068-2-27 compliant, IEC60068-2-27 compliant) Grounding Class D grounding, SG-FG / continuity VPC-500 Series User’s Manual...
-
Page 14: Physical Dimensions
2. System Reference Physical Dimensions ■VPC-500-76412B-C01, VPC-500-76412B-C05 < Main unit dimensions > Figure 2.1 VPC-500-76412B-C01, VPC-500-76412B-C05 Main unit dimensions VPC-500 Series User’s Manual... - Page 15 2. System Reference < Dimensions when attached to the stand (Horizontal Installation) > Figure 2.2 VPC-500-76412B-C01, VPC-500-76412B-C05 Dimensions when attached to the stand (Horizontal Installation) VPC-500 Series User’s Manual...
- Page 16 2. System Reference < Dimensions when attached to the stand (Vertical installation) > 225.1 (11.5) [mm] Figure 2.3 VPC-500-76412B-C01, VPC-500-76412B-C05 Dimensions when attached to the stand (Vertical installation) VPC-500 Series User’s Manual...
- Page 17 2. System Reference VPC-500 Series User’s Manual...
-
Page 18: Hardware Setup
・ Be sure to connect the keyboard and mouse to it before turning the power on for the first time. ・ Be sure to connect the display before turning the power on. Connecting the display after turning the power on may prevent it from being displayed properly. VPC-500 Series User’s Manual... -
Page 19: Hardware Setup
・ Before you start, be sure that the power is turned off. ・ Remove only those screws that are explained. Do not move any other screw. ◆Attaching the Attachment Stand (1) Attach the attachment stand. Do not attach with excess force. Figure 3.1 Attaching the Attachment Stand VPC-500 Series User’s Manual... -
Page 20: Attaching The Fg
(1) Use screws to attach the FG Figure 3.2 Attaching the FG CAUTION Screw holes may be damaged if screws are tightened with a torque greater than the specified torque.The specified tightening torque is 5 - 6kgfcm. VPC-500 Series User’s Manual... -
Page 21: Installation Requirements
CAUTION Note that even though the ambient temperature is within the specified range, an operational malfunction may occur if there is other device generating high heat; the radiation will influence the product to increase its temperature. VPC-500 Series User’s Manual... - Page 22 ・ Do not install this product in completely sealed spaces, except when it is possible to adjust the internal temperature using an air conditioner or similar equipment. Temperature increase caused by long-term usage may result in operational malfunction or other problems. VPC-500 Series User’s Manual...
- Page 23 3. Hardware Setup VPC-500 Series User’s Manual...
-
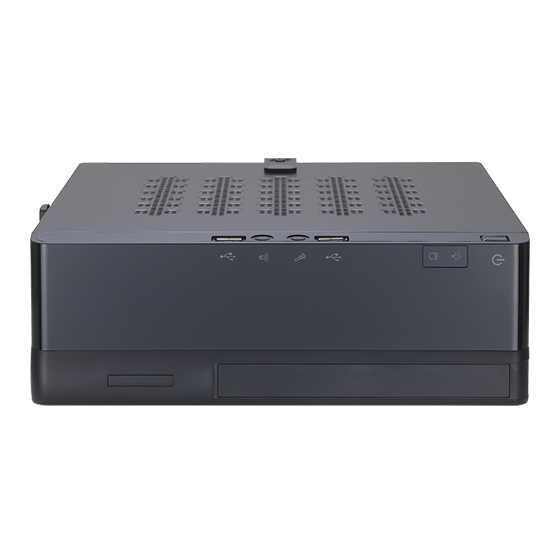
Page 24: Each Component Function
■VPC-500-76412B-C01, VPC-500-76412B-C05 < Front View > Non connection USB2.0 USB2.0 POWER SW ACCESS LED POWER LED Figure 4.1 VPC-500-76412B-C01, VPC-500-76412B-C05 Component Name < 1 / 2 > < Rear View > HDM I SERIAL ANALOG RGB USB3.0 LINE OUT AC INLET Figure 4.1 VPC-500-76412B-C01, VPC-500-76412B-C05 Component Name <... - Page 25 HDMI (19pin HDMI TYPE-A connector) 1 port USB3.0 USB3.0 (TYPE-A connector) 1 port USB2.0 USB2.0 (TYPE-A connector) 2 port 1000BASE-T/100BASE-TX (RJ-45 connector) 1 port Line out (3.5φ stereo minijack) 1 port LINE OUT AC INLET AC100-240V Power input connector VPC-500 Series User’s Manual...
-
Page 26: Component Function
Indicates that this product is switched off. ON (Blue) Indicates that this product is switched on. ACCESS LED ON (Orange) Indicates that the SATA device is being accessed. ◆Power Switch : POWER SW POWER SW is provided. VPC-500 Series User’s Manual... -
Page 27: Serial Port Interface : Serial
Connector type 9pin D-SUB connector (male) No.4-40UNC Inch screw threads RS-232C RS-422 RS-485 Pin No. Signal name Pin No. Signal name Pin No. Signal name DATA- DATA+ N.C. N.C. N.C. N.C. N.C. N.C. N.C. N.C. N.C. N.C. VPC-500 Series User’s Manual... -
Page 28: Analog Rgb Port Interface : Analog Rgb
This will not affect how the digital display appears. However, change the multi-display settings as necessary. ・ To change the settings from digital output to analog output, change the settings from the standard Windows properties screen. VPC-500 Series User’s Manual... -
Page 29: Hdmi Port Interface : Hdmi
This will not affect how the digital display appears. However, change the multi-display settings as necessary. ・ To change the settings from digital output to analog output, change the settings from the standard Windows properties screen. VPC-500 Series User’s Manual... -
Page 30: Usb3.0 Port Interface : Usb3.0
USB_GND SSTX- SSTX+ ◆USB2.0 Port Interface : USB2.0 The product is equipped with 2 port for USB2.0 interface. Table 4.8 USB2.0 port connector Connector type TYPE-A connector (female) Pin No. Signal name USB_VCC DATA- DATA+ USB_GND VPC-500 Series User’s Manual... -
Page 31: Lan Port Interface : Lan
: 100M operation -> Green ON : 1000M operation -> Orange ON ◆Line out Interface : LINE OUT The product is equipped with 1 port for line out. You can plug a headphone or amplifier-integrated speakers into this connector. VPC-500 Series User’s Manual... -
Page 32: Bios Setup
If the message disappears before you respond and you still wish to enter Setup, restart the system to try again by turning it OFF then ON on the system case. You may also restart by simultaneously pressing <Ctrl>, <Alt>, and <Delete> keys. VPC-500 Series User’s Manual... -
Page 33: Using Setup
AMI and system manufacturers to ensure maximum performance and reliability. Even changing the chipset settings slightly can result in an unavoidable need for repairs. ◆A Final Note About Setup The information in this chapter is subject to change without notice. VPC-500 Series User’s Manual... -
Page 34: Main Menu
■Security Set the password to be used to protect the security of the system. ■Boot Configure the settings related to how the system will boot. ■Save & Exit Load/save setup items and exit the setup menu. VPC-500 Series User’s Manual... -
Page 35: Main
Set the system date. Note that the ‘Day’ System Date Week Day Month / Day / Year automatically changes when you set the date System Time Hour : Minute : Second Set the system time VPC-500 Series User’s Manual... -
Page 36: Configuration
■SATA Configuration Configure the SATA controller settings. ■USB Configuration Configure the USB controller settings. ■Power Control Configuration Configure the Power control settings. ■TPM Configuration Configure the TPM settings. ■Super IO Configuration Configure the Super IO settings. VPC-500 Series User’s Manual... - Page 37 5. BIOS Setup ■H/W Monitor View such hardware monitor information as the CPU temperature. ■Serial Port Console Configuration Configure the Serial port console settings. VPC-500 Series User’s Manual...
-
Page 38: Cpu Configuration
Active Processor Cores Do not change this setting. Intel Virtualization Disabled Do not change this setting. Enabled Technology Disabled EIST Do not change this setting. Enabled Disabled CPU C6 report Do not change this setting. Enabled VPC-500 Series User’s Manual... -
Page 39: Chipset Configuration
Version x.xx.xxxx. Copyright (C) 20xx American Megatrends, Inc. Figure 5.5 Chipset Configuration Table 5.4 Chipset Configuration Item Option Description Enabled High Precision Timer Configure the high-precision event timer settings. Disabled Disabled Audio Controller Configure the audio controller settings. Enabled VPC-500 Series User’s Manual... -
Page 40: Lan Configuration
Version x.xx.xxxx. Copyright (C) 20xx American Megatrends, Inc. Figure 5.6 LAN Configuration Table 5.5 LAN Configuration Item Option Description Disable Launch Legacy PXE Enable Do not change this setting. Auto Enabled Wake On Lan Controller Configure the wake on lan settings. Disabled VPC-500 Series User’s Manual... -
Page 41: Graphics Configuration
Device Disabled Enabled IGD Turbo Enable Do not change this setting. Disabled Auto Primary Display Do not change this setting. 128M 160M 192M DVMT Pre-Allocated 224M Do not change this setting. 256M 288M 320M 352M 384M VPC-500 Series User’s Manual... - Page 42 BIOS display and OS recovery. Can not change this setting. Configure the settings for the port that will be output as the Secondary IGFX Boot HDMI auxiliary display at start-up. Display Can not change this setting. VPC-500 Series User’s Manual...
-
Page 43: Pci/Pcie Configuration
F1:General Help F2:Previous Values F3:Optimized Defaults F4:Save & Exit ESC:Exit Version x.xx.xxxx. Copyright (C) 20xx American Megatrends, Inc. Figure 5.8 PCI/PCIE Configuration Table 5.7 PCI/PCIE Configuration Item Option Description PCI Express Refer to Configuration Table 5.8 VPC-500 Series User’s Manual... -
Page 44: Pci Express Configuration
Speed Gen2 Do not change this setting. (PCI Express Port 2) Gen1 Enabled PCI Express Port 3 Do not change this setting. Disabled Auto Speed Gen2 Do not change this setting. (PCI Express Port 3) Gen1 VPC-500 Series User’s Manual... -
Page 45: Sata Configuration
Configure the operation settings for SATA port0. Disabled Enabled SATA Port0 HotPlug Do not change this setting. Disabled Enabled Serial-ATA Port 1 Configure the operation settings for SATA port1. Disabled Enabled SATA Port1 HotPlug Do not change this setting. Disabled VPC-500 Series User’s Manual... -
Page 46: Usb Configuration
Do not change this setting. Disabled Disabled EHCI Hand-off Do not change this setting. Enabled USB Mass Storage Disabled Configure the USB storage support settings with BIOS. Enabled Driver Support Refer to USB Configuration Table 5.11 VPC-500 Series User’s Manual... -
Page 47: Usb Configuration
Do not change this setting. Disabled Enabled USB Port 1 Do not change this setting. Disabled Enabled USB Port 2 Do not change this setting. Disabled Enabled USB Port 3 Do not change this setting. Disabled VPC-500 Series User’s Manual... -
Page 48: Power Control Configuration
Enable or disable the function for automatically turning Disabled Wake system with Fixed on the system at the specified date and time. When Time Enabled enabled, use the following items to set the date and time the system will automatically turn on. VPC-500 Series User’s Manual... - Page 49 0-23 Sets the time the system will automatically turn on. Wake up Minute 0-59 Sets the minute the system will automatically turn on. Wake up Second 0-59 Sets the second the system will automatically turn on. VPC-500 Series User’s Manual...
-
Page 50: Tpm Configuration
Version x.xx.xxxx. Copyright (C) 20xx American Megatrends, Inc. Figure 5.14 TPM Configuration Table 5.14 TPM Configuration Item Option Description Disabled Security Device Support Do not change this setting. Enabled Disabled Security Device Support Do not change this setting. Enabled VPC-500 Series User’s Manual... -
Page 51: Super Io Configuration
Configure the operation settings for serial port 1. Enabled RS232 Configure the operation mode settings for serial UART Mode RS485 HALF DUPLEX port 1. RS485/422 FULL DUPLEX Disabled Serial Port Configure the operation settings for serial port 2. Enabled VPC-500 Series User’s Manual... -
Page 52: H/W Monitor
F4:Save & Exit ESC:Exit Version x.xx.xxxx. Copyright (C) 20xx American Megatrends, Inc. Figure 5.16 H/W Monitor (Actual Display May Vary.) Table 5.16 H/W Monitor Item Option Description Disabled Smart System Fan Do not change this setting. Function Enabled VPC-500 Series User’s Manual... -
Page 53: Serial Port Console Redirection
Version x.xx.xxxx. Copyright (C) 20xx American Megatrends, Inc. Figure 5.17 Serial Port Console Redirection Table 5.17 Serial Port Console Redirection Item Option Description Disabled Console Redirection Do not change this setting. (COM0) Enabled Disabled Console Redirection Do not change this setting. (COM1) Enabled VPC-500 Series User’s Manual... -
Page 54: Security
Enter a password at least 3 characters long twice. To disable the password, enter the Administrator Password entry screen again. CAUTION Be careful to not forget the password. If you forget the password, the product will have to be repaired at an extra cost. VPC-500 Series User’s Manual... -
Page 55: Boot
Do not change this setting. Keep Current Immediate INT19 Trap Response Do not change this setting. Postponed Do not launch Storage UEFI only Do not change this setting. Legacy only Disabled Full Screen Logo Do not change this setting. VPC-500 Series User’s Manual... - Page 56 GPT-formatted. Make sure to specify (1) as the boot setting. Booting with (2) will result in non-support. ・ Only devices set as the highest in individual settings like CD/DVD ROM Drive BBS Priorities are listed as selectable under Boot Option #x. VPC-500 Series User’s Manual...
-
Page 57: Save & Exit
Return the settings to their default values. ■Boot Override Configure the settings for temporary booting from a connected device other than that set in Boot Configuration. The bootable devices will be displayed in place of XXXX. VPC-500 Series User’s Manual... -
Page 58: Appendix
: 1g or less ■Removing the battery Remove the battery according to the following figure. Remove the battery Figure 6.1 Removing the battery ■Disposing the battery Dispose the removed battery properly as instructed by local government. VPC-500 Series User’s Manual... - Page 59 3-9-31, Himesato, Nishiyodogawa-ku, Osaka 555-0025, Japan Japanese http://www.contec.co.jp/ English http://www.contec.com/ Chinese http://www.contec.com.cn/ No part of this document may be copied or reproduced in any form by any means without prior written consent of CONTEC CO., LTD. [10212015] Management No. NA04219 Parts No. LYSU411...
Need help?
Do you have a question about the VPC-500 and is the answer not in the manual?
Questions and answers