Miele HR 1421-3 E Operating Instructions Manual
30 inch electric range (electric oven and electric cooktop)
Hide thumbs
Also See for HR 1421-3 E:
- Installation instructions manual (124 pages) ,
- Operating instructions manual (72 pages)
Table of Contents
Advertisement
Advertisement
Table of Contents

Related Manuals for Miele HR 1421-3 E


Summary of Contents for Miele HR 1421-3 E
- Page 1 Operating instructions 30 inch electric range (electric oven and electric cooktop) To avoid the risk of accidents or damage to the appliance it is imperative that you read these instructions before installing the appliance and using it for the first time. en-CA M.-Nr.
-
Page 2: Warnings And Safety Instructions
Warnings and safety instructions WARNING Children and adults can tip over the range if has not been secured. This may lead to fatal injuries. This Range must be secured and connected using the anti-tip device according to the installation instructions. ... -
Page 3: Table Of Contents
Contents Warnings and safety instructions ..............Warnings and safety instructions ..............Guide to the range..................... 20 Electric cooktop ....................20 Oven ........................21 Range controls ....................22 Burner control knobs for electric cooktop............22 Oven controls ...................... 23 Features......................26 Data plate ...................... - Page 4 Contents Operating the clock / timer.................. 43 Switching cooking programs on and off automatically ........43 Changing the time of day ................46 Changing factory default settings ..............46 Switching the system lock on and off............50 Using the timer ................... 51 Baking......................... 52 Tips on baking.....................
- Page 5 Contents Warranty ......................80 Caring for the environment ................81...
-
Page 6: Warnings And Safety Instructions
They prevent both personal injury and damage to the appliance. Miele cannot be held liable for damage caused by non-compliance with these instructions. Keep the installation instructions and the operating instructions in... - Page 7 Warnings and safety instructions Appropriate use This Range is intended for domestic use and use in other similar environments. This Range is not intended for outdoor use. The Range is exclusively for use under normal domestic conditions: - Use the oven for baking, roasting, broiling, defrosting, canning, and drying food.
- Page 8 Warnings and safety instructions Burn Hazard - Do not allow children to use the oven. Failure to do so can result in severe burns or serious injury. Burn Hazard - Do not allow children to use the cooktop. Failure to do so can result in severe burns or serious injury.
- Page 9 Unauthorized installation, maintenance, and repairs can cause considerable danger for the user. Installation, maintenance, and repairs must only be carried out by a Miele authorized technician. Do not lift or carry the Range by the oven door handle or control panel.
- Page 10 Miele Service. Otherwise the warranty will be invalidated. Miele can only guarantee the safety of the appliance when original Miele parts are used. Faulty components must only be replaced with genuine Miele replacement parts.
- Page 11 Warnings and safety instructions - Disconnect the circuit breakers, or - Completely unscrew the screw-out circuit breakers (in countries where this is applicable), or - Pull out the plug (if one is present) at the electrical socket. To do this, pull the plug, not the power cable. ...
- Page 12 Warnings and safety instructions Open the door carefully to allow hot air or steam to escape before placing or removing food. To prevent burns, always place oven racks at their desired height while the oven is cool. If the rack must be moved while the oven is hot, do not let pot holders touch hot heating elements.
- Page 13 Warnings and safety instructions Do not let metal objects (aluminum foil, pans) come in contact with the heating element. Make certain that the power cords of small appliances do not come in contact with or get caught in the oven door. ...
- Page 14 Warnings and safety instructions Certain foods dry out quickly and may catch fire due to high broiling temperatures. Never use broiling modes to finish baking par-cooked rolls or bread, or to dry flowers or herbs. Instead, use the Convection Bake (Conv Bake) or Surround ...
- Page 15 Warnings and safety instructions Risk of injury caused by steam. Pouring a cold liquid onto a hot surface creates steam, which can cause severe scalding. The sudden temperature change can also cause damage to hot surfaces. Never pour cold liquids directly onto hot enamelled surfaces. ...
- Page 16 Warnings and safety instructions Metallic objects, such as knives, forks, spoons, and lids should not be placed on the cooktop, as they can get hot. Do not allow solid or liquid sugar, or pieces of plastic or aluminum foil, to get on the cooktop when it is hot, as they can damage the ceramic surface when it cools down.
- Page 17 Warnings and safety instructions If spills or splatters are allowed to remain on the cooktop for any length of time, they can bake onto the cooktop, and it may not be possible to remove them. Remove spills and splatters immediately. Also make sure that the bottom of any cookware is clean, dry, and free of grease before placing it on the cooktop.
- Page 18 Warnings and safety instructions The following applies to stainless steel surfaces: Adhesives will damage the coated stainless steel surface and cause it to lose its dirt-repellent protective coating. Do not use sticky notes, adhesive tape, or other types of adhesive on the stainless steel surface.
- Page 19 Warnings and safety instructions Accessories Only use original Miele accessories. Using spare parts or accessories from other manufacturers will invalidate the warranty, and Miele cannot accept liability. Accessories that are not suitable for the Self Clean program will be damaged by the high temperatures.
-
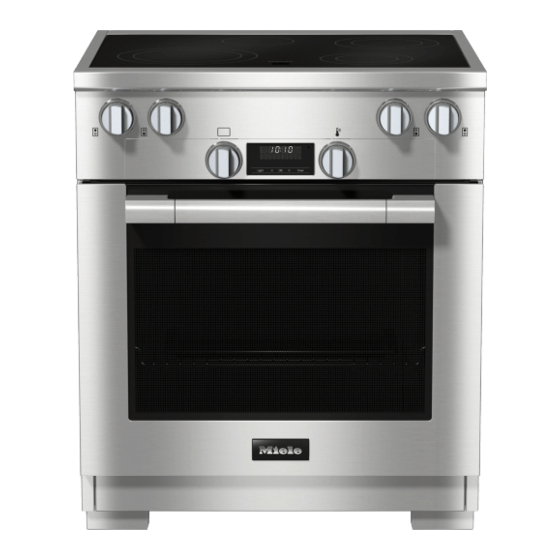
Page 20: Guide To The Range
Guide to the range Electric cooktop a Rear left standard burner c Front right variable burner 14.5 cm 12–18 cm b Front left variable burner d Rear right variable burner 21–27 cm 14.5–21 cm e Residual heat indicator... -
Page 21: Oven
Guide to the range Oven a Electric cooktop f Side runners with 6 shelf levels b Controls g Oven floor with bottom heat element underneath it c Door lock for the Self Clean program h Data plate d Browning / broiling element The data plate is located behind the e Air inlets for the fans with ring heater base panel. -
Page 22: Range Controls
Range controls Burner control knobs for electric cooktop a Burner control knob Rear left burner b Burner control knob Front left burner c Burner control knob Front right burner d Burner control knob Rear right burner The range is equipped with various burner control knobs: Symbol Description Burner off... -
Page 23: Oven Controls
For displaying the time of day and For setting a timer settings h Optical interface c Light sensor button (for Miele Service only) To turn the oven interior lighting on i Temperature selector and off For setting the temperature d sensor control For modifying times and settings e OK sensor button... - Page 24 Range controls Temperature selector Clock / timer Use the temperature selector to select The clock / timer is operated via the the temperature for the cooking display and the sensor controls. programs. Display It can be turned clockwise until a resistance is felt and then turned back ...
- Page 25 Range controls Sensor buttons Temperature indicator light The range has the following touch- The temperature indicator light on sensitive sensor buttons: Light, , OK, the display lights up whenever the oven , and Timer. Every touch on the is heating up. sensors is confirmed by a keypad tone.
-
Page 26: Features
(voltage / frequency / maximum rated designed for the Miele Range. load). These can be ordered from the Miele Have this information available if you web store, Miele Service, or from your need to contact Miele so that any Miele dealer. - Page 27 Features Universal tray and wire rack with Fully telescopic rails with wire non-tip safety notches rack HFCBBR 30-3 Universal tray HUBB 30-1: Wire rack HBBR 30-2: The fully telescopic rails with wire rack are attached to the side runners and can be pulled completely out of the The wire rack has non-tip safety oven so that you can inspect the food notches fitted on the short sides.
- Page 28 Features Use both hands to grip the fully Temperature selector in °C telescopic rails with rack, taking care The range is supplied with a to hold them by the actual rails, and temperature selector in °F. A position them in front of the desired temperature selector in °C is available shelf level.
- Page 29 Features Round baking pans Perforated Gourmet Baking Tray HBBL 71 The solid round baking pan HBF 27-1 is suitable for cooking pizzas, flat cakes The perforated Gourmet Baking Tray made with yeast, or whisked mixtures, has been specially developed for sweet and savoury tarts, baked preparing baked goods made from desserts, flat bread, and can also be fresh yeast and quark doughs, and for...
-
Page 30: Safety Features Of The Electric Cooktop
HUB Gourmet Oven Dishes Safety features of the electric HBD Gourmet Oven Dish Lids cooktop Miele Gourmet Oven Dishes can be Overheating protection placed on the wire rack. The surface of the oven dishes has a non-stick Each burner is equipped with coating. -
Page 31: Oven Safety Features
Features - Door locking for Self Clean Oven safety features At the beginning of a Self Clean - System lock for the oven program, the door will lock for safety (see “Operating the oven – Operating reasons. The door will only unlock the clock / timer”) when the temperature in the oven compartment has dropped to below... -
Page 32: Self-Clean-Ready Accessories
Features Self-Clean-ready accessories See “Cleaning and care of the oven” for more information. The following accessories can be left in the oven compartment during the Self Clean program: - Side runners - Fully telescopic runners with wire rack - Wire rack... -
Page 33: Initial Commissioning
Initial commissioning Before using for the first time The time of day can also be displayed in 24-hour format by setting in the Risk of injury due to hot surfaces settings menu to status (see The range gets hot during operation. “Operating the oven –... -
Page 34: Cleaning The Cooktop Before Heating It Up For The First Time
Initial commissioning Cleaning the cooktop before Heating up the oven for the heating it up for the first time first time Metal components are protected by a New ovens may have a slight odour conditioning agent. New cooktops may during their first use. Heating up the have a slight odour and can also give oven for at least an hour with nothing in off vapours during their first use. - Page 35 Initial commissioning Set the maximum temperature Cleaning the oven compartment after (500°F/260°C). heating it up for the first time The oven heating will switch on. Risk of injury caused by hot surfaces. Heat the empty oven for at least an The oven gets hot during operation.
-
Page 36: Operating The Electric Cooktop
Operating the electric cooktop Energy-saving tips Cookware - Check that the diameter of the pot or The most suitable cookware is metal pan base is wide enough for the pots and pans with thick bases that, electric burner. This prevents heat when cold, bulge inwards slightly. -
Page 37: How The Burners Work
Operating the electric cooktop The composition of the pan base can How the burners work affect the evenness of the cooking Each burner has overheating protection, results (e.g. when making pancakes). which stops the ceramic surface from - To make optimum use of the burners, becoming too hot (see “Features –... -
Page 38: Burner Data
Operating the electric cooktop Burner data in cm Burner Wattage 208 V, 60 Hz 240 V, 60 Hz Rear left 14.5 1,200 1,200 (standard burner) Front left 21 / 27 2,000 / 2,800 2,300 / 3,100 (variable burner) Front right 12 / 18 1,100 / 2,400 1,100 / 2,400 (variable burner) Rear right 14.5 / 21 700 / 1,800 700 / 1,800 (variable burner) Total: 8,200 Total: 8,500... -
Page 39: Power Level Ranges
Operating the electric cooktop Power level ranges Power level range Melting butter, chocolate, etc. 1–2 Dissolving gelatin Preparing yogurt Thickening sauces containing only egg yolk and butter 1–3 Warming small quantities of liquid Keeping food warm that sticks easily Cooking rice Warming liquid and semi-solid foods 3–5 Thickening sauces, e.g. -
Page 40: Switching On The Burner
Operating the electric cooktop Switching off a burner Do not heat empty pots on the cooktop as this this can damage the Turn the burner control knob ceramic surface. counterclockwise to 0. Never leave the cooktop unattended Residual heat indicator when it is on! When a particular temperature is reached after the burner (e.g. -
Page 41: Operating The Oven
Operating the oven - It is best to use dark bakeware and Overview of operating modes cooking containers with a matte Operating modes Range finish made of non-reflective materials (enamelled steel, heat- Booster 150–500°F resistant glass, non-stick coated cast (65–260°C) aluminum). -
Page 42: Simple Operation
Operating the oven Residual heat utilization Preheating the oven compartment - The temperature in cooking programs using temperatures above 140°C The Booster operating mode is (280°F) which take longer than used to quickly preheat the oven. 30 minutes to cook can be turned The appliance only needs to be down to the lowest possible preheated in a few cases. -
Page 43: Operating The Clock / Timer
Operating the oven Place the food in the oven. Operating the clock / timer Switching cooking programs on and off automatically Cooking programs can be switched on or off automatically. To do this, set a cooking duration or a duration and end of cooking duration after selecting an operating mode and a temperature. - Page 44 Operating the oven The cooking duration is now saved and will count down in minutes: Use or to set the cooking duration ().
- Page 45 Operating the oven The oven heating, lighting, and cooling Deleting a cooking duration fan will switch off. Select OK. As soon as the start time ( - = If necessary, use or to move the ) has been reached, the oven triangle ...
-
Page 46: Changing The Time Of Day
Operating the oven Deleting the end of cooking duration Changing factory default settings Select OK. Default settings are set in the oven controls at the factory (see “Settings If necessary, use or to move the overview”). triangle ... - Page 47 Operating the oven The setting is selected and the current status appears, e.g. . To change the status: Use or to set the status you want. Confirm with OK. The selected status is now saved and the setting appears again.
- Page 48 Operating the oven Settings overview Setting Status * Time of day display is deactivated. Time of day The display appears dark if the oven is switched off. display The time of day continues to run in the background. If you select the status , the oven then has to be switched on before it can be used.
- Page 49 Operating the oven Setting Status to You can choose different levels of brightness for the , Display display. brightness * : minimum brightness : maximum brightness * The oven interior lighting is switched on for Lighting 15 seconds and then turns off automatically.
-
Page 50: Switching The System Lock On And Off
Operating the oven Switching the system lock on and off The system lock has been activated. The system lock prevents the oven When the oven is switched on again, from being used unintentionally. the symbol will appear to remind you that the system lock has been The appliance is delivered with the activated. -
Page 51: Using The Timer
Operating the oven Using the timer The timer duration is now saved and will count down in seconds: The timer can be used to time other activities in the kitchen, e.g. boiling eggs. The timer can also be used at the same ... -
Page 52: Baking
Baking Using parchment paper Handling food carefully will help protect your health. Miele accessories, e.g. the universal Cakes, pizzas, and French fries tray, are treated with PerfectClean (see should be cooked until golden, not “Features”). Surfaces treated with dark brown. -
Page 53: Notes On The Operating Modes
Baking Using Surround (Surround) Notes on the operating modes Dark metal, enamel, or aluminum For a list of all the operating modes, bakeware with a matte finish, as well as please see “Overview of operating heat-resistant glass, ceramic, and modes”. coated bakeware can be used. -
Page 54: Roasting
Roasting - Do not add too much liquid during Always observe CFIA food safety cooking as this will hinder the guidelines. browning process. Browning only occurs towards the end of the Tips for roasting cooking duration. Remove the lid - You can use all dishware made from about halfway through the cooking temperature-resistant materials, e.g. -
Page 55: Notes On The Operating Modes
Roasting Selecting the cooking duration Notes on the operating modes Determine the cooking duration by For a list of all the operating modes, multiplying the thickness of the roast please see “Overview of operating [cm] by the time per cm [min/cm] modes”. -
Page 56: Broiling
Broiling - The tray under the insert will collect Risk of injury caused by hot the meat juices and stop them from surfaces. burning so that they can be used for If you broil with the door open, the making gravy and sauces. -
Page 57: Notes On The Operating Modes
Broiling Selecting the cooking duration Notes on the operating modes Broil thinner cuts of meat / slices of For a list of all the operating modes, fish for approx. 6–8 minutes per side. please see “Overview of operating It is best to broil food of a similar modes”. -
Page 58: Further Applications
Further applications This section provides information on the Tips following applications: - Remove the packaging and place the frozen food on the universal tray or in - Defrost a suitable bowl or dish. - Dehydrating - Use the universal tray with the rack - Heating dishes placed on top of it for defrosting poultry. -
Page 59: Drying
Further applications Drying Heating dishes Dehydrating or drying is a traditional Use the Convection Bake (Conv method of preserving fruit and certain Bake) operating mode for preheating vegetables. dishes. It is important that fruit and vegetables Only preheat heat-resistant dishes. are ripe, fresh, and not bruised before they are dehydrated. -
Page 60: Slow Roasting
Further applications Serve on preheated plates with very Slow Roasting hot sauce or gravy to prevent it Slow Roasting is ideal for cooking cooling down too quickly. The meat is delicate cuts of beef, pork, veal, or an ideal temperature to eat straight lamb to perfection. - Page 61 Further applications Cooking durations / core temperatures Always observe CFIA food safety guidelines. Meat Cooking Core temperature duration Beef tenderloin, approx. 2.2 lbs (1 kg) - Rare 60–80 min 113–119°F (45–48°C) 75–85 min 129–135°F (54–57°C) - Medium 110–130 min 145–151°F (63–66°C) - Well done Prime rib, approx. 2.2 lbs (1 kg) - Rare 70–80 min 113–119°F (45–48°C)
-
Page 62: Canning
Further applications Preparing fruit and vegetables Canning The instructions are for 6 jars with a Risk of infection from bacteria. capacity of 1 litre each. The spores of the botulinum bacterium are not sufficiently killed Only use special jars for canning by canning pulses and meat only (preserving jars or jars with a screw once. - Page 63 Further applications Canning fruit and vegetables Removing the jars after canning Set the specified post-canning Risk of injury caused by hot warming temperature as soon as surfaces. bubbles are visible in the jars, then The jars will be very hot after leave the jars in the warm oven for canning.
-
Page 64: Frozen Food / Ready Meals
Further applications Preparing frozen food / ready meals Frozen food / ready meals Handling food carefully will help Tips for cakes, pizza, and baguettes protect your health. - Bake cakes, pizza, and baguettes on Cakes, pizzas, and French fries parchment paper on the wire rack. should be cooked until golden, not - Use the lowest temperature dark brown. -
Page 65: Cleaning And Care Of The Electric Cooktop
Cleaning and care of the electric cooktop Unsuitable cleaning agents Risk of injury due to hot burners. The burners will be hot after use. To avoid damaging the surfaces, do not use: Switch the cooktop off. Allow the burners to cool down - dish detergent before cleaning the cooktop. - Page 66 Then clean the ceramic surface with Afterwards, clean the ceramic surface the Miele Ceramic and Stainless Steel in its cooled state, as described Cleaner (see “Features”) or with a above. commercially available ceramic glass...
-
Page 67: Cleaning And Care Of The Oven
Cleaning and care of the oven Unsuitable cleaning agents Risk of injury caused by hot surfaces. To avoid damaging the surfaces, do not The oven gets hot during operation. use: You could burn yourself on the - Cleaning agents containing soda, heater elements, oven compartment, ammonia, acids, or chlorides or accessories. -
Page 68: Removing Normal Soiling
Cleaning and care of the oven Removing stubborn soiling The accessories are not dishwasher-safe. Do not line the oven (e.g. with aluminum foil) and do not use Useful tip: Soiling caused by spilled standard oven cleaners unless they fruit juices and cake mixtures is best are suitable for use in a self-cleaning removed while the oven is still warm. -
Page 69: Cleaning With The Self Clean (Clean) Operating Mode
Cleaning and care of the oven Preparing for Self Clean Cleaning with the Self clean (Clean) operating mode Accessories that are not suitable for the Self Clean program will be Instead of cleaning the oven manually, damaged by the high temperatures. you can use the Self clean ... -
Page 70: Starting Self Clean
Cleaning and care of the oven Starting Self Clean If you wish to follow the progress of the Self Clean program, you will need to call Risk of burns! up the duration . The oven door gets much hotter Select OK. during the Self Clean program than during normal use. -
Page 71: At The End Of The Self Clean Program
Cleaning and care of the oven Starting Self Clean at a later time At the end of the Self Clean program Start the Self Clean program as described and then set the desired finish time within the first five minutes of starting the program. -
Page 72: Self Clean Interrupted
Cleaning and care of the oven Self Clean interrupted Most residues can be removed with warm water, liquid dish soap, and a If the Self Clean program is cancelled, clean sponge or a clean, damp the oven door will remain locked until microfibre cloth. -
Page 73: Removing The Door
Cleaning and care of the oven Removing the door You could damage the oven if you remove the door incorrectly. The door weighs approx. 39.7 lbs Do not pull the door horizontally off (19 kg). its retainers, as they will spring back against the oven. -
Page 74: Reinstalling The Door
Cleaning and care of the oven Open the door fully. Reinstalling the door If the locking clamps are not locked, the door could become loose, resulting in damage. Ensure that the locking clamps are locked after refitting the door. ... -
Page 75: Removing The Side Runners
Cleaning and care of the oven Removing the side runners Risk of injury due to hot surfaces The oven gets hot during operation. You could burn yourself on the heater elements, oven compartment, or accessories. Allow the heater elements, oven compartment, and accessories to cool down before removing the side runners. -
Page 76: Frequently Asked Questions
Check if the fuse has tripped. Contact a qualified turned on. electrician or Miele Service (for the minimum fuse rating, see data plate). There may be a technical fault. Disconnect the range from the power supply for approx. - Page 77 There is no power to the oven. Check if the circuit breaker has tripped. If it has, contact a qualified electrician or Miele Service. Demo mode is activated. appears. The oven can be operated, but the oven heating will not work.
- Page 78 and a fault code not A fault has occurred that you cannot resolve. listed here appear on Contact Miele Service. the display. A noise is heard after The cooling fan will continue to run for a while after the...
- Page 79 Frequently Asked Questions Problem Possible cause and solution The accessories The Self-Clean-resistant surface of the side runners make noises when creates friction when accessories are pushed into or they are pushed into pulled out of the oven. or pulled out of the ...
-
Page 80: Technical Service
In the event of a fault which you cannot For further information, please refer to remedy yourself, please contact your your warranty booklet. Miele dealer or Miele Service. Contact information for Miele Service can be found at the end of this document. - Page 81 Consult with local authorities, dealers or Miele in order to dispose of and recycle electrical and electronic appliances. Miele assumes no responsibility for deleting any personal data left on the appliance being disposed.
- Page 83 Please have the model and serial number of your appliance available when contacting Customer Service. Canada Importer Miele Limited Headquarters and Miele Centre 161 Four Valley Drive Vaughan, ON L4K 4V8 www.miele.ca Customer Care Centre Phone: 800 565-6435 customercare@miele.ca Germany Manufacturer Miele &...
- Page 84 HR 1421-3 E en-CA M.-Nr. 11 918 440 / 01...
Need help?
Do you have a question about the HR 1421-3 E and is the answer not in the manual?
Questions and answers