
Subscribe to Our Youtube Channel
Related Manuals for BLAUBERG AERIS MINI-WHI


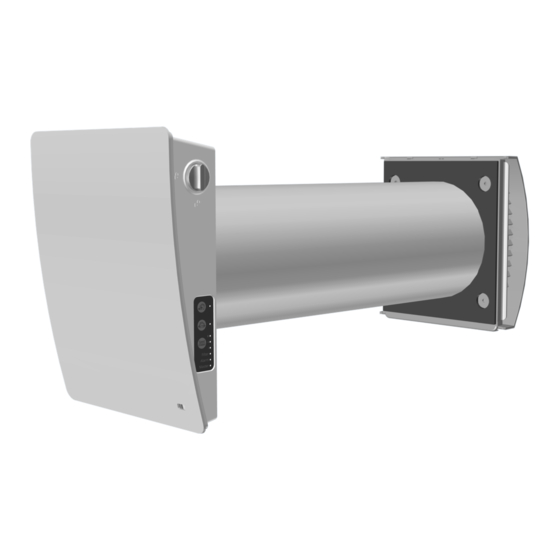
Summary of Contents for BLAUBERG AERIS MINI-WHI
- Page 1 Single-room reverSible energy recovery ventilator AERIS MINI-WHI AERIS MIDI-WHI USER’S MANUAL...
-
Page 2: Table Of Contents
The manual contains information about purpose, technical details, operating principle, design, and installation of the AERIS MIDI-WHI, AERIS MINI-WHI unit and all its modifications. Technical and maintenance staff must have theoretical and practical training in the field of ventilation systems and should be able to work in accordance with workplace safety rules as well as construction norms and standards applicable in the territory of the country. - Page 3 Do not close or block the intake or extract vents in order to ensure the efficient air flow. Do not sit on the unit and do not put objects on it. The information in this user’s manual was correct at the time of the document’s preparation.
-
Page 4: Purpose
PURPOSE The ventilator is designed to ensure continuous mechanical air exchange in flats, cottages, hotels, cafés and other domestic and public premises. The ventilator is equipped with a regenerator that enables supply of fresh filtered air heated by means of extract air heat energy recovery. -
Page 5: Technical Data
65 % (no condensation buildup). Transported air temperature must be in the range: from -15 ˚С to +40 ˚С for AERIS MINI-WHI models from -20 ˚С to +40 ˚С for AERIS MIDI-WHI models If the conditions of use of the ventilator are outside the specified limits, turn off the ventilator. Provide fresh air with open windows. -
Page 6: Design And Operating Principle
In the AERIS MINI-WHI the fan unit and the regenerator unit are connected in a non-assembled cartridge. Inside the air duct, on the air flow path, there are two filters that ensure rough air filtration and prevent ingress of dust and foreign objects into the regenerator and the fan. - Page 7 AIR DAMPER OPERATING PRINCIPLE The indoor unit of the ventilators has a swivel damper. The vertical position of the handle corresponds to the position OPEN, the horizontal one – to the position CLOSED. The indoor unit of the ventilators is equipped with an automatic air damper. It opens at the beginning of the ventilator’s operation and lets the air flow freely through the ventilator.
-
Page 8: Mounting And Set-Up
MOUNTING AND SET-UP READ THE USER'S MANUAL BEFORE INSTALLING THE UNIT. DO NOT BLOCK THE AIR DUCT OF THE INSTALLED VENTILATOR WITH DUST ACCUMULATING MATERIALS, SUCH AS CURTAINS, CLOTH SHUTTERS, ETC. AS IT PREVENTS AIR CIRCULATION IN THE ROOM. - Page 9 Ventilator model or installation variant Reference dimensions for installation of AERIS MIDI-WHI ventilators AERIS MINI-WHI AERIS MIDI-WHI with minimum wall thickness Length of cartridge or fan and regenerator units [mm] Hole diameter D [mm] Minimum possible wall thickness when...
- Page 10 4. Stick the delivered cardboard master plate on the indoor wall using a mounting tape. The large opening in the master plate must be axially aligned with the air duct. Align the master plate horizontally with a building level.
- Page 11 7. Fix the back part of the indoor unit on the wall with the screws supplied with the mounting kit of the ventilator. 8. Route the power cable as figured below and connect the ventilator to power mains in compliance with the external wiring diagram, see section Connection to power mains.
- Page 12 10. Install the cartridge or the regenerator unit and the fan unit into the air duct as figured below and connect the connector to the board. Insert the sound-absorbing layer in the air duct. Roll the layer of the sound absorbing material to match the air duct diameter. The protecting paper layer must be outside.
-
Page 13: Connection To Power Mains
CONNECTION TO POWER MAINS POWER OFF THE POWER SUPPLY PRIOR TO ANY OPERATIONS WITH THE UNIT. THE UNIT MUST BE CONNECTED TO POWER SUPPLY BY A QUALIFIED ELECTRICIAN. THE RATED ELECTRICAL PARAMETERS OF THE UNIT ARE GIVEN ON THE MANUFACTURER’S LABEL. - Page 14 CONNECTION OF VENTILATORS TO A SINGLE NETWORK Connection of ventilators to a single network For coordinated control of several ventilators, they must be connected to a single network. All devices in the RS-485 network must be connected using the Bus topology.
- Page 15 SETTING THE VENTILATOR OPERATION MODE USING DIP SWITCHES Prior to operating the ventilator set its operation modes using the DIP switch. It is located on the controller circuit board. To access the DIP switch, take off the front panel of the indoor unit and uplift the rubber plug that covers the switch.
- Page 16 VENTILATOR CONTROL The ventilator is operated with: • infra-red remote control • control buttons located on the side of the indoor unit (see the figure below) VENTILATOR CONTROL WITH THE BUTTONS ON THE INDOOR UNIT Turning the ventilator on/o...
- Page 17 Ventilation mode The ventilator operates in the supply or extraction mode at a set speed. The fan rotation direction depends on the position of the DIP switch No. 3. Resetting to factory settings To reset all parameters to the factory settings, hold this button on the indoor unit of the master ventilator for 5 seconds until a beep sounds.
-
Page 18: Technical Maintenance
TECHNICAL MAINTENANCE DISCONNECT THE UNIT FROM POWER SUPPLY BEFORE ANY MAINTENANCE OPERATIONS! MAKE SURE THE UNIT IS DISCONNECTED FROM POWER MAINS BEFORE REMOVING THE PROTECTION Maintenance of the ventilator means regular cleaning of the ventilator surfaces of dust and cleaning and replacement of the filters. To enable access to the main units, follow the procedure described below. - Page 19 Clean the filters as they get clogged, but not less than once in three months. • On the expiry of 90 days the filter replacement indicator (Filter) starts glowing. • Wash the filters and let those dry out completely. Install the dry filters in their place and assemble the unit in the reverse order.
-
Page 20: Storage And Transportation Regulations
POSSIBLE REASONS AND TROUBLESHOOTING Problem Possible reasons Troubleshooting Make sure the power supply line is connected No power supply. correctly, otherwise troubleshoot a connection When switching on the error. ventilator, the fan does not Turn the ventilator off. Troubleshoot the motor jam start. -
Page 21: Manufacturer's Warranty
MANUFACTURER’S WARRANTY The product is in compliance with EU norms and standards on low voltage guidelines and electromagnetic compatibility. We hereby declare that the product complies with the provisions of Electromagnetic Compatibility (EMC) Directive 2014/30/EU of the European Parliament and of the Council, Low Voltage Directive (LVD) 2014/35/EU of the European Parliament and of the Council and CE-marking Council Directive 93/68/EEC. - Page 22 mini-WHi...
-
Page 23: Certificate Of Acceptance
CERTIFICATE OF ACCEPTANCE Unit Type Single-room reversible energy recovery ventilator Model Serial Number Manufacture Date Quality Inspector’s Stamp SELLER INFORMATION Seller Address Phone Number E-mail Purchase Date This is to certify acceptance of the complete unit delivery with the user’s manual. The warranty terms are acknowledged and accepted. - Page 24 Blauberg_UK222-2EN-02...
Need help?
Do you have a question about the AERIS MINI-WHI and is the answer not in the manual?
Questions and answers