Kollmorgen AKD PDMM Quick Start Manual
Hide thumbs
Also See for AKD PDMM:
- Installation manual (196 pages) ,
- Manual (20 pages) ,
- Fault card (16 pages)
Table of Contents
Advertisement
Quick Links
AKD PDMM™
Quick Start
Edition: April, 2012, Revision A
Valid for Hardware Revision DB
Patents Pending
Part Number 903-200014-00
Keep all manuals as a product component during the life span of the product.
Pass all manuals to future users / owners of the product.
Need Help?
Kollmorgen is committed to quality customer service. If you have trouble with the
PDMM Quick Start setup, please contact Kollmorgen customer support:
North America
Kollmorgen Customer Support
Internet: www.kollmorgen.com
E-Mail: support@kollmorgen.com
Tel.: +1 - 540 - 633 - 3545
Fax: +1 - 540 - 639 - 4162
Europe
Kollmorgen Customer Support
Internet: www.kollmorgen.com
E-Mail: technik@kollmorgen.com
Tel.: +49(0)2102 - 9394 - 0
Fax:+49(0)2102 - 9394 - 3155
Advertisement
Table of Contents

Related Manuals for Kollmorgen AKD PDMM


Summary of Contents for Kollmorgen AKD PDMM
- Page 1 Keep all manuals as a product component during the life span of the product. Pass all manuals to future users / owners of the product. Need Help? Kollmorgen is committed to quality customer service. If you have trouble with the PDMM Quick Start setup, please contact Kollmorgen customer support: North America...
- Page 2 Printed in the United States of America This document is the intellectual property of Kollmorgen™. All rights reserved. No part of this work may be reproduced in any form (by photocopying, microfilm or any other method) or stored, processed, copied or distributed by electronic means without the...
-
Page 3: Table Of Contents
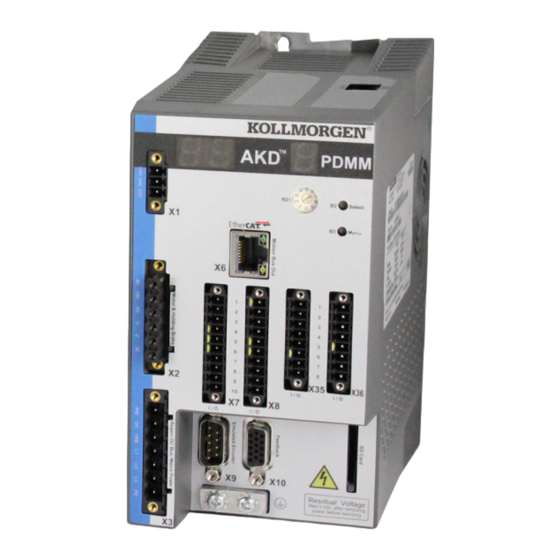
Before installing, review the safety instructions included in the AKD PDMM Installation Manual. Failure to follow these safety instructions may result in user injury or damage to equipment. The AKD PDMM Installation Manual is available on the CD included with the AKD PDMM, and also on the Kollmorgen website: www.kollmorgen.com. - Page 4 Hardware Installation AKD PDMM Wiring Diagram Figure 1 summarizes wiring of the AKD PDMM. Detailed wiring diagrams are included at the end of this Quick Start guide. Steps 1 through 8 of this guide provide detailed information for each connection shown...
-
Page 5: Step 1 Secure The Drive And Connect The Protective Earth (Pe)
• 3 mm T-handle Allen key • No. 2 Phillips head screwdriver Bolt the AKD PDMM to a conductive metal plate. See the AKD PDMM Installation Manual for the dimensions and mounting information on your specific drive model. Connect the protective earth (PE) to any ground screw on the drive grounding lug shown in Figure 2. -
Page 6: Step 3 Connect Motor Power (X2 Connector)
AKD PDMM Quick Start | Connect Logic Power and STO Please note the following when connecting logic power supply: • Input current of up to 2A is required. If the brake relay is used, current of up to 4A must be supplied. -
Page 7: Step 4 Connect Feedback (X10 Connector)
Step 4: Connect Feedback (X10 Connector) Connect the feedback from the motor to the X10 connector according to Figure 7. Standard Kollmorgen motor feedbacks are plug-and-play and require no parameter set- ting for motor recognition and commutation to occur. Figure 7. Feedback connection... -
Page 8: Step 5 Connect I/O (X7, X8, X35, And X36 Connectors)
Step 5: Connect I/O (X7, X8, X35, and X36 Connectors) Connect required I/O according to the configuration shown in Figure 8. All pins are configurable; factory presets are shown in the pin configuration table. Figure 8. I/0 Connection Pin Configuration Connector Pin Signal Recommended Function... -
Page 9: Step 6 Connect Ac Input Power (X3 And X4 Connectors)
Step 6: Connect AC Input Power (X3 and X4 Connectors) Connect AC input power for your AKD PDMM model as shown in Figures 9 and 10. Do not apply power until all hardware connections are made. - Page 10 AKD PDMM IP address using either static or dynamic IP addressing. a. Static IP addressing (switch setting 1 to 9): The S1 rotary switch on the front panel of the AKD PDMM corresponds to its IP address setting. Figure 11. Rotary switch for static IP addressing IP address = 192.168.0.S1...
- Page 11 Dynamic IP addressing (DHCP and Auto-IP): If the S1 switch is set at 0, then the drive is in Dynamic Host Configuration Protocol (DHCP) mode. The AKD PDMM will acquire its IP address from an external DHCP server if one is present in the network.
- Page 12 AKD PDMM Quick Start | Connect AKD PDMM Communication Service Port (TCP/IP) X32 Connection AKD PDMM PC Running KAS IDE Figure 13. Option A. Direct Connection 2. Set the PC IP address. In Windows, select Start>Control Panel>Network Connections. Choose the correct network connection for the port over which you will connect to the AKD PDMM.
-
Page 13: Step 8 Confirm Connections
(static IP connection). The connection is now configured to establish a point-to-point direct connection be- tween the AKD PDMM and the PC using the KAS IDE. You can now skip to Step 8. Option B: Network device connection 1. Set the rotary switch on the AKD PDMM to zero. - Page 14 Operational - program not running Operational - program running Confirm that the link LEDs on the AKD PDMM(green LED on the RJ45 connector) and on your PC are both illuminated. If both LEDs are illuminated, then you have a working electrical connection.
-
Page 15: Step 9 Install And Start Kas Ide
AKD PDMM connection complete. Although Windows displays this limited functionality icon for the AKD PDMM connec- tion, the PC can communicate fully with the AKD PDMM. Using the KAS IDE, you can now configure the AKD PDMM through this connection. - Page 16 AKD PDMM Quick Start | Install and Start the KAS IDE Select your AKD PDMM model from the list and click Next. You will then be prompted to select an application template: Figure 20. Select Application Template Choose from PipeNetwork, PLCopen, or Library, and click Finish. The controller will then be added to the project view.
-
Page 17: Step 10 Starting A New Project In The Kas Ide
AKD PDMM Quick Start | Install and Start the KAS IDE Select Properties and the following screen appears: Figure 22. Controller Properties Type in the IP address of the PDMM, set the Controller Type to PDMM and click OK. Step 10: KAS IDE Project View The KAS IDE contains tools for configuring the EtherCAT network, setting up and tuning the drives, adding and configuring HMIs, and creating a PLC program. -
Page 18: Step 11 Configuring The Drives And Remote I/O
Step 11: Configuring the Drives and Remote I/O All drives, including the drive in the PDMM itself and the Remote I/O, can be configured by the IDE. In order to connect to an EtherCAT device you must first compile your project. - Page 19 AKD PDMM Quick Start | Configuring the Drives and Remote I/O The devices are added to the project view: Figure 26. Devices Added to Project To communicate directly with a drive without running a project, first compile and down- load the project:...
-
Page 20: Step 12 Running The Axis
AKD PDMM Quick Start | Configuring the Drives and Remote I/O Additionally, the setup wizard will guide you through a set of configuration steps: Figure 30. Setup Wizard Step 12: Running the Axis To perform basic motion without running a project, use the Service Motion view with the drive set to Position Mode: Figure 31. -
Page 21: Wiring Diagram, Akd-M00306 & Akd-M00606
Wiring Diagram 3A and 6A, 240V AKD PDMM-x00306 to x00606... -
Page 22: Wiring Diagram, Akd-M01206
Wiring Diagram 12A, 240V AKD PDMM-x01206... -
Page 23: Wiring Diagram, Akd-Mxxx07
Wiring Diagram 3A, 6A, and 12A, 480V AKD PDMM-xzzz07... - Page 24 About Kollmorgen Kollmorgen is a leading provider of motion systems and components for machine builders. Through world-class knowledge in motion, industry-leading quality, and deep expertise in linking and integerating standards and custom products, Kollmorgen delivers breakthrough so- lutions that are unmatched in performace, reliability, and ease-of-use, giving machine builders an irrefutable marketplace advantage.
Need help?
Do you have a question about the AKD PDMM and is the answer not in the manual?
Questions and answers