Advertisement
Table of Contents
- 1 Assembly Procedure
- 2 Lay Floor Trays Side-By-Side into the Bottom of the Whelping Box
- 3 Connect Floors to Side Panels with Supplied #250 Floor Clips
- 4 Assemble the Puppy Rails
- 5 Insert the Roverpet Puppy Rail Assembly into the Whelping Box
- 6 Feed the #DPK Designer Puppy Keeper
- 7 Thank You for Purchasing a Roverpet Whelping Box #WB2444DSF
- Download this manual
Roverpet
20 Kiji Dava Circle Prescott, Arizona 86301
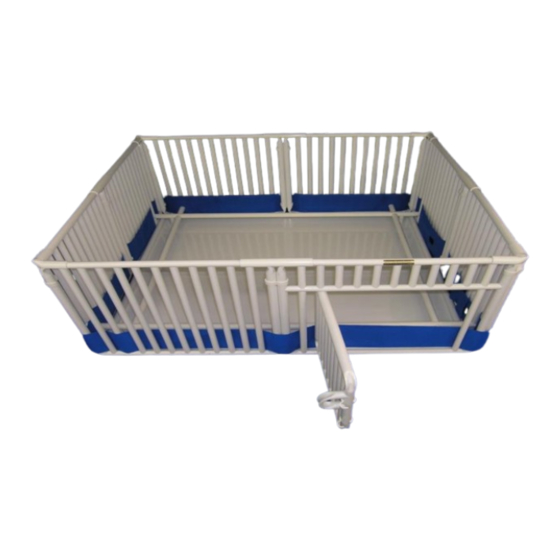
Roverpet #WB2444DSF 24" high 4' x 4' Whelping Box Assembly Instructions
Inventory list for The Roverpet #WB2444DSF Whelping Box:
#124 24" high Panels
(7)
(1) #44DPK Designer Puppy Keeper (6" high)
(1) #44PR3 Puppy Rail assembly (two leg bars, two cross-bars and four legs)
(4) #180 Straight Stabilizers
(12) #250 Floor/Divider clips (16) #200 Panel Clips (pre-assembled onto frames by Roverpet)
Assembly Procedure
1.) Unpack contents of shipping carton and compare to parts list above.
2.) Layout the two #124 panels / #D24 door sub-assemblies as show below, with the assembly containing the
door positioned on the right side.
#200 panel clips- pre-attached
to end panels here by Rover
Co.
3.) Connect the ends of the sub-assemblies together with the #200 panel clips that are already attached to the
end panels; reposition panels into a square shape resembling the main photo at the top of this page.
4.) Install #180 straight stabilizers onto the top of in-line connected panels (left photo below) and install #90
corner stabilizers onto the top of corner connected panels (right photo below).
(1) #D24 24" high Door
(4) #90 Corner Stabilizers
1-800-658-5925
rover@roverpet.com
(2) #F24 2'x4' Floors
Advertisement
Table of Contents

Related Manuals for Roverpet WB2444DSF


Summary of Contents for Roverpet WB2444DSF
- Page 1 (1) #44PR3 Puppy Rail assembly (two leg bars, two cross-bars and four legs) (4) #180 Straight Stabilizers (4) #90 Corner Stabilizers (12) #250 Floor/Divider clips (16) #200 Panel Clips (pre-assembled onto frames by Roverpet) Assembly Procedure 1.) Unpack contents of shipping carton and compare to parts list above.
- Page 2 Refer to the three photos below for visual clarification. 8.) Insert the Roverpet puppy rail assembly into the whelping box with the drilled and end-notched leg bars running across the door opening for correct fastening orientation, as shown in the left photo below; partially engage the two notched ends of the leg bars with the second inward-most vertical bars of the #124 panels as shown in the right photo below.
- Page 3 #124 panel (again see right photo below). 14.) Run the fabric along the inside of the Roverpet whelping box until you reach the center where the two #124 panels connect and feed the fabric out around the frame pipes and back into the Roverpet whelping box and shown in the left photo below.
Need help?
Do you have a question about the WB2444DSF and is the answer not in the manual?
Questions and answers