
Related Manuals for Endress+Hauser ASP Station 2000 peristaltic


Summary of Contents for Endress+Hauser ASP Station 2000 peristaltic
- Page 1 Operating manual ASP Station 2000 peristaltic Stationary peristaltic water sampler BA176R/09/a3/04.06 51008239...
-
Page 2: Table Of Contents
Für die schnelle und einfache Inbetriebnahme. Sicherheitshinweise Seite 5 ⇓ Montage Seite 8 ⇓ Anzeige- und Bedienelemente Seite 20 ⇓ Inbetriebnahme Seite 28 Hier finden Sie Vorgehensweisen zur Inbetriebnahme. ⇓ Wartung und Reinigung Seite 49 Hier finden Sie Vorgehensweisen zur Wartung und Reinigung Endress+Hauser... - Page 3 ASP Station 2000 Peristaltik Betriebsanleitung Deutsch ab Seite 2 (Bitte lesen, bevor Sie das Gerät in Betrieb nehmen) Gerätenummer:............< ASP Station 2000 peristaltic Operating manual English from page 68 (Please read before installing the unit) Unit number:............ASP Station 2000 peristaltic Mise en service Français...
- Page 4 Prozessfehler ohne Meldungen ....52 Ersatzteile ......54 Endress+Hauser...
-
Page 5: Sicherheitshinweise
Der Hersteller behält sich vor, technische Details ohne spezielle Ankündigung dem entwicklungs- technischen Fortschritt anzupassen. Über die Aktualität und eventuelle Erweiterungen der Betriebsanleitung erhalten Sie bei Ihrer Vertriebsstelle Auskunft. Rücksendung Folgende Maßnahmen müssen ergriffen werden, bevor Sie das Gerät an Endress+Hauser, z. B. für eine Reparatur, zurücksenden: Endress+Hauser... -
Page 6: Sicherheitszeichen Und -Symbole
ASP Station 2000 Peristaltik • Legen Sie dem Gerät in jedem Fall ein vollständig ausgefülltes 'Gefahrgutblatt' bei. Nur dann ist es Endress+Hauser möglich, ein zurückgesandtes Gerät zu transportieren, zu prüfen oder zu reparieren. • Legen Sie der Rücksendung spezielle Handhabungsvorschriften bei, falls dies notwendig ist, z. B. -
Page 7: Identifizierung
ASP Station 2000 Peristaltik Identifizierung Identifizierung Gerätebezeichnung Vergleichen Sie das Typenschild am Gerät mit den folgenden Abbildungen: ASP Station 2000 Peristaltic RPS24- Order Code: Ser.No.: Spec.: 230 V, 50 Hz 340 W Made in Germany D-87484 Nesselwang Abb. 1: Typenschildangaben für die ASP Station 2000 Peristaltik (beispielhaft) Pos. -
Page 8: Montage
Warenannahme, Transport, Lagerung 3.2.1 Warenannahme Kontrollieren Sie nach der Warenannahme folgende Punkte: • Sind Verpackung oder Inhalt beschädigt? • Ist die gelieferte Ware vollständig? Vergleichen Sie den Lieferumfang mit Ihren Bestellangaben. 3.2.2 Transport Schrank immer senkrecht transportieren. Nicht kippen! Endress+Hauser... -
Page 9: Aufstellungsbedingungen
• Stellen Sie eine ungehinderte Luftzirkulation an der Rückseite des Schranks sicher. Stellen Sie das Gerät nicht direkt an eine Wand (Abstand Wand - Schrankrückseite: mind. 100 mm) • Stellen Sie den Schrank nicht direkt über den Kanal des Kläranlagenzulaufs (Schwefeldämpfe!) Endress+Hauser... - Page 10 Stellen Sie das Gerät unter Berücksichtigung der Aufstellungsbedingungen s. Kap. 3.3 auf. Verlegen Sie den Entnahmeschlauch von der Entnahmestelle zum Gerät. Hinweis! Beachten Sie bitte hierbei die Anforderungen an die Probenentnahmestelle unter → Kap. 3.3 Schrauben Sie den Entnahmeschlauch an den Schlauchanschluss des Gerätes → Abb. 2, Pos. d. Endress+Hauser...
-
Page 11: Aufstellungskontrolle
• Sehen Sie ab Fundament bis zum Klemmenanschluss eine Kabellänge von ca. 1,7 m vor 4.1.2 Kabeltypen • Stromversorgung: z.B. NYY-J; 3 adrig; 1,5 bis 2,5 mm • Analog-, Signal- und Meldeleitungen: Es ist ein geschirmtes Kabel zu verwenden z.B. LiYCY 12x0,34 mm Endress+Hauser... - Page 12 Schirmklemmen angeschlossen. Wenn die Möglichkeit besteht, soll der Schirm beidseitig auf- gelegt werden. An das Signalkabel können folgende Signale gelegt werden: • Eingangssignale: - 2 Digitalsignale > 20 ms - 1 Analogsignal 0/4...20 mA • Ausgangssignale: - 2 Digitalsignale Endress+Hauser...
- Page 13 Warnung! Spannungsführende Betriebsmittel Abb. 7: Dachmontage 1: Befestigungsschrauben lösen 2: Schrankdach vorne anheben 3: Schrankdach nach vorne ziehen und anheben 4.1.6 Montage der Rückwand Abb. 8: Montage der Rückwand 1: Befestigungsschrauben lösen 2: Rückwand nach oben heben und abnehmen Endress+Hauser...
- Page 14 An diese Anschlussbuchsen (4-polig, weiblich) wird über ein RS232 Schnittstellenkabel (4-polig, männlich) ein PC (9-poliger SUB-D Stecker) angeschlossen. Eine Fernparametrierung und Messda- tenabfrage bzw. Setup der Thermostatisierung über den PC ist mit der Endress+Hauser Gerätesoft- ware ReadWin 2000 möglich. 4.1.8 Anschluss Multiparametersonde (optional) Die ASP Station 2000 Peristaltik verfügt optional über eine zusätzliche RS232 Anschlussbuchse für...
-
Page 15: Schutzart
Sind Gerät oder Kabel beschädigt (Sichtkontrolle)? Elektrischer Anschluss Hinweise Stimmt die Versorgungsspannung mit den Angaben auf dem vgl. Typenschild auf Typenschild überein? dem Gerät → Kap. 4.1.2 Erfüllen die verwendeten Kabel die erforderlichen Spezifikationen? Sind die montierten Kabel von Zug entlastet? Endress+Hauser... -
Page 16: Bedienung
Die "Off"-Taste hat je nachdem, ob ein Programm gestartet wurde oder nicht, verschiedene Funk- tionen. Programm wurde noch nicht gestartet Für den Fall, dass kein Programm gestartet wurde, bewirkt ein Druck auf die "Off"-Taste lediglich ein Ausschalten des Gerätes. D.h. die Tastenfunktionen "Man", "Aut" bzw. "->" sind nicht mehr vorhanden. Endress+Hauser... - Page 17 Durch Betätigen der Taste "Meld" wird die Anzeige der Meldeliste aktiviert. In dieser Liste werden Ereignisse protokolliert, während das Gerät eingeschaltet ist. Es werden maximal 30 Meldungen gespeichert. Die Meldungen werden in einem Ringspeicher abgelegt. Ist der Ringspeicher voll und es trifft eine neue Meldung ein, wird die älteste Meldung gelöscht. Endress+Hauser...
- Page 18 Automatikende / abbruch 14:12 11.01.98 Ende: Prog xx Programmumschaltung 14:12 11.01.98 -> Ereignisprog Fehler Kalibrierung 14:12 11.01.98 Kalibrierung 0-1 V Eingang Fehler allgemein 14:12 11.01.98 Fehler Uhrenbaustein Ext Signale 14:12 11.01.98 14:12 11.01.98 Meldetext Meldetext (s. Digitaleingang) (siehe Digitaleingang) Endress+Hauser...
- Page 19 In diesem Fall erscheint bei laufendem Programm in der Anzeige der Text "Über- füllsicherung". • In der 4. Spalte (k.Zu) wird eingetragen, wie oft die Probenahme abgebrochen wurde, da kein bzw. nicht genügend Medium in das Dosierglas angesaugt werden konnte um die LF1-Sonde zu benetzen. Endress+Hauser...
-
Page 20: Anzeige- Und Bedienelemente
Display angezeigt. Die Bedienung ist menügeführt. Abb. 19: Anzeigendarstellung Auswahllisten zeigen automatisch die möglichen Einstellungen an. Die angewählte Auswahlliste (z. B. Zeit, Menge, ext. Sign, Durchfluss) wird durch den schwarz hinterlegten Balken (in der Abb. ’- modus’) signalisiert. Abb. 20: Auswahllisten (Beispiel ’Quick-Setup’) Endress+Hauser... -
Page 21: Vor Ort Bedienung
Fehlermeldungen auf dem Display der Steuerung werden durch Drücken der Bedientaste unter dem OK-Feld quittiert. ® Kommunikation via ReadWin 2000 Außer über die Vor-Ort-Bedienung kann das Gerät auch über einen PC mit der Endress+Hauser ® ® Bediensoftware ReadWin 2000 fernparametriert und Messwerte abgefragt werden. ReadWin 2000 ist ein universelles PC-Programm für die Fernbedienung des Gerätes. -
Page 22: Kalibrierung
13. Führen Sie abschließend den Pumpenschlauch in die Schlauch- Abb. 23: Menüebene KALIBRIERUNG durchführung bis zum Anschlag wieder ein (s. Abb. 22, Pos. A). A: Kalibriervolumen B: Dosiervolumen C: Schlauchvolumen (fest eingestellter Wert 24 ml) D: Auswahlliste bei DOSIERVOL Endress+Hauser... - Page 23 Verläuft die Kalibrierung erfolgreich, erscheint die Anzeige ’KALIBRIER. ERFOLG’. Liegen die Messwerte außerhalb bestimmter Grenzen, wird die Meldung ’WERT AUSSERHALB’ angezeigt und es folgt die Aufforderung ’KALIBRIERUNG ÜBERNEHMEN’ oder ’ABBRECHEN’. Lässt sich ein Sensor nicht kalibrieren, muss er eventuell ausgetauscht werden. Endress+Hauser...
- Page 24 Für die Kalibrierung der pH-Messung stehen die Verfahren: Ein-Punkt-, Zwei-Punkt und Drei- Punkt-Kalibrierung zur Auswahl. Abb. 27: Menüstruktur Kalibrierung pH-Messung Vorgehensweise bei der Ein-Punkt-Kalibrierung: pH-Sensor in Pufferlösung tauchen und Temperaturausgleich abwarten. Kalibrierung auf Werkseinstellung zurücksetzen (wenn nötig). pH-Wert der aktuellen Pufferlösung eingeben. Kalibrierung bestätigen. Endress+Hauser...
- Page 25 Bereichs, so ist mit hoher Wahrscheinlichkeit der pH-Sensor defekt und muss ausgetauscht werden. Mit dem Sensor-Check-System ist es möglich, das vom pH-Sensor ausgegebene mV-Signal anzuzeigen. Menüstruktur: Abb. 28: Kontrolle der pH-Messung (Sensor-Check-System) Kalibrierung der Redox (ORP)-Messung Abb. 29: Menüstruktur Kalibrierung Redox (ORP)-Messung Endress+Hauser...
- Page 26 Aktueller Messwert muss 100% betragen. Vorgehensweise der Kalibrierung nach "gelöster Sauerstoff [mg/l]": Abb. 31: Menüstruktur Kalibrierung Sauerstoffmessung nach "gelöster Sauerstoff [mg/l]" "Sauerstoffmesskopf in Lösung mit bekannter O2-Konzentration tauchen. Kalibrierung auf Werkseinstellung zurücksetzen (wenn nötig). O2-Konzentrationswert der Kalibrierlösung eingeben. Kalibrierung bestätigen. Aktuellen Messwert überprüfen. Endress+Hauser...
- Page 27 Ein bestimmter Wert für den Sauerstoff bewegt sich dabei in einem bestimmten mV-Bereich. Ist der Messwert außerhalb dieses Bereichs, so ist mit hoher Wahrscheinlichkeit der Sauerstoff-Sensor defekt und muss ausgetauscht/gewartet werden. Mit dem Sensor-Check-System ist es möglich, das vom Sauerstoff-Sensor ausgegebene mV-Signal anzuzeigen. Menüstruktur: Abb. 32: Kontrolle der Sauerstoffmessung (Sensor-Check-System) Endress+Hauser...
-
Page 28: Inbetriebnahme
Die Energieversorgung und der Datenaustausch einer angeschlossenen Multiparametersonde muss über die Bedienung aktiviert werden. Hinweis! Die Sonde kann nur ein- bzw. ausgeschaltet werden, wenn in der Steuerung kein Probenahmepro- gramm aktiv ist. Menüstruktur: Abb. 33: Inbetriebnahme der Multiparametersonde (optional) Endress+Hauser... - Page 29 Wenn die Multiparametersonde in Betrieb genommen ist, können im Menü MULTI-SONDE alle bestückten Sensoren aktiviert/deaktiviert bzw. parametriert werden. Stehen zur Darstellung eines Messwertes, wie im Beispiel Temperatur, mehr als eine Einheit zur Verfügung, wird der Sensor durch die Wahl einer Einheit aktiviert (s. Abb. 35). Endress+Hauser...
-
Page 30: Quick-Setup
Inbetriebnahme ASP Station 2000 Peristaltik Quick-Setup Abb. 36: Quick-Setup ASP Station 2000 Peristaltik Endress+Hauser... -
Page 31: Gerätekonfiguration
Flasche befüllt werden. Meldung Es erscheint eine Meldung mit Datum und Uhrzeit im Display (z.B.: Funktionsstörung des Durchflussmessgerätes); die Meldung muss quittiert werden; das Probenahmeprogramm wird nicht unterbrochen. Umschalt Das Eingangssignal löst einen Wechsel in das Umschaltprogramm aus. Endress+Hauser... - Page 32 Stellen Sie bitte die Abtastrate für das Analogsignal und die Multiparametermessung (optional) ein. Die Kapazität des Ringspeichers wird dann automatisch im Display angezeigt. Bei einer Abtastrate von 0000 Sekunden (Werkseinstellung) werden die Signale nicht aufgezeichnet. Mit Drücken der AUT-Taste wird der interne Daten-Logger aktiviert. Endress+Hauser...
- Page 33 Der Ausgang wird geschaltet, wenn das Gerät kein Probenmedium ansaugen konnte (z.B.: verstopfter Ansaugschlauch.) Fehler Der Ausgang wird bei Fehler geschaltet Ansaugen Der Ausgang wird während des Ansaugens bei einer Probenahme geschaltet Überfülls. Der Ausgang wird bei Überfüllung einer Flasche geschaltet Endress+Hauser...
- Page 34 • Umschaltung per externem Signal • Umschaltung aufgrund eines Parameters der Multiparametersonde Es können mehrere Kriterien gleichzeitig definiert werden. Die definierten Kriterien sind unterei- nander ODER-verknüpft. D.h. sobald ein Umschaltkriterium erfüllt ist, wird das zugeordnete Umschaltprogramm zur Ausführung gebracht. Endress+Hauser...
- Page 35 Für diese Option muss zuvor ein digitaler Eingang für die Ereignisprobenahme parametriert worden sein. Abb. 42: Menü Umschaltprogramme Sobald die Verwendung von Umschaltprogrammen eingestellt wurde, erscheinen weitere Menü- punkte zur Definition der Umschaltkriterien. Zeitliche Umschaltung Abb. 43: Menü zeitliche Umschaltung Endress+Hauser...
- Page 36 Durchfluss von 200 l/s. Die Rückschaltung in das Hauptprogramm erfolgt hingegen bei einem gemessenen Durchfluss von 190 l/s. Für den unteren Grenzwert erfolgt die Umschaltung in das Umschaltprogramm bei 100 l/s und die Rückschaltung in das Hauptprogramm bei 110 l/s. Endress+Hauser...
- Page 37 (Siehe hierzu auch die Beschreibung für die Umschaltung aufgrund eines gemessenen Durchfluss.) Ereignisprogramm Das Ereignisprogramm wird durch einen digitalen Eingang aktiviert. Hinweis! Einen der Digitaleingänge belegen und diesen Eingang mit der Funktion EREIGNIS parametrie- ren.Für das Ereignisprogramm können ein separates Probenahmeprogramm und eine separate Fla- sche definiert werden. Endress+Hauser...
- Page 38 Einer der Digitaleingänge muss belegt und mit der Funktion PROBE parametriert sein. Durchfluss Die Probenahme wird nach einer einstellbaren Zeit ausgelöst. Die entnommene Probe- menge ist dabei proportional zu einer gemessenen Durchflussmenge. Hinweis! Für diese Funktion muss ein Mengensignal an den Analogeingang des Probenehmers angeschlossen sein. Endress+Hauser...
- Page 39 • Zeit, d.h.: das Probenahmeprogramm wird zu einem einstellbaren Zeitpunkt beendet. Bei der Betriebsart kann zwischen Dauerbetrieb und Betrieb in verschiedenen Intervallen gewählt werden. • Tag: Betriebszeit an zwei einstellbaren Zeitpunkten am Tag • Woche: Betriebszeit an drei einstellbaren Tagen in der Woche • Intervall: Betrieb in bestimmten Zeitabständen Endress+Hauser...
- Page 40 Wird beispielsweise das Programm um 10:00 Uhr gestartet, befüllt das Gerät zunächst die Flasche 6. 6.4.6 Umschaltprogramme erstellen Probenahmemodus Menüstruktur: Abb. 52: Menüstruktur Probenahmemodus In den Umschaltprogrammen kann wie in den Hauptprogrammen die Probenentnahme Zeit-, Men- gen-, Durchflussproportional oder durch externes Signal ausgelöst werden. Endress+Hauser...
- Page 41 Bei Wechsel ins Umschaltprogramm werden, von der zweiten Flaschengruppe der Vertei- lung, 1-9 Flaschen befüllt. Die Anzahl der Flaschen, die für das Umschaltprogramm reser- viert werden können, sind abhängig von der Gesamtanzahl der Flaschen (max. 9 Fla- schen). 6.4.7 Ereignisprogramm erstellen Menüstruktur: Abb. 54: Menüstruktur Ereignisprogramm Endress+Hauser...
- Page 42 1-9 Flaschen Bei Wechsel ins Ereignisprogramm werden, von der letzten Flaschengruppe der Vertei- lung, 1-9 Flaschen befüllt. Die Anzahl der Flaschen, die für das Ereignisprogramm reser- viert werden können, sind abhängig von der Gesamtanzahl der Flaschen (max. 9 Fla- schen). Endress+Hauser...
- Page 43 2: 1 Hauptprogramm und 1 Umschaltprogramm aktiv Anzahl 1+Ereignis: 1 Hauptprogramm und ein Ereignisprogramm aktiv 2+Ereignis: 1 Hauptprogramm, 1 Umschaltprogramm und 1 Ereig- nisprogramm aktiv Set ↵ Prog.Bez. Auswahl des aktiven Probenahmeprogramms Program 1-4; Programmauswahl ↵ 1-U1; 1-E; Prog.Bez. 1-U1-E Endress+Hauser...
- Page 44 Probenahme bei externen Signal (Signaleingang belegen!) Durchfluss: Probenahme proportional zum Durchfluss (Mengensig- nal anschließen) Set ↵ Verteilung Zeit: Flaschenwechsel nach bestimmter Zeit Zeit Programme ändern ↵ Anzahl: Flaschenwechsel nach bestimmter Probenanzahl Umschalt 1,2 ↵ ext.Sign.: Flaschenwechsel bei externen Signal (Signaleingang bele- Verteilung gen!) Endress+Hauser...
- Page 45 Kalibrierung: Kalibrierung des Drehhahns und des Probenvolumens Pumpenwartung: Pumpenbetrieb für den Wechsel des Pumpen- schlauchs • Laufzeiten - Schlauch: Betriebsdauer der Schlauchpumpe seit der letzten Rückstellung; • Laufzeiten - Grenzwert: Bei Erreichen der Sollbetriebszeit erscheint auf dem Display der Warnhinweis ’SCHLAUCHWECH- SEL’ Endress+Hauser...
-
Page 46: Einstellung Der Thermostatisierung
Bedienstruktur für Multiparametersonden (optional) Einstellung der Thermostatisierung 6.5.1 Allgemeines Die Parametrierung der Thermostatisierung erfolgt auschliesslich über ReadWin 2000. Dazu muss die RS232-Schnittstelle für die Thermostatisierung (Schnittstelle B) mit einer seriellen Schnittstelle am PC verbunden werden. Abb. 58: Thermostatisierung in ReadWin 2000 Endress+Hauser... - Page 47 Über die Schaltfläche "Datum/Uhrzeit senden" wird die neu eingestellte Uhrzeit an die Steuerung übertragen. Zur Kontrolle, ob die Uhrzeit richtig übernommen wurde, wird in dem Feld "Aktuelle Uhrzeit Ther- mostatisierung" die aktuelle Uhrzeit der Steuerung dargestellt. Abb. 60: Anzeige "Aktuelle Uhrzeit Thermostatisierung" (links im Screenshot) Endress+Hauser...
- Page 48 Einstellungen zu diesem Zeitpunkt einmalig ausgelesen. Um die Einstellungen zu einem beliebigen Zeitpunkt auszulesen, kann die Schaltfläche "Einstellungen lesen" betätigt werden. Service-Button Der Service-Button ist durch einen Service - Code geschützt und ist der Bedienung durch den E+H Service vorbehalten! Endress+Hauser...
-
Page 49: Wartung Und Reinigung
Der Pumpenschlauch unterliegt im Betrieb einem natürlichen Materialverschleiss. Überprüfen Sie daher in regelmäßigen Abständen den Pumpenschlauch auf Dichtheit. Sollte der Pumpenschlauch undicht sein, tauschen Sie den Pumpenschlauch gemäß der separaten Einbauanleitung aus. Die Ein- bauanleitung liegt bei Lieferung der Verpackung des Pumpenschlauchs bei. Endress+Hauser... -
Page 50: Reinigung Des Probenraums
Abständen mit Pressluft ausgeblasen werden. Wartungsempfehlung Hinweis! Endress+Hauser bietet Ihnen für Ihre ASP Station 2000 Peristaltik einen Wartungsvertrag an. Durch einen Wartungsvertrag erhöhen Sie die Betriebssicherheit und entlasten Ihr Betriebsperso- nal. Ausführliche Angaben zu Wartungsverträgen erhalten Sie von Ihrer E+H-Serviceorganisation. -
Page 51: Zubehör
ASP Station 2000 Peristaltik Zubehör Zubehör Für das Gerät sind verschiedene Zubehörteile lieferbar, die bei Endress+Hauser separat bestellt wer- den können. Ausführliche Angaben zum betreffenden Bestellcode erhalten Sie von Ihrer E+H-Ser- viceorganisation. Bestell-Code Zubehörteile 51002425 Saugkorb komplett (1", V2A) 51003198 Schlauchendstück komplett (L = 500 mm, V2A) -
Page 52: Störungsbehebung
Entnahmeschlauch korrekt verlegen Siphonbildung Prozessfehler ohne Meldungen Problem Ursachen Behebung Gerät lässt sich nicht einschalten bzw. Akku leer Akku aufladen Anzeige bleibt dunkel Akku nicht angeschlossen Überprüfen Sie den korrekten Anschluss im Akkufach Akku defekt Akku austauschen Steuerung defekt E+H Service Endress+Hauser... - Page 53 Falscher Pumpenschlauch nur E+H Pumpenschlauch verwenden Sensorik austauschen (nur durch E+H Sensorik fehlerhaft Service) Keine Probenahme Anschluss undicht Dichtheit der Schläuche/Anschlüsse Entnahmeschlauch zieht Luft prüfen Falscher Pumpenschlauch nur E+H Pumpenschlauch verwenden Sensorik austauschen (nur durch E+H Sensorik fehlerhaft Service) Endress+Hauser...
-
Page 54: Ersatzteile
Tür kpl. Standard SS 304H 51000288 Dichtungssatz für Tür (Standardschrank) RPS20X-LC Dichtungssatz für zweiteilige Tür RPS20X-LD Schlüssel (1 Paar) 51000233 Schloss mit Schlüssel 51000244 Griff (Türschloss) mit Gelenkdorn 51000245 Lüfter EBM Standard 51000298 Verflüssiger mit Lüfter RPS20X-AA Kompressor Standard RPS20X-AB Endress+Hauser... - Page 55 Grundkarte (230 V AC) RPS24X-GA Klemmenplatine, Steuerung Thermostat RPS24X-KA Steuerung Thermostat RPS24X-TH Heizung, oben + Thermostat RPS24X-HA ® Softwarenachrüstung (Programm, ReadWin 2000, Schnittstellenkabel) Software 7 Programme Sprache deutsch englisch französisch italienisch spanisch holländisch / niederländisch dänisch tschechisch polnisch RPS24A1- Bestell-Code Endress+Hauser...
-
Page 56: Rücksendung
RPS24X1- Bestell-Code Rücksendung Folgende Maßnahmen müssen ergriffen werden, bevor Sie das Gerät an Endress+Hauser, z. B. für eine Reparatur, zurücksenden: • Legen Sie dem Gerät in jedem Fall ein vollständig ausgefülltes 'Gefahrgutblatt' bei. Nur dann ist es Endress+Hauser möglich, ein zurückgesandtes Gerät zu transportieren, zu prüfen oder zu reparieren. -
Page 57: Entsorgung
ASP Station 2000 Peristaltik Störungsbehebung Entsorgung Das Gerät enthält elektronische Bauteile und diese müssen deshalb, im Falle der Entsorgung, als Elektronikschrott entsorgt werden. Beachten Sie bitte insbesondere die örtlichen Entsorgungsvor- schriften Ihres Landes. Endress+Hauser... -
Page 58: Technische Daten
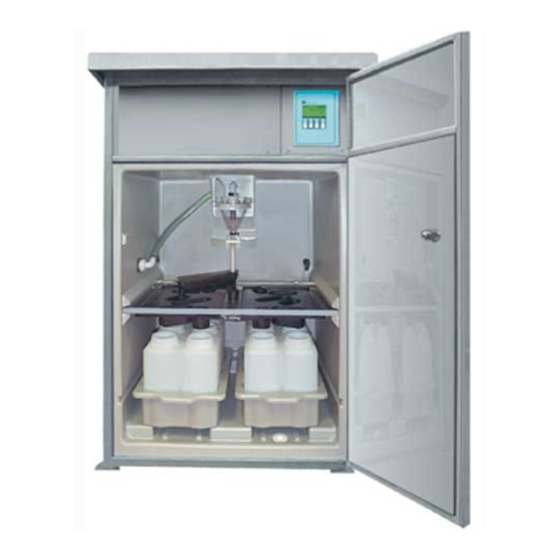
Pumpenschlauch durch eingreifende Rollen, die am Umfang umlaufen, periodisch verformt und damit eine Pumpwirkung erzeugt. Die Mediumsdetektion steuert die elektronische Volumenzäh- lung. Die Mediumsdetektion ist ein von Endress+Hauser neu entwickeltes System. Das Herzstück des Systems ist ein Drucksensor. Der Drucksensor erkennt den Unterschied zwischen gefüllter und nicht gefüllter Pumpenleitung. - Page 59 Umschalt-, und Ereignisprogramme können Einzelflaschen und Flaschengruppen frei definiert wer- den. Einzelflaschen befinden sich in zwei getrennten Flaschenkörben (Pos. C). Griffschalen an den Flaschenkörben ermöglichen einen leichten und praktischen Transport. Abb. 67: Probenverteilung ASP Station 2000 Peristaltik Pos. A: Drehhahn Pos. B: Verteilerwanne Pos. C: Flaschenkörbe Endress+Hauser...
-
Page 60: Hilfsenergie
• 2 x Kabelverschraubung M20 • 2 x Kabelverschraubung M32 10.2.4 Kabelspezifikationen Siehe Kap. 4.1 "Kabeltypen" 10.2.5 Leistungsaufnahme ca. 340 W 10.2.6 Anschlussdaten Schnittstelle Serielle Schnittstelle: • RS232 (optional für externes Data-logging), 4-polige Buchse auf der Frontplatte (s. Kap. 4.1.7) Endress+Hauser... -
Page 61: Aufstellungsbedingungen
Elektrische Sicherheit Nach EN 61010-1, Schutzklasse I, Umgebung < 2000 m Höhe über N.N. 10.5 Prozessbedingungen 10.5.1 Mediumstemperaturbereich 0 bis +50 °C 10.5.2 Betriebsdruckbereich Drucklos 10.5.3 Probemedien Probemedien müssen frei von abrasiven Stoffen sein. Werkstoffbeständigkeiten der medienführenden Teile beachten! Endress+Hauser... -
Page 62: Konstruktiver Aufbau
Technische Daten ASP Station 2000 Peristaltik 10.6 Konstruktiver Aufbau Bauform, Maße: Abb. 68: Abmessungen (in mm); Optional mit Sockel Abb. 69: Abmessungen (in mm) ohne Sockel 10.6.1 Gewicht ca. 110 kg (ohne Sockel) Endress+Hauser... -
Page 63: Anzeige Und Bedienoberfläche
• Auslesen des internen Datenspeichers mit gemessener Durchflussrate, entnommener Proben- menge, etc. Interner Speicher Integrierter Ringspeicher zur Aufzeichnung eines Analogwertes (Durchfluss, pH-Wert, Leitfähig- keit, etc.), Ereignissen (z. B. Netzausfall), Probenstatistik (z. B. Probenvolumen, Füllzeiten, Fla- schenbelegung). Berechnung der Aufzeichnungsdauer Automatische Anzeige bei Eingabe der Abtastrate. Endress+Hauser... -
Page 64: Zertifikate Und Zulassungen
ASP Station 2000 Peristaltik 10.8 Zertifikate und Zulassungen 10.8.1 CE-Zeichen Das Gerät erfüllt die gesetzlichen Anforderungen der EG-Richtlinien. Endress+Hauser bestätigt die erfolgreiche Prüfung des Gerätes mit der Anbringung des CE-Zeichens. 10.8.2 Externe Normen und Richtlinien • EN 60529: Schutzarten durch Gehäuse (IP-Code) •... -
Page 65: Index
Kabelspezifikationen ......60 Kabeltypen ........11 Endress+Hauser... - Page 66 Warenannahme........8 Werkstoffe ........63 Endress+Hauser...
- Page 67 Declaration of Contamination Erklärung zur Kontamination Because of legal regulations and for the safety of our employees and operating equipment, we need the "declaration of contamination", with your signature, before your order can be handled. Please make absolutely sure to include it with the shipping documents, or - even better - attach it to the outside of the packaging.
- Page 68 ASP station 2000 peristaltic Brief overview For rapid and easy commissioning. Safety instructions Page 71 ⇓ Installation Page 74 ⇓ Display and operating elements Page 86 ⇓ Commissioning Page 94 Here you can find the procedure for commissioning. ⇓ Maintenance and cleaning Page 115 Here you can find the procedure for maintenance and cleaning.
- Page 69 ASP station 2000 peristaltic ASP station 2000 peristaltic Operating Instructions Deutsch ab Seite 2 (Bitte lesen, bevor Sie das Gerät in Betrieb nehmen) Gerätenummer:............< ASP station 2000 peristaltic Operating Instructions English from page 68 (Please read before installing the unit) Unit number:............
- Page 70 ASP station 2000 peristaltic Table of contents Table of contents Safety instructions ....71 Return ....... . 122 Disposal .
-
Page 71: Safety Instructions
Operational safety Hazardous areas The standard version of the ASP station 2000 peristaltic (RPS24-) is not suitable for mounting in Ex areas. Repairs Repairs that are not described in these Operating Instructions may only be carried out directly at the manufacturer's or by the Service department. -
Page 72: Notes On Safety Conventions And Icons
For a return, e.g. in case of repair, the device must be sent in protective packaging. The original packaging offers the best protection for this. Repairs must only be carried out by Endress+Hauser's service organisation. An overview of the service network can be found on the back page of these Operating Instructions. -
Page 73: Identification
230 V, 50 Hz 340 W Made in Germany D-87484 Nesselwang Fig. 1: Nameplate data for the ASP station 2000 peristaltic (example) Item a: Device designation Item b: Order code Item c: Serial number of the device Item d: Job number... -
Page 74: Installation
The device is fully mounted when delivered. No mounting work is required! Quick installation guide Fig. 2: ASP station 2000 peristaltic installation overview a: Electronics compartment b: Hose connection (optional: on right or hose entry from below) c: Distribution pans... -
Page 75: Mounting Conditions
ASP station 2000 peristaltic Installation 3.2.3 Storage Observe the following points: • The device must be packed in shockproof packaging for storage (and transport). The original packaging offers the best protection for this. • The permitted storage temperature is -20...+60 C (preferably +20 C). - Page 76 Installation ASP station 2000 peristaltic 3.3.3 Foundation plan Fig. 4: Foundation plan (all data in mm) A: Fixing points (4 x M10) B: Cable pit C: Outflow for condensation water D: Bottom hose entry (optional) E: Outflow for overflow 3.3.4 Hydraulic connection •...
-
Page 77: Mounting Check
ASP station 2000 peristaltic Wiring Useful sampling accessories • Strainer: impedes the entry of coarse solids and solids which can cause clogging. • Immersion assembly: the adjustable immersion assembly fixes the sampling hose at the sampling point. • Hose end piece Order numbers, see Section "Accessories"... - Page 78 Wiring ASP station 2000 peristaltic 4.1.3 Terminal position Fig. 5: Electronics compartment after mounting the cover (→ Fig. 7) A: Position of the shielded terminals in electronics compartment B: Position of the terminal block in the electronics compartment C: Position of the battery for sampling charge buffer operation 4.1.4...
- Page 79 ASP station 2000 peristaltic Wiring Note! The terminal connection is in a protected position beneath the cabinet cover in the electronics compartment. Therefore to connect the power supply, you must remove the rear panel and the cover of the device before commissioning. To install the rear panel and the cover, proceed in reverse order to the descriptions in the following two sections.
- Page 80 PC. 4.1.8 Multi-parameter probe connection (optional) As an added option, the ASP station 2000 peristaltic has an additional RS232 connection socket for a multi-parameter probe. The following multi-parameter probes can be connected to this connection socket: •...
-
Page 81: Degree Of Protection
ASP station 2000 peristaltic Wiring Position (probe cable) Connection position of ASP station Pin - description 2000 peristaltic N. C. Alarm N. C. SDI-12 N. C. N. C. Degree of protection The individual components meet the requirements of the following protection types: •... -
Page 82: Operation
Operation ASP station 2000 peristaltic Operation Quick operation guide Fig. 11: Quick operation guide 5.1.1 "Man" key Fig. 12: "Man" key The "Man" key is used to trigger immediate sampling regardless of whether a programme has been started or not. The sampling process starts immediately once the key has been pressed. - Page 83 ASP station 2000 peristaltic Operation The programme has been started Fig. 13: "Off" key, active running programme If a programme is running, pressing the "Off" key briefly (<= approx. 1 s) sets the programme to break mode. If the key is pressed for a longer period (> 1 s), it terminates the running programme.
- Page 84 Operation ASP station 2000 peristaltic Report Reports on the display Report list Unit on 14:12 11.01.98 Unit on Unit off 14:12 11.01.98 Unit off Power on 14:12 11.01.98 Power on Power off 14:12 11.01.98 Power off Ext. hold active 14:12 11.01.98 Ext.
- Page 85 ASP station 2000 peristaltic Operation The messages that appear on the display can be acknowledged by pressing the "OK" key. 5.1.4 "Stat" key Fig. 16: "Stat" key The bottle statistics of the sampler are displayed once the "Stat" key is actuated. Statistics are displayed for each individual bottle since the programme start.
-
Page 86: Display And Operating Elements
Operation ASP station 2000 peristaltic Display and operating elements Fig. 18: Display and operating elements A = "ON" switch B = "OFF" switch C = LC display: 32 characters, 8 lines D = Operating keys 5.2.1 Display Set the sampler using four operating keys. The function of the keys is shown on the display. -
Page 87: Local Operation
Besides by means of local operation, you can also remotely configure the device and poll measured ® ® values using a PC with the Endress+Hauser operating software ReadWin 2000. ReadWin 2000 is a universal PC programme for remote device operation. The interface for remote configuration is the RS232 connection socket (see Fig. - Page 88 Operation ASP station 2000 peristaltic Note! A beaker with a volume of at least 200 ml is needed for calibrating the sample volume. Carry out the calibration as follows: 1. Switch on the device (see section 6.2) 2. Connect sampling hose to the device and insert into a full water tank (see section 3.3)
- Page 89 ASP station 2000 peristaltic Operation Fig. 24: Multi-parameter probe calibration The menu structure for calibration is identical for the individual sensors and appears as follows: Fig. 25: Menu structure for sensor calibration Act. value Displays the current measured value of the sensor, the unit corresponds to the setting made.
- Page 90 Operation ASP station 2000 peristaltic Fig. 26: Menu structure for conductivity calibration Calibrating specific conductivity: Immerse conductivity sensor in calibration solution and wait for temperature equalization. Reset calibration to factory setting (if necessary). Enter conductivity value of current calibration solution.
- Page 91 ASP station 2000 peristaltic Operation The pH value corresponds to a mV signal which is output by the pH sensor. Here, a certain pH value is in a certain mV range. Example: pH 7 is in a range between -40 mV and +40 mV. If the pH value is outside this range, the pH sensor is most probably faulty and has to be replaced.
- Page 92 Operation ASP station 2000 peristaltic Procedure: Immerse redox sensor in calibration solution. Reset calibration to factory setting (if necessary). Enter ORP value of the current calibration solution. Confirm calibration. Calibrating oxygen measurement For calibrating the oxygen measurement, you can choose from the following output forms: percentage saturation and amount of dissolved oxygen.
- Page 93 ASP station 2000 peristaltic Operation Checking the oxygen measurement (sensor check system) The oxygen value corresponds to a mV signal which is output by the oxygen sensor. Here, a certain value for the oxygen is in a certain mV range. If the measured value is outside this range, the oxygen sensor is most probably faulty and has to be replaced/serviced.
-
Page 94: Commissioning
Commissioning ASP station 2000 peristaltic Commissioning Function check If you can answer the following questions with YES, then you can commission the device → Chap. 6.2. If the answer is NO, then please refer to the appropriate sections: General Section reference Is the power supply connected? See Section 4.1... - Page 95 Commissioning Fig. 34: Multi-parameter probe adjustment If the probe is activated, there is an adjustment between the ASP station 2000 peristaltic and the multi-parameter probe. Afterwards, all the fitted sensors of the multi-parameter probe are shown on the display. A double arrow appears on the display to indicate that the probe is in operation(→ Chap. 34).
-
Page 96: Quick Setup
Commissioning ASP station 2000 peristaltic Quick Setup Fig. 36: Quick Setup of ASP station 2000 peristaltic Endress+Hauser... -
Page 97: Device Configuration
ASP station 2000 peristaltic Commissioning Device configuration Note! The figures show the menu structures with the display and picklist for the different configuration parameters. Below the figures are tables containing the corresponding function descriptions for the parameters. 6.4.1 Configuring the inputs You can assign the inputs when configuring in the "Quick Setup"... - Page 98 Enter the maximum measuring range. 6.4.2 Configuring the internal datalogger The ASP station 2000 peristaltic has an internal datalogger (378 kByte RAM ring memory) in which the following measured values are saved: • Analogue signal (e.g. flow signal) • Sampling log (sample volume, bottle filling time, events...) •...
- Page 99 ASP station 2000 peristaltic Commissioning Note! Pressing the AUT key irreversibly deletes all the data saved up to this point in the datalogger. 6.4.3 Configuring the outputs Menu structure: Fig. 40: Outputs menu structure Power down The output is switched when the controller is shut down (battery voltage < 10 V) Sample The output is switched on a sample.
- Page 100 Commissioning ASP station 2000 peristaltic Menu structure: Fig. 41: Programme selection menu structure Several programme combinations are available for the 7 programme version: A main programme is active. A main programme and a switching programme are active. 1+Event A main programme and the event programme are active.
- Page 101 ASP station 2000 peristaltic Commissioning Use of switching programmes. The programme pair is then configured via the "Set-Programme selection-Prog. nr." item. • Number 2 + event: Use of switching programmes and also an event programme. The programme pair is then configured via the "Set-Programme selection-Prog.
- Page 102 Commissioning ASP station 2000 peristaltic 2 modes are available to the user for time switching: • Choice day: Switch to the switching programme at two settable times in one day. • Choice week: Switch to the switching programme at three settable days (incl. time) in the week.
- Page 103 ASP station 2000 peristaltic Commissioning Switching based on a parameter of the multi-parameter probe Fig. 46: Example: switching based on a parameter of the multi-parameter probe In this setting, the switch to the switching programme takes place by means of a measured value of the multi-parameter probe.
- Page 104 Commissioning ASP station 2000 peristaltic 6.4.5 Creating a main programme Menu structure: Programme name The programme name can be changed as required with the operating keys. Fig. 47: Main programme menu structure Sampling types Menu structure: Fig. 48: Sampling types menu structure You can take samples proportional to time, quantity, flow or controlled by events (see also "Sampling...
- Page 105 ASP station 2000 peristaltic Commissioning Distribution Menu structure: Fig. 49: Distribution menu structure You can programme a bottle change by time, number or an external signal: Time After a settable time, the tap switches to the next empty bottle. Number After a set number of samples has been taken, the tap switches to the next empty bottle.
- Page 106 Commissioning ASP station 2000 peristaltic Synchronisation Menu structure: Fig. 51: Synchronisation menu structure You can use synchronisation to assign specific filling times to specific bottles. In this way you could fill bottle 1 between 00:00 and 02:00 and bottle 2 between 02:00 and 04:00 etc. For this, you have the following options: •...
- Page 107 ASP station 2000 peristaltic Commissioning Distribution You can reserve separate bottles for the switching programmes. The following applies to bottle distribution: • The first bottle group of a distribution is reserved for the main programmes. • The second bottle group is reserved for the switching programmes.
- Page 108 Commissioning ASP station 2000 peristaltic Sample mode Menu structure: Fig. 55: Sample mode menu structure The event programme contains the same sampling options (time, volume, ext. signal and flow) as those of the main and switching programmes. In addition, you can select the function once. In this function, the sampler takes a sample in the event programme once and then returns immediately to the main programme.
- Page 109 ASP station 2000 peristaltic Commissioning 6.4.8 Description of device functions The following table lists and describes all the setting parameters which you can read off and configure when configuring the device. Parameter Menu level Setting options Factory setting Info Set ↵...
- Page 110 Commissioning ASP station 2000 peristaltic Parameter Menu level Setting options Factory setting Set ↵ Switch (only for an Day: switch between main and switching programmes at two specific active switching Programme selection↵ times a day. programme) Switch Week: switch between main and switching programmes on three specific week days.
- Page 111 ASP station 2000 peristaltic Commissioning Parameter Menu level Setting options Factory setting Set ↵ Event prog. Sample: sampling type in the event programme Creating programmes ↵ Distribution: distribution mode for the event programme Event prog. Set ↵ Sample Time: sampling acc. to time.
-
Page 112: Setting The Thermostat
Commissioning ASP station 2000 peristaltic Operating structure for multi-parameter probes (optional) Menu structure: Fig. 57: Operating structure for multi-parameter probes (optional) Setting the thermostat 6.5.1 General The thermostat is configured solely via ReadWin 2000. For this purpose, the RS232 interface for the thermostat (interface B) has to be connected to a serial interface at the PC. - Page 113 ASP station 2000 peristaltic Commissioning The screen with the settings for the thermostat is opened by means of the "Thermo" button in the basic settings. 6.5.2 Settings Com port The Com port, which is used to communicate with the thermostat controller, can be set in the "Interface"...
- Page 114 Commissioning ASP station 2000 peristaltic Thermostat parameters The parameters for regulating the temperature in the sample compartment are specified in the "Thermostat" section. The thermostat is switched on and off by means of the "Operation" box. The "Target temp." slide control is used to set the desired sample compartment temperature The defrost time can be set with the "Defrost"...
-
Page 115: Maintenance And Cleaning
ASP station 2000 peristaltic Maintenance and cleaning Maintenance and cleaning Cleaning the device Only clean the device when it is switched off. Use only a cleaning agent which you are sure will not damage the mechanical and electrical equipment. For the cabinet body, we recommend a stainless steel cleaner. For any parts conveying media, use water or soap. -
Page 116: Cleaning The Sample Compartment
Maintenance recommendation Note! Endress+Hauser can offer you a maintenance contract for your ASP station 2000 peristaltic. A maintenance contract offers you increased operational safety and will reduce the burden on your operating staff. More detailed information on maintenance contracts can be obtained from your local E+H service organisation. -
Page 117: Accessories
ASP station 2000 peristaltic Accessories Accessories Various accessories can be supplied for the device and can be ordered separately from Endress+Hauser. More detailed information on the particular order code can be obtained from your local E+H service organisation. Order code Accessories 51002425 Suction filter cpl., 1", V2A... -
Page 118: Trouble-Shooting
Trouble-shooting ASP station 2000 peristaltic Trouble-shooting Trouble-shooting instructions Always begin trouble-shooting using the following checklists if faults occur after commissioning or during operation. Different questions will guide you to the cause of the error and will suggest appropriate remedial action. - Page 119 ASP station 2000 peristaltic Trouble-shooting Problem Cause Remedy Control signals not accepted or outputs Incorrect programme setting Check programming do not switch (see Section 6) Incorrect wiring Check wiring (see Section 4) Electronics failure Replace controller (only by E+H Service)
-
Page 120: Spare
Blown-up drawing: Fig. 63: Spare parts for the ASP station 2000 peristaltic (item numbers explained in the spare parts list) Item A: electronics compartment when cover removed, see Section 4.1.5 (view from above) Item B: cpl. dosing bracket incl. hose pump... - Page 121 ASP station 2000 peristaltic Trouble-shooting Item Wet compartment: hose fitting for side of cabinet, left Order code: Hose connection kit RPS24X-TC Temperature sensor wet compartment RPS24X-DT Charger 230 V AC RPS24X-LA Battery 12 V RPS24X-LK Dosing bracket cpl. incl. pump ZP6M, pressure sensor and clamp RPS24X-DA Dosing bracket cpl.
-
Page 122: Return
RPS24X1- Order code Return You should take the following measures before sending the device back to Endress+Hauser, for example for repair: • Always enclose a fully-completed "Dangerous Goods Sheet" with the device. Only then can Endress+Hauser transport, test or repair a returned device. -
Page 123: Disposal
ASP station 2000 peristaltic Trouble-shooting Disposal The device contains electronic components and these must, therefore, be disposed of as electronic waste in the event of disposal. Please observe in particular the local waste disposal regulations of your country. Endress+Hauser... -
Page 124: Technical Data
The medium detection system is a new system developed by Endress+Hauser. A pressure sensor is at the heart of the system. The pressure sensor detects the difference between a full and empty pump line. - Page 125 Individual bottles are located in two separate bottle trays (item C). Grips on the bottle trays make transportation easy and practical. Fig. 67: ASP station 2000 peristaltic sample distribution Item A: Tap Item B: Distribution pan...
-
Page 126: Power Supply
Technical data ASP station 2000 peristaltic 10.1.4 Sample preservation The sample bottles are located in the lower section of the sampler. The sample compartment temperature can be set directly with the PC software from +2 to +20 C (factory setting: +4 C). The current sample compartment temperature is displayed at the controls and recorded in the internal datalogger (optional). -
Page 127: Mounting Conditions
ASP station 2000 peristaltic Technical data 10.3 Mounting conditions See Section 3.3 "Mounting conditions" 10.4 Environment 10.4.1 Ambient temperature range -20 to +40 C 10.4.2 Storage temperature -20 to +60 C (preferably at +20 C) 10.4.3 Degree of protection • Control (front panel): IP 65 •... -
Page 128: Mechanical Construction
Technical data ASP station 2000 peristaltic 10.6 Mechanical construction Design, dimensions: Fig. 68: Dimensions (in mm); optional with base Fig. 69: Dimensions (in mm); without base 10.6.1 Weight Approx. 110 kg (without base) Endress+Hauser... -
Page 129: Human Interface
Menu-guided operation using 6 keys on the device. Picklists and short operating menu (“Quick- Setup”) for easy commissioning. 10.7.3 Remote operation + datalogging Interface PC interface RS232. It is especially easy to configure the ASP station 2000 peristaltic (as well as ® other E+H instruments) with the PC software ReadWin 2000. ®... -
Page 130: Accessories
Technical data ASP station 2000 peristaltic 10.8.2 Other standards and guidelines • EN 60529: Degrees of protection by housing (IP code) • EN 61010-1: Protection measures for electrical equipment for measurement, control, regulation and laboratory procedures (Endress+Hauser devices) • EN 61326 (IEC 61326): Electromagnetic compatibility (EMC requirements) •... -
Page 131: Index
ASP station 2000 peristaltic Index Index Symbols Internal memory ....... 129 "Man"... - Page 132 Montage page 138 ⇓ Interface utilisateur page 150 ⇓ Mise en service page 158 Vous trouverez ici la procédure de mise en service. ⇓ Maintenance et nettoyage page 179 Vous trouverez ici la procédure de maintenance et de nettoyage. Endress+Hauser...
- Page 133 ASP Station 2000 Peristaltik Betriebsanleitung Deutsch ab Seite 2 (Bitte lesen, bevor Sie das Gerät in Betrieb nehmen) Gerätenummer:............< ASP Station 2000 peristaltic Operating manual English from page 68 (Please read before installing the unit) Unit number:............ASP Station 2000 péristaltique Mise en service Français...
- Page 134 Erreurs process sans messages ....183 Pièces de rechange ..... . . 184 Endress+Hauser...
-
Page 135: Conseils De Sécurité
Progrès technique Le fabricant se réserve le droit d'adapter les caractéristiques de ses appareils aux évolutions techniques sans avis préalable. Pour tout renseignement concernant les activités ou d'éventuelles mises à jour du présent manuel, veuillez contacter votre agence Endress+Hauser. Endress+Hauser... -
Page 136: Retour De Matériel
Conseils de sécurité ASP Station 2000 péristaltique Retour de matériel Avant de retourner un appareil à Endress+Hauser, par ex. pour réparation, il convient de prendre les mesures suivantes : • Joignez toujours une "Déclaration de décontamination" dûment complétée, faute de quoi Endress+Hauser ne pourra transporter, contrôler ou réparer l'appareil retourné. -
Page 137: Identification
Pos. f : Puissance consommée Contenu de la livraison La livraison du préleveur d'échantillons comprend : • ASP Station 2000 péristaltique • câble d'interface RS232 • logiciel ReadWin 2000 • manuel de mise en service • accessoires (voir chap. 8 "Accessoires") Endress+Hauser... -
Page 138: Montage
A la réception de la marchandise, contrôlez les points suivants : • L'emballage ou le contenu sont-ils endommagés ? • Le matériel livré est-il complet ? Comparez l'ensemble livré avec le bon de commande. 3.2.2 Transport L'armoire doit toujours être transportée à la verticale. Ne pas la basculer ! Endress+Hauser... -
Page 139: Conditions De Montage
• Assurez-vous que l'air peut circuler sans obstacle à l'arrière de l'armoire. N'accolez pas l'appareil à un mur (écart minimal entre le mur et l'arrière de l'armoire : min. 100 mm) • N'installez pas l'armoire directement au-dessus du canal d'arrivée d'une station d'épuration (vapeurs de soufre H S !) Endress+Hauser... - Page 140 Mettez en place le tuyau de prélèvement du point de prélèvement à l'appareil. Remarque ! Tenez compte des exigences au point de prélèvement → chap. 3.3. Vissez le tuyau de prélèvement au raccord de l'appareil → fig. 2, pos. d. Endress+Hauser...
-
Page 141: Contrôle Du Montage
• Prévoyez une longueur de câble d'env. 1,7 m de la fondation jusqu'au compartiment de raccordement 4.1.2 Types de câbles • Alimentation : par ex. NYY-J ; 3 fils ; 1,5 à 2,5 mm • Lignes analogiques, signal et message : utiliser un câble blindé par ex. LiYCY 12x0,34 mm Endress+Hauser... - Page 142 - 2 signaux numériques > 20 ms - 1 signal analogique 0/4...20 mA • Signaux de sortie : - 2 signaux numériques Vous trouverez une description détaillée de l'affectation des signaux (entrées et sorties) dans le chap. "Configuration de l'appareil". Endress+Hauser...
- Page 143 3 : Tirer vers l'avant et soulever le toit de l'armoire 4.1.6 Démontage de la paroi arrière Fig. 8 : Démontage de la paroi arrière 1 : Retirer les vis de fixation 2 : Tirer vers le haut et retirer la paroi arrière Endress+Hauser...
- Page 144 Un PC (connecteur SUB-D 9 pôles) est raccordé à ces connecteurs (4 pôles, femelle) via un câble d'interface RS232 (4 pôles, mâle). Le logiciel ReadWin 2000 d'Endress+Hauser permet la configu- ration à distance et l'interrogation des données et/ou le réglage de la thermostatisation par PC.
-
Page 145: Protection
La tension d'alimentation correspond-elle à celle indiquée sur la Comparer avec la plaque signalétique ? plaque signalétique sur l'appareil → chap. 4.1.2 Les câbles utilisés remplissent-ils les spécifications requises ? Les câbles montés sont-ils déchargés de toute traction ? Endress+Hauser... -
Page 146: Configuration
La touche "Off" a différentes fonctions selon qu'un programme a été lancé ou non. Aucun programme n'a encore démarré Dans ce cas, une pression sur la touche "Off" entraîne une mise hors tension de l'appareil. Cela signifie que les touches "Man", "Aut" et "->" ne sont plus disponibles. Endress+Hauser... - Page 147 Un maximum de 30 messages peuvent être mémorisés. Ils sont sauvegardés dans une mémoire circulaire. Si un nouveau message arrive alors que la mémoire circulaire est pleine, le message le plus ancien est effacé. Endress+Hauser...
- Page 148 End : Prog xx Commutation de programmes 14:12 11.01.98 -> Prog. événem. Erreur d'étalonnage 14:12 11.01.98 Etalonnage Entrée 0-1 V Erreur générale 14:12 11.01.98 Erreur Horloge Signal ext. 14:12 11.01.98 14:12 11.01.98 Texte message Texte message (voir entrée numérique) (voir entrée numérique) Endress+Hauser...
- Page 149 Dans ce cas, le message "Sécurité anti-débordement" s'affiche en cours de programme. • Dans la 4ème colonne (P.éc) figure le nombre de fois où le prélèvement a été interrompu par manque de produit dans le bocal de prélèvement. Endress+Hauser...
-
Page 150: Interface Utilisateur
Fig. 19 : Affichage Les listes de sélection affichent automatiquement les réglages possibles. La liste sélectionnée (par ex. temps, quantité, sign. ext., débit) est surlignée en noir (dans la fig. ’-mode’). Fig. 20 : Listes de sélection (exemple ’Quick-Setup’) Endress+Hauser... -
Page 151: Configuration Sur Site
Communication via ReadWin 2000 Outre la configuration sur site, il est également possible de configurer l'appareil à distance sur PC ® via le logiciel d'exploitation Endress+Hauser ReadWin 2000 et d'interroger les valeurs mesurées. ® ReadWin 2000 est un logiciel PC universel pour la configuration à distance de l'appareil. L'inter- face pour la configuration à... -
Page 152: Etalonnage
(voir fig. 22, pos. A). Fig. 23 : Menu CALIBRATION Pos. A : Volume d'étalonnage Pos. B : Volume dosé Pos. C : Volume du tuyau (val. préréglée 24 ml) Pos. D : Liste de sélection pour VOL. DOS. Endress+Hauser... - Page 153 Si l'étalonnage s'est déroulé sans problème, ’CALIBR. SUCCES’ s'affiche. Si les valeurs de mesure se trouvent en dehors des seuils fixés, ’VALUE OUTSIDE’ s'affiche et l'utilisateur doit choisir entre ’ACCEPT CALIBRATION’ ou ’ABORT’. Si un capteur ne peut pas être étalonné, il faut éventuellement le remplacer. Endress+Hauser...
- Page 154 Etalonnage de la mesure de pH Pour l'étalonnage de la mesure du pH, vous pouvez choisir entre : étalonnage en 1 point, 2 points et 3 points. Fig. 27 : Structure du menu pour l'étalonnage de la mesure de pH Endress+Hauser...
- Page 155 Le Sensor Check System permet d'afficher le signal mV émis par le capteur pH. Structure du menu : Fig. 28 : Contrôle de la mesure de pH (Sensor Check System) Endress+Hauser...
- Page 156 Laissez le capteur dans l'air saturé en eau et attendez que la valeur mesurée et la température se stabilisent (~15min). Réinitialisez l'étalonnage au réglage usine (si nécessaire). Entrez la valeur de pression (mbar) de la pression atmosphérique locale. Confirmez l'étalonnage. La valeur de mesure courante doit être de 100%. Endress+Hauser...
- Page 157 Le Sensor Check System permet d'afficher le signal mV émis par la cellule d'oxygène. Structure du menu : Fig. 32 : Contrôle de la mesure d'oxygène (Sensor Check System) Endress+Hauser...
-
Page 158: Mise En Service
La sonde ne peut être mise sous tension ou hors tension que si aucun programme de prélèvement n'est actif dans l'unité de commande. Structure du menu : Fig. 33 : Mise en service de la sonde multiparamètres (en option) Endress+Hauser... - Page 159 Lorsque la sonde multiparamètres est mise en service, tous les capteurs raccordés peuvent être activés/désactivés ou paramétrés dans le menu SONDE MULTI. S'il existe plusieurs unités pour l'affichage d'une valeur mesurée, comme par exemple pour la température, le capteur est activé en sélectionnant une unité (voir fig. 35). Endress+Hauser...
-
Page 160: Quick Setup
Mise en service ASP Station 2000 péristaltique Quick setup Fig. 36 : Quick setup ASP Station 2000 péristaltique Endress+Hauser... -
Page 161: Configuration De L'appareil
Info. Un message avec date et heure s'affiche (par ex.: dysfonctionnement du débitmètre) ; le message doit être validé ; le programme de prélèvement n'est pas interrompu. Commutat. Le signal d'entrée déclenche un changement dans le programme de commutation. Endress+Hauser... - Page 162 (en option). La capacité de la mémoire circulaire s'affiche automatiquement sur l'afficheur. Si la fréquence d'enregistrement est réglée sur 0000 seconde (réglage par défaut), les signaux ne sont pas enregistrés. Pour activer le datalogger interne, appuyez sur la touche AUT. Endress+Hauser...
- Page 163 La sortie est activée lorsque l'appareil ne peut plus prélever de produit (par ex. : tuyau d'aspiration bouché). Erreur La sortie est activée en cas d'erreur. Aspiration La sortie est activée en cas de prélèvement d'échantillon pendant l'aspiration. Antidébor. La sortie est activée en cas de débordement d'un flacon. Endress+Hauser...
- Page 164 • Commutation en fonction d'un paramètre de la sonde multiparamètres Plusieurs critères peuvent être définis en même temps. Les critères définis sont reliés entre eux par une liaison OU. C'est-à-dire que dès qu'un critère de commutation est rempli, le programme de commutation assigné est exécuté. Endress+Hauser...
- Page 165 Fig. 42 : Menu programme de commutation Une fois l'utilisation des programmes de commutation réglée, d'autres options de menu apparaissent pour définir les critères de commutation. Commutation en fonction du temps Fig. 43 : Menu Commutation en fonction du temps Endress+Hauser...
- Page 166 200 l/s. En revanche, le système repasse au programme principal à un débit mesuré de 190 l/s. Pour le seuil inférieur, le système passe au programme de commutation à 100 l/s et repasse au programme principal à 110 l/s. Endress+Hauser...
- Page 167 Le programme événementiel est activé par une entrée digitale. Remarque ! L'une des entrées numériques doit être affectée à cette fonction et paramétrée avec la fonction EVENEM. Pour le programme événementiel, un programme de prélèvement spécifique et des flacons séparés peuvent être définis. Endress+Hauser...
- Page 168 L'une des entrées digitales doit être affectée et paramétrée avec la fonction PRELEVE- MENT. Débit Le prélèvement est déclenché après un temps réglable. La quantité d'échantillon prélevée est proportionnelle à un débit mesuré. Remarque ! Pour cette fonction, un signal de quantité doit être raccordé à l'entrée analogique du préleveur. Endress+Hauser...
- Page 169 Les modes de fonctionnement disponibles sont le fonctionnement continu et le fonctionnement à différents intervalles. • Jour : temps de fonctionnement à deux instants programmables dans la journée • Semaine : temps de fonctionnement à trois jours programmables dans la semaine • Intervalle : fonctionnement à intervalles définis Endress+Hauser...
- Page 170 Fig. 52 : Structure du menu Mode de prélèvement Dans les programmes de commutation, comme dans les programmes principaux, le prélèvement d'échantillon peut se faire en fonction du temps, de la quantité, du débit ou être déclenché par un signal externe. Endress+Hauser...
- Page 171 1 à 9 flacons du 2ème groupe sont remplis lors du passage au programme de commutation. Le nombre de flacons pouvant être réservés au programme de commutation dépend du nombre total de flacons (max. 9 flacons). 6.4.7 Elaboration d'un programme événementiel Structure du menu : Fig. 54 : Structure du menu Programme événementiel Endress+Hauser...
- Page 172 Le flacon vide suivant est rempli lors du passage au programme événementiel. 1 à 9 flacons 1 à 9 flacons du dernier groupe sont remplis lors du passage au programme événementiel. Le nombre de flacons pouvant être réservés au programme événementiel dépend du nombre total de flacons (max. 9 flacons). Endress+Hauser...
- Page 173 1+événem. : 1 programme principal et 1 programme événementiel activés 2+événem. : 1 programme principal, 1 programme de commutation et 1 programme événementiel activés Set ↵ N° progr. Sélection du programme de prélèvement Programme 1-4 ; Choix du programme ↵ 1-U1 ; 1-E ; N° progr. 1-U1-E Endress+Hauser...
- Page 174 Temps : changement de flacon après un temps défini Temps Chgt de programme ↵ Nombre : changement de flacon après un nombre de prélèvements Commutat. 1,2 ↵ défini Répartition Sign. ext. : changement de flacon si signal externe (affecter une entrée de signal !) Endress+Hauser...
- Page 175 • Temps de marche - tuyau : temps de marche de la pompe péristalti- que depuis la dernière remise à zéro ; • Temps de marche - limite : lorsque le temps de marche prescrit est atteint, le message ’REMPLACEMENT TUYAU’ s'affiche. Endress+Hauser...
-
Page 176: Réglage De La Thermostatisation
Réglage de la thermostatisation 6.5.1 Généralités La thermostatisation ne peut être configurée que via ReadWin 2000. Pour ce faire, l'interface RS232 pour la thermostatisation (interface B) doit être raccordée à une interface série au PC. Fig. 58 : Thermostatisation dans ReadWin 2000 Endress+Hauser... - Page 177 L'heure courante de l'unité de commande est affichée dans le champ "Thermo control actual time" pour permettre à l'utilisateur de vérifier si l'heure a été correctement reprise. Fig. 60 : Affichage "Thermo control actual time" (à gauche sur le screenshot) Endress+Hauser...
- Page 178 à cet moment. Pour interroger les réglages à n'importe quel moment, il faut activer le bouton "Read set-up". Bouton Service Le bouton Service est protégé par un code Service et ne peut être utilisé que par le SAV E+H ! Endress+Hauser...
-
Page 179: Maintenance Et Nettoyage
Pendant le fonctionnement, le tuyau d'aspiration est soumis à une usure matérielle naturelle. Il est donc nécessaire de contrôler régulièrement l'étanchéité du tuyau d'aspiration. S'il n'est plus étanche, il doit être remplacé selon les instructions de montage jointes au tuyau d'aspiration. Endress+Hauser... -
Page 180: Nettoyage Du Compartiment À Échantillons
Conseils de maintenance Remarque ! Pour votre ASP station 2000 péristaltique, Endress+Hauser vous propose un contrat de maintenance. Ce contrat vous permet d'améliorer la sécurité de fonctionnement de votre appareil et de décharger votre personnel. Pour plus de renseignements, contactez le SAV E+H. -
Page 181: Accessoires
ASP Station 2000 péristaltique Accessoires Accessoires Il existe différents accessoires qui peuvent être commandés séparément auprès d'Endress+Hauser. Pour plus de renseignements sur les références concernées, contactez le SAV E+H. Référence Accessoires 51002425 Filtre d'aspiration complet, 1", V2A 51003198 Extrémité lestée L = 400 mm V2A RPS24A-SE Kit de modification socle de rehausse 1.4301/SS304H... -
Page 182: Suppression Des Défauts
Capteur pas raccordé Raccorder le capteur ERREUR : produit capteur Capteur défectueux Réparation par le SAV E+H ERREUR : puls timeout Tuyau de prélèvement mal mis en Mettre le tuyau de prélèvement place, formation d'un siphon correctement en place Endress+Hauser... -
Page 183: Erreurs Process Sans Messages
Remplacer le capteur (uniquement par le SAV E+H) Pas de prélèvement Raccordement pas étanche Vérifier l'étanchéité des tuyaux/ Tuyau de prélèvement aspire de l'air raccordements Mauvais tuyau d'aspiration N'utiliser que des tuyaux d'aspiration Capteur défectueux Remplacer le capteur (uniquement par le SAV E+H) Endress+Hauser... -
Page 184: Pièces De Rechange
51000288 Jeu de joints pour porte (armoire standard) RPS20X-LC Jeu de joints pour porte en deux parties RPS20X-LD Clé (1 paire) 51000233 Serrure avec clé 51000244 Poignée avec axe 51000245 Ventilateur 51000298 Condenseur avec ventilateur RPS20X-AA Compresseur standard RPS20X-AB Endress+Hauser... - Page 185 Unité de commande thermostat RPS24X-TH Heater, upstairs + thermostat RPS24X-HA ® Mise à jour software (programme, ReadWin 2000, câble d'interface) Software 7 programmes Langue allemand anglais français italien espagnol hollandais / néerlandais danois tchèque polonais RPS24A1- Référence de commande Endress+Hauser...
-
Page 186: Retour De Matériel
RPS24X1- Référence de commande Retour de matériel Avant de retourner un appareil à Endress+Hauser, par ex. pour réparation, il convient de prendre les mesures suivantes : • Toujours joindre une "Déclaration de décontamination" dûment complétée, faute de quoi Endress+Hauser ne pourra transporter, contrôler ou réparer l'appareil retourné. -
Page 187: Mise Au Rebut
ASP Station 2000 péristaltique Suppression des défauts Mise au rebut L'appareil contient des composants électroniques et doit être considéré comme déchet électronique en cas de mise au rebut. Les directives locales de mise au rebut doivent être respectées. Endress+Hauser... -
Page 188: Caractéristiques Techniques
La détection de produit commande le comptage électronique du volume. La détection de produit est un système nouvellement développé par Endress+Hauser. Le coeur du système est un capteur de pression qui fait la différence entre un tuyau d'aspiration plein et un tuyau d'aspiration vide. - Page 189 Les flacons individuels se trouvent dans deux bacs à flacons séparés (pos. C). Les poignées des bacs à flacons facilitent le transport. Fig. 67 : Répartition des échantillons ASP station 2000 péristaltique Pos. A : Bras répartiteur Pos. B : Plaque de répartition Pos. C : Bac à flacons Endress+Hauser...
-
Page 190: Energie Auxiliaire
Spécifications de câble Voir chap. 4.1 "Types de câble" 10.2.5 Consommation env. 340 W 10.2.6 Données de raccordement interface Interface sérielle : • RS232 (en option pour enregistrement externe des données), connecteur 4 pôles sur la plaque frontale (voir chap. 4.1.7) Endress+Hauser... -
Page 191: Conditions De Montage
0 à +50 °C 10.5.2 Pression de service sans pression 10.5.3 Produits à prélever Les produits à prélever doivent être exempts de matières abrasives. Tenir compte de la résistance des matériaux des pièces en contact avec le produit ! Endress+Hauser... -
Page 192: Construction
Caractéristiques techniques ASP Station 2000 péristaltique 10.6 Construction Forme, dimensions: Fig. 68 : Dimensions (en mm) ; en option avec socle Fig. 69 : Dimensions (en mm) ; sans socle 10.6.1 Poids env. 110 kg (sans socle) Endress+Hauser... -
Page 193: Interface Utilisateur
Mémoire circulaire intégrée pour l’enregistrement d’une valeur analogique (débit, pH, conductivité, etc.), événements (par ex. coupure de courant), statistiques d’échantillonnage (par ex. volume prélevé, temps de remplissage, affectation des flacons). Calcul de la durée d’enregistrement Affichage automatique en entrant la fréquence de lecture. Endress+Hauser... -
Page 194: Certificats Et Agréments
Certificats et agréments 10.8.1 Sigle CE L’appareil remplit les exigences légales des directives CE. Par l’apposition du sigle CE, Endress+Hauser certifie que l’appareil a passé les différents contrôles avec succès. 10.8.2 Normes et directives externes • EN 60529 : Protection par le boîtier (codes IP) •... -
Page 195: Index
Paramétrage du datalogger interne....162 Paramètres de la thermostatisation....178 Endress+Hauser... - Page 196 Declaration of Contamination Déclaration de décontamination Because of legal regulations and for the safety of our employees and operating equipment, we need the "declaration of contamination", with your signature, before your order can be handled. Please make absolutely sure to include it with the shipping documents, or - even better - attach it to the outside of the packaging.
- Page 197 ASP Station 2000 péristaltique Index Endress+Hauser...
- Page 198 Endress+Hauser...
- Page 199 Endress+Hauser...
- Page 200 www.endress.com/worldwide BA176R/09/a3/04.06 51008239 FM+SGML6.0 ProMoDo...
Need help?
Do you have a question about the ASP Station 2000 peristaltic and is the answer not in the manual?
Questions and answers