Table of Contents
Advertisement
Quick Links
Instructions
Harrier
Chemical Injection
Controller
For controlling and monitoring an automated injection system. Not approved for outdoor
use. For professional use only.
Not approved for use in explosive atmospheres or hazardous locations.
B32707
See page 2 for approvals.
Important Safety Instructions
Read all warnings and instructions in this manual
and in the related pump manuals before using the
equipment. Save these instructions.
®
EZ-Batch
3A8606A
EN
Advertisement
Table of Contents

Related Manuals for Graco Harrier EZ-Batch


Summary of Contents for Graco Harrier EZ-Batch
- Page 1 Instructions ® Harrier EZ-Batch Chemical Injection Controller 3A8606A For controlling and monitoring an automated injection system. Not approved for outdoor use. For professional use only. Not approved for use in explosive atmospheres or hazardous locations. B32707 See page 2 for approvals. Important Safety Instructions Read all warnings and instructions in this manual and in the related pump manuals before using the...
-
Page 2: Table Of Contents
Installing the Injection Controller ... . . 6 Graco Information ......14 Operation . -
Page 3: Warnings
Warnings Warnings The following warnings are for the setup, use, grounding, maintenance, and repair of this equipment. The exclama- tion point symbol alerts you to a general warning and the hazard symbols refer to Procedure-specific risks. When these symbols appear in the body of this manual or on warning labels, refer back to these Warnings. Product-specific hazard symbols and warnings not covered in this section may appear throughout the body of this manual where applicable. -
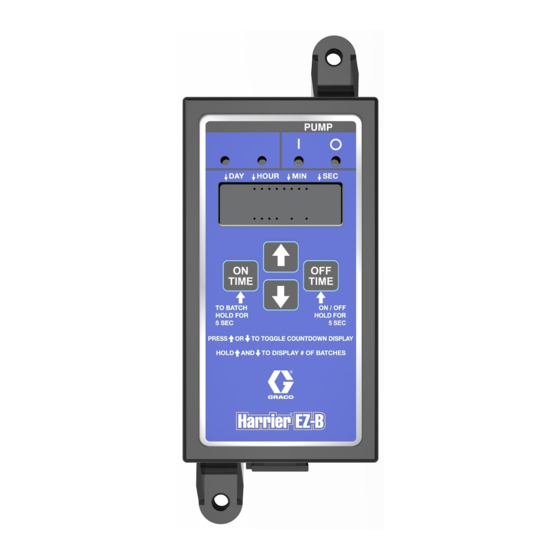
Page 4: Component Identification
Component Identification Component Identification Keypad, Display, and Icons OFF TIME (C) NOTICE • In Setup Mode, scrolls through time settings, and To prevent damage to soft key buttons, do not press the buttons with sharp objects such as pens, plastic cards, or saves entry. -
Page 5: Installation
. 2 is an example of a Harrier EZ-B chemical injection controller installation. Your installation may differ from what is shown here. The controller (J), with wiring, is supplied by Graco. All other components are supplied by the cus- tomer. Contact your Graco distributor for assistance in planning a system to suit your needs. -
Page 6: Installing The Injection Controller
Installation Installing the Injection Controller AUTOMATIC SYSTEM ACTIVATION HAZARD Unexpected activation of the system could result in serious injury, including skin injection and amputa- tion. This device has an automatic timer that activates the pump injection system when power is connected or when exiting the programming function. -
Page 7: Operation
Operation Operation 4. Press and hold the Up or Down arrow buttons (D) to increase or decrease the duration of On Time in hours. AUTOMATIC SYSTEM ACTIVATION HAZARD 5. Press the ON TIME button (E) again to activate the MIN LED dot in the Display (F) and to display min- Unexpected activation of the system could result in utes. -
Page 8: Calculating On And Off Times For Batch Treatment
This is your max using the following table. This table only flow rate (see your related pump manual for applies to Graco pumps and assumes the detailed chemical dosage instructions). pump is running at full speed (60 RPM) and maximum stroke adjustment. -
Page 9: Batch/Prime Mode
Operation Batch/Prime Mode Sleep Mode While in Run Mode (either of the ON or OFF LEDs are lit While in Run Mode (either of the ON or OFF LEDs (A or and not blinking), press and hold the ON TIME B) are lit and not blinking), press and hold the OFF TIME button (E) for five seconds to start batching. -
Page 10: Alarm Operation
Things to Check/Do Memory Problem writing setup values Cycle power. to memory Try writing values again. If error persists, contact Graco Customer Sup- port. Low Voltage Voltage too low to safely write Cycle power. memory Allow battery to charge up before trying to write values again. -
Page 11: Troubleshooting
Incorrect wiring Verify the wiring on page 5. If the Run cycle. pump remains stuck in the On portion of the Run cycle, contact Graco Cus- tomer Support. Controller flashes software revision Low voltage supplied to controller Remove motor fuse and verify code (i.e. -
Page 12: Dimensions
Dimensions Dimensions NOTE: The following image is not to scale. . 3 Harrier EZ Controller Dimensions 3A8606A... -
Page 13: Technical Specifications
Technical Specifications Technical Specifications Harrier EZ-B Controller Power Input Power Source DC 9 - 26 VDC Power Consumption 1 Watt Pump Control Outputs Voltage Pump Control Voltage = Power Source Max Switching Voltage 26 VDC Max Switching Current 16 A (DC) Min Switching Current 100 mA (DC) Protection Grade... -
Page 14: Graco Standard Warranty
With the exception of any special, extended, or limited warranty published by Graco, Graco will, for a period of twelve months from the date of sale, repair or replace any part of the equipment determined by Graco to be defective.
Need help?
Do you have a question about the Harrier EZ-Batch and is the answer not in the manual?
Questions and answers