Outdoor GreatRoom Company UPT-1242 Installation Instructions Manual
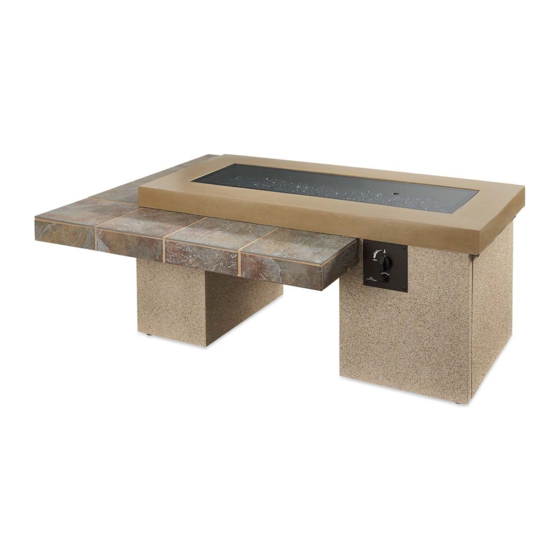
Uptown fire pit table
Hide thumbs
Also See for UPT-1242:
- Installation instructions manual (12 pages) ,
- Installation instructions manual (12 pages)

Related Manuals for Outdoor GreatRoom Company UPT-1242


Summary of Contents for Outdoor GreatRoom Company UPT-1242
- Page 1 Uptown Fire Pit Table Installation Instructions for UPT-1242 and UPT-1242-BRN P a g e...
-
Page 2: Table Of Contents
Contents Contents……………………………………………………..2 Required Tools…………………………………………...3 Placing and assembling the Table.……..…4 CF-SPARKER Installation………………….….…….6 Gas Connections…………….………………...……...6 Thermocouple Installation……………………….8 Electrode Installation………………………………..8 Locating Propane tank…………………………….9 Locating Natural Gas Line…………………….10 Fire Media Installation…………………………..…11 Required Tools Utility Knife - To cut and remove packaging 2 Open Ended Wrenches - To make gas connections ... -
Page 3: Required Tools
Placing and Assembling the Fire Pit table 1. Remove all components from packaging. 2. Move the base sections to desired location and set into place spaced approximately 26.50” from each other. 3. When locating your coffee table, refer to the Crystal Fire®... -
Page 4: Placing And Assembling The Table
5. Insert supplied sheet metal screws into the locations shown by arrows below. This secures the tile top to the base. 6. Align holes on support base with riv-nuts in the bottom of tile top. Using a Philips screwdriver and supplied bolts, attach the support base to the top as shown in the image below. - Page 5 7. Align concrete top as shown by dashed line. If the table is relocated, disconnect support base from tile top before moving. Failure to do so may result in riv-nuts becoming detached from tile top. Read and understand your Crystal Fire® Plus owner’s manual before beginning burner hookups or using the device.
-
Page 6: Cf-Sparker Installation
SPARKER Installation Locate CF-SPARKER inside of crystal fire burner box. Remove CF-SPARKER cap and hex nut. Insert AAA battery (not included) with + end out. Install CF-SPARKER into control panel as shown below. Depress CF-SPARKER button to test your sparker. Locate and orient sparker box on control panel as... - Page 7 See Crystal Fire Plus instructions for burner installation. All gas connections were completed at the factory. Check all connections for leaks. If needed, tighten connection with 2 wrenches and re-check for leaks. Attach burner valve to control panel with provided screws as shown below.
-
Page 8: Thermocouple Installation
Thermocouple Installation • Refer to Crystal Fire® Plus instruction manual for detailed attachment of thermocouple. • Attach thermocouple to burner valve as shown below. Electrode Installation • Connect igniter and ground wire to sparker box. Both wires can connect to either connection point. The unit will operate in either configuration. -
Page 9: Locating Propane Tank
Locating your Tank (If Applicable) 1. Tilt your propane tank into the slide out tank drawer. 2. With the propane tank and control valve in the OFF position, connect the Regulator Hose, included with the Crystal Fire® Plus burner, to your propane tank (not included). -
Page 10: Locating Natural Gas Line
Locating Natural Gas Line (If Applicable) Top View of Base with Door Locate natural gas stub inside of the red outline to avoid clearance issues with the door for natural gas installations. 10 | P a g e... -
Page 11: Fire Media Installation
Fire Media Installation Scatter all included glass beads, lava rock, or other approved fire media evenly across entire burner surface. DO NOT BURN WITHOUT GLASS OR OTHER APPROVED DECORATIVE FIRE MEDIA DO NOT BURN WITH GLASS COVER INSTALLED IMPORTANT Please consult your Crystal Fire®... - Page 12 Warranty: Fire pit tables are covered under a 1-year manufacturer’s warranty. Please visit https://www.outdoorrooms.com/product-registration to register your product. Thank you for purchasing an Outdoor GreatRoom Company product! This fire pit was made with pride in the USA. St. W . • Lakeville, MN 55044 9583 217 Toll Free: 1-866-303-4028 •...
Need help?
Do you have a question about the UPT-1242 and is the answer not in the manual?
Questions and answers