Table of Contents
Advertisement
Quick Links
Advertisement
Table of Contents

Related Manuals for FineTek SIS


Summary of Contents for FineTek SIS
- Page 1 SIS Sanitary Intelligent Level Switch Operation Manual FineTek Co., Ltd. No.16, Tzuchiang St., Tucheng Industrial Park, New Taipei City 23678 Tel: 886-2-22696789 Fax: 886-2-22686682 Website: http://www.fine-tek.com E-mail:info@fine-tek.com 08-SIS10XX-B4-EK,02/02/2021...
-
Page 2: Table Of Contents
Contents 1. READING LABELS ..................3 2. PRODUCT WARRANTY ................... 4 2.1 New Product Warranty ................4 2.2 Repair Warranty ..................4 2.3 Service Network ..................5 3. PRODUCT INSPECTION .................. 6 3.1 Item Check ....................6 3.2 Safety Check..................... 6 4. -
Page 3: Reading Labels
1. Reading Labels Thanks for purchasing FineTek’s Product. This operation manual describes the product features, working principles, operation and maintenance methods. It makes the user fully understand how to use the product correctly, so as to prevent dangerous situations such as device damage or operator injury. -
Page 4: Product Warranty
2. Product Warranty 2.1 New Product Warranty We don’t charge for the inspection, part/s and repair for the product of the company that has a defect within 12 months from the delivery date and meets the warranty terms. If the product defect is not due to human error during its transportation, user may change to a new unit from the company within 7 days from delivery date. -
Page 5: Service Network
No. 451, Duhui Road, Zhuanqiao Township, Minhang District, +86 021 64907260 +86 021 6490 7276 Co., Ltd. Shanghai City 201109 (China) FineTek Pte Ltd. 37 Kaki Bukit Place, Level 4 +65 6452 6340 +65 6734 1878 (Singapore Branch) Singapore 416215 Bei den Kämpen 26... -
Page 6: Product Inspection
3. Product Inspection 3.1 Item Check Sensor (1) Operation manual (1) 3.2 Safety Check Before unpacking, check the packaging for deformation or damage, and take photos to be used as evidence. After unpacking, checks the contents for deformation, damage or any quality problems, and take photos to be used as evidence. -
Page 7: Scope Of Application
5. Scope of Application Scope The product is designed based on food grade structure and materials, ideal for food and health areas. Suitable for level detection of water-based medium, oil-based medium, powder or sticky material as a switch output. ... -
Page 8: Ambient Conditions
6. Ambient Conditions Normal type (Standard type / Extension type / Mini type) Storage temperature: -40°C ~ 85°C (-40°F ~ 185°F) Ambient temperature:-40°C ~ 85°C (-40°F ~ 185°F) Medium temperature: Continuous; max.100°C @ ambient temperature -40°C~85°C (-40°F~185°F) Short time(1hr);... -
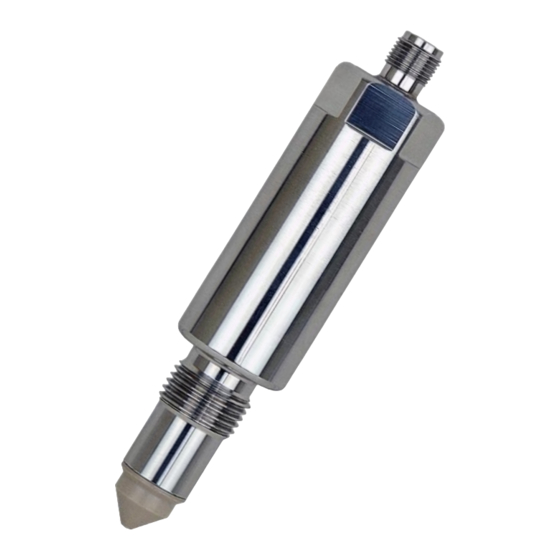
Page 9: Working Principle
7. Working Principle Working principle of this sensor is based on the frequency sweep technology. The sensor tip will send out electric field signal, and different resonance frequency is created according to different medium. Thus a switching signal will be triggered if the sensor is covered with material.. -
Page 10: Technical Performance
8. Technical Performance 8.1 Specifications Explosion Normal type Rear install type proof type Water-based media, oil-based media, powder Scope (optional) media, dual-level media (such as oil+water), Powder media fluid with separation layer (such as bubbles) Storage -40°C ~ 85°C (-40°F ~ 185°F) temperature Ambient -40°C ~ 85°C... - Page 11 Short circuit Short pulse protection Overload protection Switch delay Standard < 1 second (max. 60 seconds) (optional) Electrical M12 4PIN connector socket connection Wetted part material SUS304, SUS316, SUS316L (optional) Operating -1 ~ 40 bar pressure Process G 1/2” G 1/2” M32*P1.5 connection Probe...
- Page 12 Warning ! 1. Only Explosion-proof type can be installed and used in Combustible dust explosion environment. 2. The sensor must be installed with the exclusive “Thread connector” or “Thread adapter”, in order to ensure the installation sensor operate normally and avoid leakage. 3.
-
Page 13: External Dimensions
9. External Dimensions 9.1 Dimensions... -
Page 14: Installation
10. Installation Before installing and unloading the product, make sure that the device is not suffered to any pressure and that the material inside the pipe or container does not have leakage. Pay attention to the potential hazards relevant to the temperature of the device and the media. 10.1 Installation Environment ... -
Page 15: Installation Process
10.2 Installation Process Make sure that the sealing surface is clean before installation and remove the protective cover only when installing. If the sealing surface is damaged, replace the device or adapter sleeve. Install or weld the adapter sleeve onto the container/pipe. For the welding operation, please refer to "SISB Welding Adapter / Thread Adaptor Operating Instructions". - Page 16 Rear install type Auxiliary rod is needed for rear installation, auxiliary rod is not included in the order (customized order if need)。 When tightening, the sealing ring is not exposed and must be compressed at least 1/4 wire diameter or more than 0.3mm to ensure the seal, and the tightening torque is controlled between 20...30 Nm.
-
Page 17: Installation Examples
10.3 Installation Examples The sensor can be installed as shown below: Normal type Tank Diagram Pipeline Diagram The figure on the left shows an example of container installation, such as for liquid level detection or as idling protection. The figure on the right shows an example of pipe installation as liquid level monitoring. -
Page 18: Grounding Instructions For Dust-Explosion Zone
Rear install type Top-mounted Side-mounted The probe crosses the material of High/low alarm and to the barrel wall and effectively solve the problem that inhibits bridging. no hole in the side. After installation, please check whether the resistance of the container or pipe entrance is within the allowable range. -
Page 19: Wiring Instructions
To protect the sensor from damage in the event of system failure, adding FUSE 0.5A to the power circuit is recommended. only represents the property. The actual wire color depends on the connector purchased. Note: The accuracy and efficiency can not be guaranteed if using NON-FineTek connector. -
Page 20: Simulation Output Test
11.1 Simulation output test 1. Finished the installation and supply the sensor with 18~30Vdc. 2. Lean a magnet close to the + sing for 2 seconds or more, there will be switching output with corresponding LED light display. 3. Remove the magnet from the + sign, the switching output and corresponding LED light display will return to normal status. -
Page 21: Daily Maintenance And Handling
12. Daily Maintenance and Handling Regularly check the probe for material accumulation or damage and clean as needed. Replace the device if it is damaged. Before removing and reinstalling the device, carefully clean the probe neck and the mounting slot, especially the sealing cone. Take appropriate methods to ensure that no external matter enters the device. -
Page 22: Simple Troubleshooting
13. Simple Troubleshooting Anomaly Cause Solution Check and repair the power cord. The device is not powered. Check and turn on the power switch. The connector is not plugged in Check the M12 connector and No lights are lit and the switch is properly. -
Page 23: List Of Applicable Media
14. List Of Applicable Media As shown in the table below, you can select the medium form and the corresponding factory setting. As shown in the table below, you can select the medium form and the corresponding factory setting. ... - Page 24 ● Barbecue sauce ● Soy sauce ● Flour ● Starch ● Cocoa powder ● Coffee powder Hazelnut powder ● (about 40°C) ● Pepper (ground) ● Mashed potato ● Creamer (powder) ● Salt ● Caster sugar Crystal Sugar ● (Crushed) ● Salad dressing ●...
Need help?
Do you have a question about the SIS and is the answer not in the manual?
Questions and answers