Advertisement
Quick Links
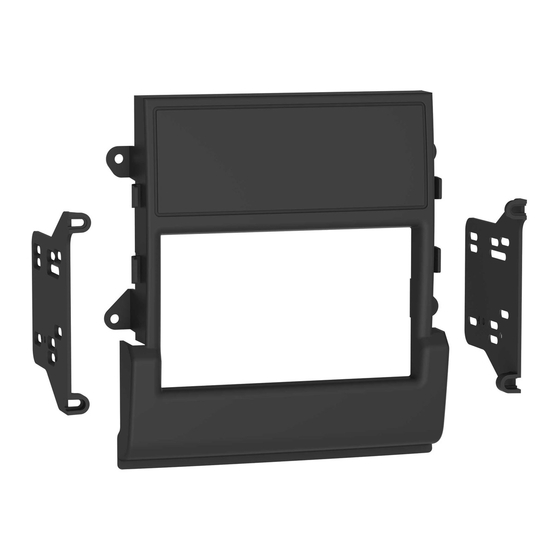
KIT COMPONENTS
• A) Radio trim panel • B) Radio brackets • C) (4) #8 3/8" Phillips screws
A
B
Metra. The World's Best Kits.
®
Porsche Macan (95B)†
For Amplified vehicles, with OEM parking sensors and graphics on vehicle screen
Visit
MetraOnline.com
for more detailed information about the product and up-to-date vehicle
specific applications
KIT FEATURES
• ISO DDIN radio provision
• Includes an Axxess interface for retaining CAN data information
• Includes an Axxess interface for retaining the fiber-optic MOST-25
• Includes an Axxess interface for retaining steering wheel control functionality
• Painted matte black
† With fiber optic MOST-25
®
C
MetraOnline.com
2015-2016
®
amplifier
amp
© COPYRIGHT 2021 METRA ELECTRONICS CORPORATION
95-9616B
I N S TA L L AT I O N I N S T R U C T I O N S
TABLE OF CONTENTS
Dash Disassembly ..................................................2
Kit Assembly ..........................................................3
Axxess Interface Installation ............................4-10
Final Assembly .......................................................7
WIRING & ANTENNA CONNECTIONS
Wiring Harness: Included with kit
Antenna Adapter: Included with kit
Steering Wheel Control Interface:
Included with kit
TOOLS REQUIRED
• 3mm Allen screwdriver • Long hook tool
• Panel removal tool • T-27 Torx screwdriver
Attention!
Let the vehicle sit with the key
out of the ignition for a few minutes before
removing the factory radio. When testing the
aftermarket equipment, ensure that all factory
equipment is connected before cycling the
key to ignition.
REV. 4/13/21 INST95-9616B
Advertisement

Subscribe to Our Youtube Channel
Related Manuals for Metra Electronics 95-9616B


Summary of Contents for Metra Electronics 95-9616B
- Page 1 When testing the aftermarket equipment, ensure that all factory equipment is connected before cycling the key to ignition. Metra. The World’s Best Kits. ® MetraOnline.com © COPYRIGHT 2021 METRA ELECTRONICS CORPORATION REV. 4/13/21 INST95-9616B...
- Page 2 DASH DISASSEMBLY 4. Carefully remove the hinged door 1. Unclip and remove the a/c vent panel to the left of the radio. (Figure A) covering the DVD drive. (Figure D) Tip! A long-hook too can be inserted 5. With the parking brake on, put the gear into the vent to grab it from the back.
- Page 3 KIT ASSEMBLY 1. Attach the radio brackets to the radio trim panel using (4) #(8) x 3/8” Phillips screws supplied. (Figure A) 2. Slide the radio into the completed assembly, and then secure it to the assembly using screws supplied with the radio.
- Page 4 AXXESS INTERFACE INSTALLATION KIT ASSEMBLY INTERFACE FEATURES TABLE OF CONTENTS • Provides accessory power Connections ........................... 5 • Provides illumination, parking brake, reverse, and speed sense outputs Installation ............................ 6 • Retains audio controls on the steering wheel Programming ..........................6 •...
-
Page 5: Connections
CONNECTIONS From the 9616 harness to the aftermarket radio, connect the: From the SWC harness to the aftermarket radio: • Black wire to the ground wire. • Parrot: Connect the AX-SWC-PARROT (sold separately) to the 3.5mm jack, then to the radio. •... -
Page 6: Installation
INSTALLATION PROGRAMMING With the ignition switch in the off position, connect the: 1. Open the driver’s door and keep open during the programming process. 1. SWC harness to the SWC interface, then to the 9616 interface. 2. Press and hold the Volume Up button on the steering wheel. For models with a scroll wheel, scroll up quickly. - Page 7 FINAL ASSEMBLY 1. Secure the radio assembly into the dash using the factory hardware and reassemble the dash in reverse order of disassembly. REV. 4/13/2021 INST95-9616B...
-
Page 8: User Guide
USER GUIDE Steering Wheel Control Functionlity *Programmable button In Normal Mode The diamond button on the steering wheel can be 1. Volume Up (Scroll Up) programmed to perform a Volume Down (Scroll Down) specific radio function within the Infodapter Mute (Short Press) menus on both a long and short press. - Page 9 USER GUIDE (CONT.) Infodapter Menu Preferences -> Diamond Short Press (None/SRC/TRK+/ TRK-/DSK+/DSK-) Press and hold Button 1 to enter the -> Camera Connected (None/Generic/OEM) Select short press function for the Diamond Infodapter menu and navigate through the Choose the style of camera connected to the button on the steering wheel controls various options and settings: vehicle (if applicable)
- Page 10 USER GUIDE (CONT.) OEM Parking sensor graphics The Infodapter interface will automatically generate a replication of the OEM front/ rear parking sensor graphics based on the vehicle’s data. These graphics have been designed to exactly replicate Porsche’s original as closely as possible to retain the OEM feel of the system.
- Page 11 REV. 4/13/2021 INST95-9616B...
- Page 12 Log onto www.installerinstitute.com or call 800-354-6782 for more information and take steps toward a better tomorrow. Metra recommends MECP certified technicians ® Metra. The World’s Best Kits. MetraOnline.com © COPYRIGHT 2021 METRA ELECTRONICS CORPORATION REV. 4/13/21 INST95-9616B...
Need help?
Do you have a question about the 95-9616B and is the answer not in the manual?
Questions and answers