Advertisement
Quick Links
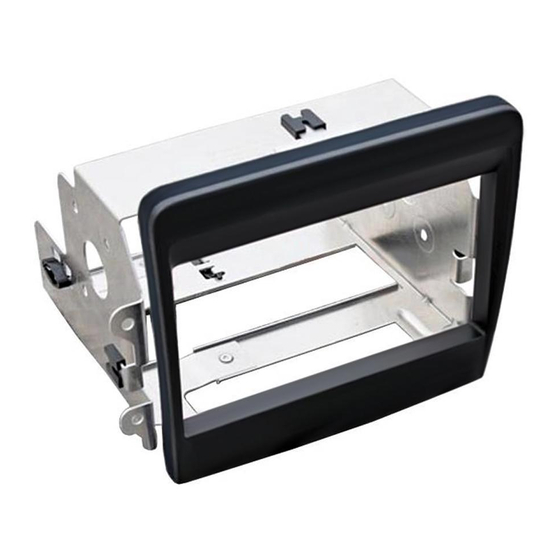
KIT COMPONENTS
• A) Radio trim panel • B) Radio bracket • C) Allen head machine-thread screws (6) • D) Push nut retainers (4)
A/B
Metra. The World's Best Kits.
®
Porsche
911 (991) 2012-2016
Boxster (981) 2013-2016
Caymen (981) 2014-2016
KIT FEATURES
• ISO DDIN radio provision
• Painted matte black
C
MetraOnline.com
D
© COPYRIGHT 2020 METRA ELECTRONICS CORPORATION
95-9607B
I N S TA L L AT I O N I N S T R U C T I O N S
TABLE OF CONTENTS
Dash Disassembly . .................................................2
Kit Assembly ..........................................................3
WIRING & ANTENNA CONNECTIONS
Wiring Harness: Please visit metraonline.com
for wiring harness options
Antenna Adapter: Please visit metraonline.com
for antenna adapter options
TOOLS REQUIRED
• Panel removal tool • Phillips screwdriver
• Torx screwdriver
Attention!
With the key out of the ignition,
disconnect the negative battery terminal
before installing this product. Ensure that all
installation connections are secure before
cycling the ignition to test this product.
REV. 4/15/22 INST95-9607B
Advertisement

Related Manuals for Metra Electronics 95-9607B


Summary of Contents for Metra Electronics 95-9607B
- Page 1 Ensure that all installation connections are secure before cycling the ignition to test this product. Metra. The World’s Best Kits. MetraOnline.com ® © COPYRIGHT 2020 METRA ELECTRONICS CORPORATION REV. 4/15/22 INST95-9607B...
- Page 2 DASH DISASSEMBLY 1. Unclip the center console side panels starting from the rear, then pull back to release the front of the panels. Note: Pull out away from console and toward back of vehicle. (Figure A) 2. Remove (4) T-25 Torx screws securing the radio then unplug and remove the radio from the dash. (Figure B) Continue to Kit Assembly (Figure A) (Figure B) 386.257.1187 MetraOnline.com...
- Page 3 KIT ASSEMBLY 1. Secure the radio trim panel to the radio bracket using the (4) included push nut retainers. (Figure A) 2. Slide the radio into the 95-9607B assembly from the back, and then secure the radio using the screws provided with the radio. (Figure A) Note: Allen head screws are provided if needed. 3. Locate the factory wiring harness and antenna connection in the dash, and complete all necessary connections to the radio. Metra recommends using the proper mating adapter from Metra and/or Axxess. Test the radio for proper operation. (Figure A) 4. Secure the completed assembly to the dash using the factory screws. 5. Reassemble the dash in reverse order of disassembly to complete the installation. REV. 4/15/2022 INST95-9607B...
- Page 4 Log onto www.installerinstitute.edu or call 386-672-5771 for more information and take steps toward a better tomorrow. Metra recommends MECP certified technicians Metra. The World’s Best Kits. MetraOnline.com ® © COPYRIGHT 2020 METRA ELECTRONICS CORPORATION REV. 4/15/22 INST95-9607B...
Need help?
Do you have a question about the 95-9607B and is the answer not in the manual?
Questions and answers