Table of Contents
Advertisement
Quick Links
Advertisement
Table of Contents

Related Manuals for ProLights LION


Summary of Contents for ProLights LION
- Page 1 LION poRTAbLE bATTERy-powEREd LUMiNARiE MANUALE UTENTE USER MANUAL IT - EN...
- Page 2 Music & Lights S.r.l. si riserva ogni diritto di elaborazione in qualsiasi forma delle presenti istruzioni per l’uso. La riproduzione - anche parziale - per propri scopi commerciali è vietata. Al fine di migliorare la qualità dei prodotti, la Music&Lights S.r.l. si riserva la facoltà di modificare, in qualunque momento e senza preavviso, le specifiche menzionate nel presente manuale di istruzioni.
-
Page 3: Table Of Contents
3. 16 Informazioni sul dispositivo 3. 17 Bilanciamento bianco 3. 18 Impostazioni wireless 4 Manutenzione 4. 1 Manutenzione e pulizia del sistema ottico 4. 2 Risoluzione dei problemi Certificato di garanzia Contenuto dell'imballo: • LION • Cavo di alimentazione • Manuale utente... -
Page 4: Sicurezza
LioN ATTENZIONE! Prima di effettuare qualsiasi operazione con l’unità, leggere con attenzione questo manuale e conservarlo accuratamente per riferimenti futuri. Contiene informazioni importanti riguardo l’installazione, l’uso e la manutenzione dell’unità. SICUREZZA Avvertenze generali • I prodotti a cui questo manuale si riferisce sono conformi alle Direttive della Comunità Europea e per- tanto recano la sigla . -
Page 5: Informazioni Generali
LioN • Conservare l’unità sempre con la batteria completamente carica. • Utilizzare e conservare l’unità in posizione orizzontale facendola poggiare bene sui supporti di base. • Conservare sempre in un ambiente asciutto, lontano dalla luce diretta del sole. • Per la pulizia del prodotto non usare solventi tipo acetone o alcool per non danneggiare la finiturae- sterna. -
Page 6: Introduzione
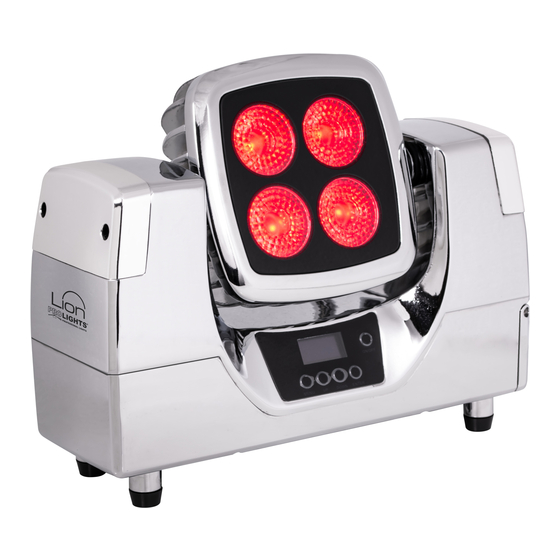
LION è un proiettore portatile a batteria di nuova generazione, concepito per applicazioni come illumina- tore d’accento in eventi sia indoor che outdoor (IP54). LION è libero dai cavi, il suo funzionamento è infatti basato su un pacco batteria al litio di grande capacità e la trasmissione del segnale DMX in Wireless. La tecnologia agli ioni di litio consente di poter preservare dimensioni compatte ed estrema leggerezza (5,5 Kg), ricaricabile innumerevoli volte senza alcun effetto “memoria”. - Page 7 LioN zione a convezione naturale Corpo e alimentazione • Grado di protezione: IP54, per uso temporaneo outdoor • Corpo in alluminio pressofuso ad alta resistenza • Pannello frontale realizzato in vetro temperato • Batteria: 24V, Litio • Autonomia batteria: 18 ore con funzionamento in cambio colore e di 9 ore in full-output • Operazioni di ricarica: Roadcase per 6 unità...
-
Page 8: Elementi Di Comando E Di Collegamento
LioN 1.3 ELEMENTI DI COMANDO E COLLEGAMENTI A - Pannello Posteriore Fig.2 1. INTERRUTTORE ON/OFF (100-240V~/50-60Hz) tramite il cavo rete in 2. PANNELLO DI CONTROLLO con display LCD e dotazione. 4 pulsanti per accesso e gestione delle diverse 5. DMX IN (XLR a 5 poli): funzioni. -
Page 9: Installazione
- 2 - INSTALLAZIONE 2.1 MONTAGGIO Il LION può essere collocato su un piano solido. Inoltre, grazie alle possibilità di fissaggio mediante i fori filettati presenti sul cabinet (fig.3), l’unità può essere montata anche a testa in giù, su una traversa. Per il fissaggio occorrono dei supporti robusti per il montaggio. -
Page 10: Funzioni E Impostazioni
3.1 FUNZIONAMENTO Il LION è dotato di un pacco batteria agli ioni di Litio che consente il funzionamento senza cavi. Per ac- cendere il proiettore, premere il pulsante ON/OFF (se la batteria è scarica, inserire la spina del cavo di ali- mentazione in una presa di rete (100-240V~/50-60Hz). -
Page 11: Struttura Menu
LioN 3.4 STRUTTURA MENU MENU (LEVEL 1) (LEVEL 2) (LEVEL 3) REMARK Auto Show Auto Show Speed <Auto 0> 0 ~ 100 <Auto 1> 0 ~ 100 <Auto 2> 0 ~ 100 <Auto 3> 0 ~ 100 <Auto 4> 0 ~ 100... -
Page 12: Autoshow
LioN DMX Channel <4 Ch> <6 Ch> <10 Ch> <HSV> <HSI> Master/Slave <Master> <Slave> Wireless Setting Receive Deliver Reset Reset 10 White Balance Balance Value <R = 255> <R = 255> <G = 255> <G = 255> <B = 255>... -
Page 13: Modalità Master/Slave
• Sull’unità master selezionare il programma desiderato come indicato al paragrafo 3.5. • Servirsi dei connettori DMX del LION e di un cavo XLR per formare una catena di unità. In certe condi- zioni e lunghezze si consiglia di effettuare una terminazione come mostrato a pagina 15. - Page 14 LioN DMX Address: 33 DMX Address: 39 DMX Address: 45 DMX Address: 51 ... . DMX512 Controller Fig.5 - Esempio di configurazione a 6 canali DMX...
-
Page 15: Collegamenti Della Linea Dmx
LioN 3.11 COLLEGAMENTI DELLA LINEA DMX La connessione DMX è realizzata con connettori standard XLR. Utilizzare cavi schermati, 2 poli ritorti, con impedenza 120Ω e bassa capacità. Per il collegamento fare riferimento allo schema di connessione riportato di seguito: DMX - OUTPUT... -
Page 16: Canali Dmx
LioN 3.13 CANALI DMX MODE MODE FUNCTION FUNCTION Value Value 4 Ch 10 Ch WHITE 0~100% 000 - 255 0~100% 000 - 255 GREEN STROBE 0~100% 000 - 255 No Function 000 - 010 Strobe slow to fast 011 - 255... - Page 17 LioN MODE FUNCTION Value 3 Ch 000 - 255 Saturation 000 - 255 Value (Brightness) 000 - 255 MODE FUNCTION Value 3 Ch 000 - 255 Saturation 000 - 255 Intensity 000 - 255...
-
Page 18: Dimmer
LioN 3.14 DIMMER • Per entrare nella modalità dimmer e scegliere di simulare diverse curve dimming, premere il tasto MENU ripetutamente fino a quando sul display non compare Dimmer Mode, quindi premere il tasto ENTER. • Premere il tasto UP/DOWN per selezionare: Off - Dimmer1 - Dimmer2 - Dimmer3. - Page 19 NOTA - Una volta eseguiti questi passi, bisogna effettuare la sincronizzazione con l’eventuale unità wifi con la quale si vuole comunicare premendo il pulsante di sincronizzazione presente sulla stessa. A questo punto collegare l’eventuale console DMX all’unità wifi per aprire la comunicazione con il LION.
-
Page 20: Manutenzione
LioN - 4 - MANUTENZIONE 4.1 MANUTENZIONE E PULIZIA DEL SISTEMA OTTICO • Durante gli interventi, assicurarsi che l’area sotto il luogo di installazione sia libera da personale non qualificato. • Spegnere l’unità, scollegare il cavo di alimentazione ed aspettare finché l’unità non si sia raffreddata. - Page 22 All rights reserved by Music & Lights S.r.l. No part of this instruction manual may be reproduced in any form or by any means for any commercial use. In order to improve the quality of products, Music&Lights S.r.l. reserves the right to modify the characteristics stated in this instruction manual at any time and without prior notice.
- Page 23 3. 15 Back light 3. 16 Fixture information 3. 17 White balance 3. 18 Wireless Setting 4 Maintenance 4. 1 Maintenance and cleaning the unit 4. 2 Trouble shooting Warranty Packing content • LION • Power cord • User manual...
- Page 24 LioN WARNING! Before carrying out any operations with the unit, carefully read this instruction manual and keep it with cure for future reference. It contains important information about the installation, usage and maintenance of the unit. SAFETY General instruction • The products referred to in this manual conform to the European Community Directives and are there- fore marked with .
- Page 25 LioN • Always use and store fixture in a horizontal position making good rest on the basic carrier. • Always store in a dry environment away from direct sunlight. • When cleaning unit, please do not use solvents such as acetone or alcohol, since they may damage the of the unit outer finish.
- Page 26 LION is a new-generation portable, battery-powered luminarie, conceived for applications as accent light- er in events both indoor and outdoor (IP54). LION is cable-free and its operations are driven by an high- capacity lithium battery pack and the wireless signal transmission. The technology behind lithium -ion battery allows to preserve its compact size and extremely light weight ( 5.5 kg ) , rechargeable countless...
- Page 27 LioN Structure and Power supply • Protection: IP54, for temporary outdoor use • Sturdy die-cast aluminium body conceived for long-time durability and demanding applications • Tempered glass front panel • Battery: 24V, Lithium • Battery autonomy: 18 hours (color change mode), 9 hours (permanent white full-on) • Recharge operations: 6-units Road case with integrated battery charger or wire to the electric supply...
- Page 28 LioN 1.3 OPERATING ELEMENTS AND CONNECTIONS A - Side panel Fig.2 1. ON/OFF BUTTON socket (100-240V~/50-60Hz) via the supplied 2. CONTROL PANEL with display and 4 button mains cable. used to access the control panel functions 5. DMX IN (5-pole XLR): and manage them.
- Page 29 2.1 MOUNTING LION may be set up on a solid and even surface. The unit can also be mounted upside down to a cross arm. For fixing, stable mounting clips are required. The mounting place must be of sufficient stability and be able to support a weight of 10 times of the unit’s weight.
- Page 30 To recharge LION, plug the power cable into a mains socket (100-240V ~ / 50-60Hz). To charge the LION battery, plug in the power cord into a mains socket (100-240V ~ / 50-60Hz) at any time before, during, or after operation. The battery life indicator located on the product displays the remaining...
- Page 31 LioN 3.4 MENU STRUCTURE MENU (LEVEL 1) (LEVEL 2) (LEVEL 3) REMARK Auto Show Auto Show Speed <Auto 0> 0 ~ 100 <Auto 1> 0 ~ 100 <Auto 2> 0 ~ 100 <Auto 3> 0 ~ 100 <Auto 4> 0 ~ 100...
- Page 32 LioN DMX Channel <4 Ch> <6 Ch> <10 Ch> <HSV> <HSI> Master/Slave <Master> <Slave> Wireless Setting Receive Deliver Reset Reset 10 White Balance Balance Value <R = 255> <R = 255> <G = 255> <G = 255> <B = 255>...
- Page 33 • Press the MENU button to go back or to meet the waiting time to exit the setup menu. To able to operate the LION with a light controller, adjust the DMX start address for the first a DMX channel.
- Page 34 LioN DMX Address: 33 DMX Address: 39 DMX Address: 45 DMX Address: 51 ... . DMX512 Controller Fig.5 - Example 6 DMX channels configuration...
- Page 35 LioN 3.11 CONNECTION OF THE DMX LINE DMX connection employs standard XLR connectors. Use shielded pair-twisted cables with 120Ω imped- ance and low capacity. The following diagram shows the connection mode: DMX - OUTPUT DMX - INPUT XLR socket XLR plug...
- Page 36 LioN 3.13 DMX CONTROL MODE MODE FUNCTION FUNCTION Value Value 4 Ch 10 Ch WHITE 0~100% 000 - 255 0~100% 000 - 255 GREEN STROBE 0~100% 000 - 255 No Function 000 - 010 Strobe slow to fast 011 - 255...
- Page 37 LioN MODE FUNCTION Value 3 Ch 000 - 255 Saturation 000 - 255 Value (Brightness) 000 - 255 MODE FUNCTION Value 3 Ch 000 - 255 Saturation 000 - 255 Intensity 000 - 255...
- Page 38 LioN 3.14 DIMMER This setting determines the output of the LION based on the position of the Red, Green, Blue, White and Dimmer faders. • Press the button MENU repeatedly until Dimmer Mode shows, and press ENTER button to accept.
- Page 39 NOTE - After you complete these steps, you have to synchronize with any wifi unit with which you want to communicate by pressing the sync button present on the same. Then connect any DMX console to wifi unit for to open the communication with the LION unit.ENTER button.
- Page 40 LioN - 4 - MAINTENANCE 4.1 MAINTENANCE AND CLEANING THE UNIT • Make sure the area below the installation place is free from unwanted persons during setup. • Switch off the unit, unplug the main cable and wait until the unit has cooled down.
- Page 41 Place Stamp Here Affrancare Spett.le Music&Lights S.r.l. Via Appia Km 136.200 04020 Itri (LT) Italy "...
- Page 44 MUSIC & LIGHTS S.r.l. Via Appia, km 136,200 - 04020 Itri (LT) - ITALY Phone +39 0771 72190 - Fax +39 0771 721955 www.musiclights.it - email: info@musiclights.it ISO 9001:2008 Certified Company...
Need help?
Do you have a question about the LION and is the answer not in the manual?
Questions and answers