Maico easyTymp Operating Manual
Hide thumbs
Also See for easyTymp:
- Operation manual (62 pages) ,
- Operation manual (66 pages) ,
- Operation manual (65 pages)

Related Manuals for Maico easyTymp


Summary of Contents for Maico easyTymp
- Page 1 Operating Manual MAICO Diagnostics | 10393 West 70th Street | Eden Prairie, MN 55344, USA | Toll Free 888.941.4201...
-
Page 3: Table Of Contents
3.3.2 Visual inspection of the ear canal ................ 11 3.3.3 Handling the eartips ................... 11 3.4 Cleaning the probe tip ................12 4 Operating easyTymp® .............. 13 4.1 Operating Panel ..................13 4.2 Getting started ..................13 4.3 Probe status indication ................14 4.4 Operating easyTymp®... - Page 4 Page 4.5 Setup ....................22 4.5.1 Setup Language ....................22 4.5.2 Setup Date & Time ..................... 22 4.5.3 Setup easyTymp® ....................23 4.5.4 Setup Printer ...................... 23 4.5.5 Setup Clinic Info ....................23 4.5.6 Setup License ..................... 24 4.5.7 Setup Patient Management ................24 4.5.8 About ........................
-
Page 5: Introduction
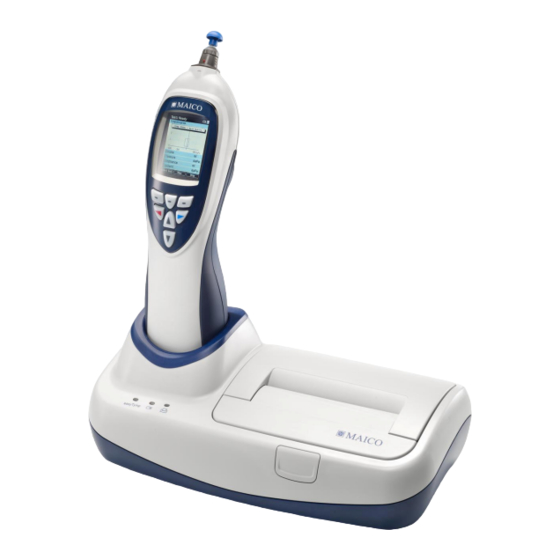
The handheld unit also enables the transfer of data to a PC via USB-connection. The easyTymp® cradle serves as a docking station and charger. It is available as a version with ear tip box or integrated printer. -
Page 6: Safety Notes
Operating Manual 1.2 Safety Notes The easyTymp® should always be operated in a quiet room with minimal magnetic influence, to ensure that examinations are not disturbed by external noise. Electro-medical instruments that emit strong electromagnetic fields (e.g. microwaves, radiotherapy devices) can affect the operation of the easyTymp®. -
Page 7: Impedance Measurements
If a ”flat” tympanogram is observed, showing a non-mobile middle ear system, the easyTymp® will not perform an acoustic reflex test. Theoretically, a compliance peak is necessary to observe a reflex at peak... -
Page 8: Getting Started
Keep the original packaging for future shipment! The easyTymp® is packaged in a specially-designed box. Please keep the box as it will be useful for sending the instrument for the annual instrument check-up. Please contact your nearest responsible dealer should the annual instrument check-up be needed. -
Page 9: System Installation
Operating Manual Optional accessories Part No Cradle w/o Printer 721-10 Cradle w/ Printer 721-8 Wall Mount Kit 6699 Carry Case 1035-3024 Standard tip configuration in Eartip box: Eartip Type Size Quantity Flanged 3-5mm Mushroom 9 mm Mushroom 11 mm... - Page 10 3.2.1.2 Cradle indication lights Depending on the version (with or without printer) the cradle has up to three indication lights. easyTymp® LED shows solid blue when the easyTymp® is placed inside the cradle and the battery is fully charged. The LED will flash as long as the battery is charging.
- Page 11 Push blue lever down Close printer cover 3.2.1.4 Mounting the cradle on the wall The easyTymp® cradle can be mounted on the wall via the optional wall-mount kit. Instructions are provided inside the wall-mount kit. See pg. 5 for part number.
- Page 12 Place the battery inside the compartment. Make sure the battery contacts are correctly placed. Replace the lid on the easyTymp® and push it upwards to close the battery compartment. If not in operation for longer periods, it is recommended to remove the battery from the instrument.
- Page 13 Do not pull the cord of the extension cord as this can damage the tubing connections! Place the probe to the easyTymp® by lining up the red triangles and pushing the probe into the unit. The probe can be attached to the extension cord by lining it up correctly and clicking the probe into the end of the extension cord.
- Page 14 3.2.1.8 Calibration cavities The easyTymp® comes with a separate 2 cc cavity which can be used for a quick check of the validity of the probe calibration. You can use 0.2 ml, 0.5 ml, 2.0 ml and 5.0 ml cylinders for more extended checks.
-
Page 15: Preparing The Test
Operating Manual 3.3 Preparing the test 3.3.1 Patient Instruction Make sure that the patient is comfortable on a chair or on an examination table if necessary. Small children may feel more comfortable sitting on a parent's lap. Show the probe to the patient and then explain the following: The aim of the test is to test the mobility of the eardrum. -
Page 16: Cleaning The Probe Tip
If any blockage or damage occurs to the sealing gasket, If any blockage or damage occurs to the sealing gasket, the probe system can only be serviced by MAICO. the probe system can only be serviced by MAICO. -
Page 17: Operating Easytymp
To get started, take the easyTymp® out of the cradle. In default setting it will turn on automatically. If you don’t store the easyTymp® in the cradle, press either red or blue arrow key to switch the device on. To switch easyTymp® off, press both red and blue arrow keys together and hold for one second easyTymp®... -
Page 18: Probe Status Indication
White – The probe has just been attached. Probe status is unknown. The probe status stays white in hand held use if the easyTymp® is not monitoring the probe status. If the probe light stays white in any other situation easyTymp® might need to be switched off and on again to regain proper probe status. -
Page 19: Test
As soon as name of the protocol which is used. As soon as easyTymp® detects that the probe is in detects that the probe is in the ear, the second line will show which test of the protocol is running. - Page 20 Operating Manual Operating from this screen: Putting the probe in an ear will automatically start the test. Top left button will bring you into the Select Test screen from where you can select a different test protocol. Top middle button will bring you to the Patient screen from where patient data can be viewed and changed and earlier sessions can be reviewed and/or printed.
-
Page 21: Select Test Screen
Top left button will result in printing the test results of the left and right ear. Note that there should be a connection to the printer by placing there should be a connection to the printer by placing the easyTymp® in the cradle. in the cradle. -
Page 22: Select Patient & Save
Top right button will save the data to the selected client. After saving all data is deleted and Top right button will save the data to the selected client. After saving all data is deleted and easyTymp® returns in the Test screen, ready for testing. returns in the Test screen, ready for testing. -
Page 23: Edit New
Operating Manual Operating Manual 4.4.5 Edit New With this screen you can put in With this screen you can put in data to a new client before data to a new client before saving the measurement. saving the measurement. -
Page 24: View Patients
Operating Manual Operating Manual 4.4.6 View Patients This screen shows a list of clients. This screen shows a list of clients. When one or more sessions are stored, the square in front When one or more sessions are stored, the square in front... -
Page 25: Edit Details
Operating Manual Operating Manual 4.4.8 Edit Details This screen shows the client ID, First Name, Last Name and This screen shows the client ID, First Name, Last Name and This screen shows the client ID, First Name, Last Name and Birth Date. -
Page 26: Setup
Operating Manual Operating Manual 4.5 Setup To change the Setup of the easyTymp® navigate from Test screen to Select test an d then to d then to easyTymp®. Operating from this screen: Top left brings you back to the Select test Select test screen. -
Page 27: Setup Easytymp
Operating Manual Operating Manual 4.5.3 Setup easyTymp® Use Up and Down to go to the next and previous Use Up and Down to go to the next and previous item. Use right and left arrow keys to go to adjust. -
Page 28: Setup License
Operating Manual Operating Manual 4.5.6 Setup License Option: Extra software license for high frequency Option: Extra software license for high frequency probe tone of 1000 Hz By pressing the Top right button you can select the the Top right button you can select the module you want to view or change the license key. -
Page 29: About
Operating Manual Operating Manual 4.5.8 About Here you find information about firmware about firmware version and calibration dates. -
Page 30: Warranty, Maintenance And Service
Operating Manual 5 Warranty, Maintenance and Service The easyTymp® is guaranteed for 1 year. This warranty is extended to the original purchaser of the instrument by MAICO through the Distributor from whom it was purchased and covers defects in material and workmanship for a period of one year from date of delivery of the instrument to the original purchaser. -
Page 31: Safety Regulations
7.1 Electrical safety: The instrument is not to be used in environments dealing with explosive material or equipment. The easyTymp® is constructed to comply with protection class I, Type B of the international standard IEC 601-1 (EN 60601-1). Protection from an electric shock is ensured even without the system earth connection. - Page 32 Operating Manual In order to comply with IEC 60601, use of the direct power adapter to mains for the thermal printer when it is connected to the cradle is not permitted. The cradle connection provides power for the thermal printer.
-
Page 33: Technical Data
Operating Manual 8 Technical Data The easyTymp® is an active, diagnostic medical product according to the class IIa of the EU medical directive 93/42/EEC IEC 60601-1, Class II, Type B Standards: Safety: IEC 60601-1-2 EMC: IEC 60645-5/ANSI S3.39, Type 1... - Page 34 PC connection USB: Theoretically an infinite amount of test results Memory: can be stored on the PC. The easyTymp® hand held unit is delivered with a 1 Gb memory card, enough for storing more than a quarter of a million tests.
- Page 35 Operating Manual Specification of Input / Output Connections Outputs: Outputs: Outputs: Outputs: Transducer Proprietary Pin 1: CH1 out 12-pole Pin 2: CH1 GND Pin 3: DGND Pin 4: GND A / GND Microphone Pin 5: Microphone – input / Analog Balanced in...
- Page 36 Operating Manual Impedance Calibration Properties Probe Tone: Probe Tone: Probe Tone: Probe Tone: Frequencies: 226 Hz ±1%, 1000 Hz ±1% Level: 85 dB SPL ±1.5dB measured in an IEC 60318-5 Acoustic coupler. The level is consistent for all volumes in the measurement range.
- Page 38 1162-1100 Rev A 06/11...
Need help?
Do you have a question about the easyTymp and is the answer not in the manual?
Questions and answers