Maico ERO SCAN Operating Instructions Manual
Screener
Hide thumbs
Also See for ERO SCAN:
- Operation manual (76 pages) ,
- Operating instructions manual (75 pages) ,
- Quick manual (4 pages)

Subscribe to Our Youtube Channel
Related Manuals for Maico ERO SCAN


Summary of Contents for Maico ERO SCAN
-
Page 1: Operating Instructions
MAICO Diagnostic GmbH Operating Instructions MAICO ERO SCAN™ SCREENER MAICO Diagnostic GmbH, Salzufer 13/14, D 10587 BERLIN, Tel. ++49 30/70714650, Fax ++49 30/70714699... -
Page 2: Table Of Contents
Operating Instructions ERO SCAN Screener Table of Contents 1 Introduction ..................... 1 2 Important Safety Instructions ..............2 3 Purpose ....................5 4 Description ....................7 5 Setup ....................... 9 5.1. Unpacking the System ............... 9 ... - Page 3 Operating Instructions ERO SCAN Screener 7.8 Setting the Clock ................24 8 Changing Instrument Settings ..............26 9 Interpreting Results ................. 30 10 Cleaning and Maintenance ..............34 10.1 Probe Tip Replacement ..............34 11 Troubleshooting ................... 36 ...
-
Page 4: Introduction
Operating Instructions ERO SCAN Screener This manual applies to firmware version 7.67 and higher. 1 Introduction Thank you very much for purchasing a quality product from the MAICO family. This automatic OAE-test system MAICO ERO•SCAN™ Screener manufactured to meet all quality and safety requirements, and has been certified with the CE-symbol according to Medical Directive 93/42/EEC. -
Page 5: Important Safety Instructions
Screener 2 Important Safety Instructions The MAICO ERO•SCAN™ Screener Otoacoustic Emission Test System should be used only by those individuals trained to perform the testing for which it has been designed. No person should attempt to use this instrument without the necessary knowledge and training to understand how this equipment is to be properly utilized and interpreted. - Page 6 Operating Instructions ERO SCAN Screener Disclaimer The MAICO ERO•SCAN™ Screener Test Instrument is designed to be a screening device for hearing loss. Sensitivity and specificity of this type of device are based on the test characteristics defined by the user, and may vary depending on environmental and operating conditions.
- Page 7 Operating Instructions ERO SCAN Screener READ THIS SECTION CAREFULLY BEFORE USE Printer AC Power Source Precautions The printer AC power source converts main voltage (120V AC or 230V AC) to a low voltage (12V DC) for powering the printer. Use only the power source supplied for this purpose.
-
Page 8: Purpose
Operating Instructions ERO SCAN Screener 3 Purpose The purpose of the ERO•SCAN™ Screener test system is to provide a rapid measurement and documentation of Distortion Product Otoacoustic Emissions (DPOAEs) or Transient Evoked Otoacoustic Emissions (TEOAEs) at several frequencies. What Are DPOAEs? - Page 9 Operating Instructions ERO SCAN Screener How Does the ERO•SCAN™ Screener Device Work? The digital signal processor in the instrument generates two pure tones (f ) for DPOAEs or a series of wideband clicks for TEOAEs through a digital-to- analog converter. These tones or clicks are presented to the ear via speaker tubes located in the probe.
-
Page 10: Description
Operating Instructions ERO SCAN Screener 4 Description What is the ERO•SCAN™ Screener? The ERO•SCAN™ Screener Otoacoustic Emission test instrument is a hand- held device designed to provide an objective test of outer hair cell function through the measurement of Distortion Product Otoacoustic Emissions (DPOAEs) or Transient Evoked Otoacoustic Emissions (TEOAEs). - Page 11 Operating Instructions ERO SCAN Screener How are the Results Stored and Reported? When the ERO•SCAN™ Screener is set in its default settings, the instrument will store the results from one patient (left and right ear) in its non-volatile memory for subsequent printing. However, the ERO•SCAN SCREENER instrument can store up to 50 test results.
-
Page 12: Setup
Notify the carrier immediately if any mechanical damage is noted. This will assure that a proper claim is made. Save all packing material so the claim adjuster can inspect it as well. Notify your dealer or MAICO when the adjuster has completed the inspection. -
Page 13: Connection To The Optional Printer
Operating Instructions ERO SCAN Screener 5.2. Connection to the optional Printer Connect one end of the printer cable into the port ♦ located on the underside of the cradle as shown in Figure 1 to the right. After firmly pushing the broad connector end into place, turn the screws on either side to tighten it. -
Page 14: Environmental Conditions
Screener should be operated in a quiet room, so that the examinations are not influenced by outside noises. Electro-medical instruments, which emit strong electromagnetic fields (e.g. microwaves - radiotherapy devices), can influence the function of the MAICO ERO•SCAN Screener. Therefore the use of these instruments is not allowed in close proximity to the ERO•SCAN... -
Page 15: Loading Paper Into The Optional Printer
Operating Instructions ERO SCAN Screener 5.5 Loading Paper into the optional Printer Open the cover of the printer by pulling up and back. Orient the paper roll so that the paper will feed from the bottom of the roll (see Figures 4 and 5). Place the roll of paper into the printer by holding the white paper-holder lever back against the case. -
Page 16: Attaching Eartips
Operating Instructions ERO SCAN Screener 5.6 Attaching Eartips The ERO•SCAN Screener instrument comes with a box of disposable eartips that fit a variety of ear canal sizes. The probe tip must have an eartip attached before inserting it into an ear canal. The eartip kit has 12 different size eartips that are color-coded for easy selection. -
Page 17: Quick Start
Figure 1 arrow key. Step 4 Insert the eartip deeply into the patient’s ear canal to obtain a seal. When a seal is obtained, the MAICO ERO•SCAN™ Screener instrument will automatically begin the test by first calibrating and then testing emissions. -
Page 18: Performing Dpoae And Teoae Tests
Operating Instructions ERO SCAN Screener 7 Performing DPOAE and TEOAE Tests 7.1. Preparing the Patient for Testing Otoscopic examination of the patient’s ear canals should be performed prior to testing. Excessive cerumen or vernix in the ear canals may interfere with the test and give invalid or incomplete results. -
Page 19: Testing In The Default Modes
Operating Instructions ERO SCAN Screener Figure 4 Figure 3 Main Menu Automatic Shutdown The ERO•SCAN Screener instrument has an automatic “shutdown” feature, designed to prolong battery life. The unit will automatically shut down after 1 minute (default) of inactivity. To turn it back on, simply press the large DOWN key. -
Page 20: To Begin Testing
Operating Instructions ERO SCAN Screener Frequency Range = 1.5 kHz to 4 kHz Pass SNR (Signal-to-Noise Ratio) = 4 Click Presentation Level = 83 dB Number of Passing Frequencies for Overall Test Pass = 3 SPL Peak Equivalent 7.4.1 To Begin Testing To begin testing, place an eartip as far down as possible on the probe tip, turn on the ERO•SCAN... -
Page 21: Testing Children With Pe Tubes
Operating Instructions ERO SCAN Screener When testing DPOAEs, the default test time is 16 seconds. When testing TEOAEs, the default test time is 64 seconds, however, the test will automatically stop when the pass criteria has been met or exceeded. The arrow key can be used to abort a TEOAE test in progress. -
Page 22: Reviewing Results
Operating Instructions ERO SCAN Screener 7.4.4 Reviewing Results When testing is complete, a display similar to figure 13 will appear. The results of the test are automatically saved in memory as soon as the test is complete. The results will be saved even if the unit turns off or the batteries are temporarily removed. -
Page 23: Remote Probe (Optional)
Operating Instructions ERO SCAN Screener When testing a newborn, gently pull down and back on the pinna to straighten out the ear canal. Prepare the ERO•SCAN Screener unit by turning on the device, selecting the test ear and eartip. It is very important to select the eartip and push the arrow key which selects the test ear before placing the ERO•SCAN... - Page 24 The plug and socket should be visually inspected prior to each installation of the remote probe. If damage is observed, contact your Special Equipment Distributor or MAICO Diagnostic. Turn on the ERO•SCAN Screener.
-
Page 25: Testing With The Remote Probe
Operating Instructions ERO SCAN Screener 7.5.2 Testing with the Remote Probe The remote probe uses the same disposable eartips as the ERO•SCAN Screener probe. Place the eartip fully onto the probe tip (Figure 15). Never use the probe without an eartip installed. Use the shirt clip on the remote probe box to secure the probe to clothing or bedding. -
Page 26: Printing The Results (Optional)
Operating Instructions ERO SCAN Screener most of the tester’s hand movement and associated noise from the probe, but the tester should hold the instrument as steady as possible. 7.7 Printing the Results (optional) It is recommended that the results be printed after each patient. The ERO•SCAN... -
Page 27: Setting The Clock
Operating Instructions ERO SCAN Screener 7.8 Setting the Clock When the ERO•SCAN SCREENER test instrument is first used, the correct date and time will need to be set on its internal clock. The date and time are listed on the test printout as month-day-year (e.g., Feb-28-06). - Page 28 Operating Instructions ERO SCAN Screener pressing the DOWN arrow key will return to the Main Menu. The time and date changes are automatically saved. Figure 19 Figure 20 Figure 21 GebaEroscreenE_09a.doc 851 983/6 03/09...
-
Page 29: Changing Instrument Settings
Operating Instructions ERO SCAN Screener 8 Changing Instrument Settings To Access Menus The ERO•SCAN Screener instrument allows the user to change many of the instrument's settings or functions. These settings include the Test Mode, Clearing Test Results, Auto-Shutdown Time, Headphone Level, Minimum Amplitude Value, Save Mode, Clock Mode, Language, and Reset to Default Settings. - Page 30 Operating Instructions ERO SCAN Screener Shutdown time which controls how long the ERO•SCAN Screener instrument waits before shutting itself off after a period of inactivity. It is not necessary to manually turn off the ERO•SCAN Screener unit. The Automatic Shutdown feature is designed to prolong the battery life of the instrument when it is not in use.
- Page 31 Operating Instructions ERO SCAN Screener this point either the results must be printed or they must be cleared from memory. It is important to keep a record of the test number for each patient if this feature is used. Upon saving test number 45, the red “ERROR” light will come on. At this point, five more tests can be stored.
- Page 32 Operating Instructions ERO SCAN Screener Clock Mode Select the ↓NEXT key to enter the Clock Mode (figure 32). This menu allows the user to change the clock from a 12 hour mode to a 24 hour mode. To change the clock mode, press the ←CHANGE→ keys. Press the ↓NEXT to exit this menu.
-
Page 33: Interpreting Results
Operating Instructions ERO SCAN Screener 9 Interpreting Results Understanding the Display The display on the ERO•SCAN Screener test instrument will indicate the results of the test with a graphic display. The display will be generated and shown during the test and can be reviewed after the test is complete. - Page 34 Operating Instructions ERO SCAN Screener - The software version number. - The averaging time used for this test. - The mode selected for this test. - The f2 frequency. - The pressure levels of f1 and f2 respectively. - The level of the emission in dB SPL.
- Page 35 Operating Instructions ERO SCAN Screener Understanding the TEOAE Printed Test Results (optional) Each test will generate its own printout. - The test number. - The ear selected. - The time and date of the test, based on the setting of the internal clock. If the clock is set correctly, this time and date will be correct.
- Page 36 Operating Instructions ERO SCAN Screener Again, the pass/refer criterion is based on the full precision of the results, and not the rounded values that are printed. The full precision value for the SN must be equal to or greater than the pass criterion (5 dB in this example) for the “P”...
-
Page 37: Cleaning And Maintenance
Operating Instructions ERO SCAN Screener 10 Cleaning and Maintenance Cleaning the Instrument This instrument and its accessories may be wiped clean with a damp cloth using a mild antiseptic solution (e.g., cetylcide). Take care not to put excessive pressure on the clear display window or allow any utensil to puncture the display window or keypad. - Page 38 Operating Instructions ERO SCAN Screener Probe Tip Replacement: Remote Probe To remove: Using a small pointed object, such as a pen or small screwdriver, push in the notches on the left and right sides of the rear of the remote probe until each tab is released (Figure 3a).
-
Page 39: Troubleshooting
Operating Instructions ERO SCAN Screener 11 Troubleshooting Problem: Instrument does not turn on. Solutions: The DOWN arrow key must be pressed for a full second. Check that the batteries are installed correctly. Install new batteries. Problem: The test will not start even though the instrument is in an ear canal. -
Page 40: Replacement Parts
Operating Instructions ERO SCAN Screener 12 Replacement Parts 1 Printer paper roll Part. No. 70 50 77 1 Set (4 Pcs.) Probe tips Part. No. 70 50 81 1 Set Eartips 3 mm (yellow) Part. No. 70 50 63 1 Set Eartip 4 mm (red) Part. -
Page 41: Technical Data
Operating Instructions ERO SCAN Screener 13 Technical Data The MAICO ERO•SCAN Screener is an active, diagnostic 0124 medical product according to the class IIa of the EU medical directive 93/42/EEC. Standards: IEC 601-1 Approvals: US F.D.A 510 (k) #980533 (DPOAE); (k) #010165 (TEOAE) Environment conditions: + 15 …... - Page 42 Operating Instructions ERO SCAN Screener PRINTER with optional rechargeable battery Power Supply: Ni-Mh rechargeable battery pack Recharger: Plug-in transformer 12V 400mA/ 230V~50Hz double insulated Battery Life: Approximately 300 tests PROCESSOR SPECIFICATIONS Digital Signal Processor: Motorola 56303 24-bit 66 MHz 3.3 V...
-
Page 43: Warranty, Maintenance And Service
Electric and electronic waste may contain hazardous substances and therefore has to be collected separately. According to this all MAICO products sold after August 13, 2005, are marked with a crossed-out wheeled bin. Article (9) of DIRECTIVE 2002/96/EC on waste electrical and... -
Page 44: Safety Regulations
Operating Instructions ERO SCAN Screener 5 Safety Regulations Electrical Safety The OAE-Test system MAICO ERO•SCAN Screener is a battery driven low voltage instrument. The instruments are not intended for operation in areas with an explosion hazard. Measuring security To guarantee that the instrument works properly, it has to be checked at least once a year. -
Page 45: Certificate Of Conformity
Operating Instructions ERO SCAN Screener 16 Certificate of Conformity Product: Product type OAE Test System Trade mark ERO SCAN Screener beginning with 886 4001 31.07.2009 Valid until Manufacturer: Name: MAICO Diagnostic GmbH Address: Salzufer 13/14 Area code/Area: D-10587 Berlin Country: Germany Phone no.:... - Page 46 Operating Instructions ERO SCAN Screener Specifications are subject to change MAICO Diagnostic GmbH Salzufer 13/14 1058 Berlin Telefon +49 3070 71 46 50 Telefax +49 30 70 71 46 99 e-mail: export@maico.biz Internet: www.maico.biz GebaEroscreenE_09a.doc 851 983/6 03/09...
-
Page 47: Appendix A Internal Probe Specifications
Operating Instructions ERO SCAN Screener Appendix A Internal Probe Specifications Microphone Frequency Response (Nominal) System Noise Floor (Nominal) Sound Source Frequency Response (Nominal) System Distortion + Noise (Nominal) GebaEroscreenE_09a.doc 851 983/6 03/09... -
Page 48: Appendix A Remote Probe Specifications
Operating Instructions ERO SCAN Screener Appendix A Remote Probe Specifications Microphone Frequency Response (Nominal) System Noise Floor (Nominal) Sound Source Frequency Response (Nominal) System Distortion + Noise (Nominal) GebaEroscreenE_09a.doc 851 983/6 03/09... -
Page 49: Appendix B Program Flowchart
Operating Instructions ERO SCAN Screener Appendix B Program Flowchart GebaEroscreenE_09a.doc 851 983/6 03/09... -
Page 50: Appendix B Program Flowchart
Operating Instructions ERO SCAN Screener Appendix B Program Flowchart GebaEroscreenE_09a.doc 851 983/6 03/09... -
Page 51: Appendix C Test Sequence
Operating Instructions ERO SCAN Screener Appendix C Test Sequence A complete test sequence consists of an autostart, calibration and test phase. The autostart phase determines when the calibration phase should proceed, while the calibration phase calibrates the level of the tones that will be applied during the actual test phase. -
Page 52: Appendix D Pass/Refer Criteria For Dpoae
Operating Instructions ERO SCAN Screener Artifact rejection is employed during the test phase to reduce the effect of transient noise bursts by the use of an adaptive rejection threshold. The unit attempts to accept the quieter sections of the test, while rejecting the noisier portions of the test. - Page 53 Operating Instructions ERO SCAN Screener Requiring an SNR of 6 dB in three out of four frequencies drops the probability of passing an ear with significant hearing loss to 1% or less. Note: By the binomial distribution, two of three frequencies at >8.4 dB or three of six frequencies at >7 dB should also ensure less than 1%...
-
Page 54: Appendix D Pass/Refer Criteria For Teoae
Operating Instructions ERO SCAN Screener Appendix D Pass/Refer Criteria for TEOAE The same basic principles that underlie DPOAE Pass/Fail criteria underlie TEOAE Pass/Fail criteria. In the case of transients, requiring SNR of 4 dB at any three out of the six test frequencies drops the probability of passing an ear with a significant hearing loss to less than 1%. - Page 55 Operating Instructions ERO SCAN Screener GebaEroscreenE_09a.doc 851 983/6 03/09...
-
Page 56: Appendix E Preset Test Protocols
Operating Instructions ERO SCAN Screener Appendix E Preset Test Protocols Number of Frequencies Tested = 4 Frequency Range = 2 kHz to 5 kHz P1 (Intensity of F1 in dB SPL) = 65 P2 (Intensity of F2 in dB SPL) = 55... -
Page 57: Appendix F Testing At 4 Khz
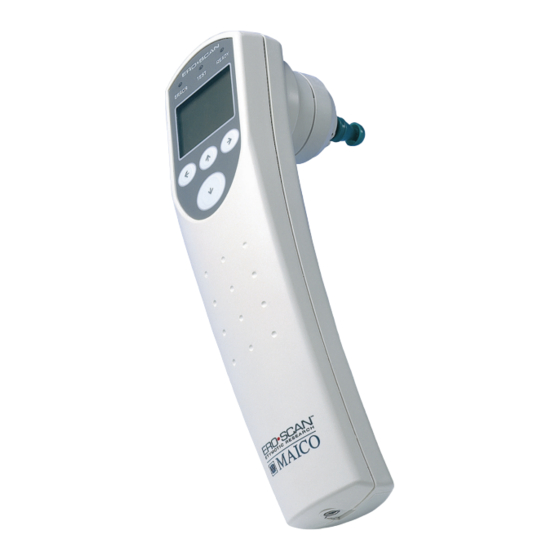
Operating Instructions ERO SCAN Screener Appendix F Testing at 4 kHz Emission levels at 4 kHz are usually stronger than those at 2 and 3 kHz, so 4 kHz should be the easiest frequency at which to obtain a PASS result. Two things can reverse the score: a) a shallow eartip placement in the ear, and b) an eartip that is not fully seated on the probe tip. - Page 58 ™ MAICO ERO•SCAN Hand-held unit Eartip Probetip Control and display area Housing Error-LED (red) Test-LED (yellow) Ready-LED (green) Graphical LCD-display Left button Down button Up button Right button Monitor phone connector Drawer battery compartment Contacts for data transfer Plug for external probe 11 12 ™...
Need help?
Do you have a question about the ERO SCAN and is the answer not in the manual?
Questions and answers
printer only printing all questions marks
The Maico SCAN printer may be printing question marks because the paper is installed backwards. If paper comes out but there is no readable text, remove the paper and reinstall it so that it feeds from the bottom of the roll.
This answer is automatically generated
We have a machine MAICO ero scan,until now the machine is functional but we need calibration certificate for recertification of our facilty. how can you help me?