Table of Contents
Advertisement
Quick Links
* The illustration above is an example. In this manual, illustrations of ET-MDNHM10C
are used as an example unless otherwise specified.
Read before use
The "Operating Instructions" explains about the interface boards to be
installed to a Panasonic display device (projector or flat panel display).
For Model No. and model names, refer to the product list ( x page 5).
Thank you for purchasing this Panasonic product.
■ Before using this product, please read these "Operating Instructions" and
the "Operating Instructions" of the display device carefully and save the
manuals for future use.
■ Before using this product, be sure to read "Read this first!" ( x pages 3 to 4).
Printed in China
Operating Instructions
Interface Board
ET-MDNHM10C
Model No.
ET-MDNDV10C
Commercial Use
ENGLISH
TQZJ730-3
Advertisement
Table of Contents

Related Manuals for Panasonic ET-MDNHM10C


Summary of Contents for Panasonic ET-MDNHM10C
- Page 1 Commercial Use ET-MDNHM10C Model No. ET-MDNDV10C * The illustration above is an example. In this manual, illustrations of ET-MDNHM10C are used as an example unless otherwise specified. Read before use The “Operating Instructions” explains about the interface boards to be installed to a Panasonic display device (projector or flat panel display).
-
Page 2: Table Of Contents
Contents Contents Read this first! Precautions for use Products list Supported display device About the handling of the product Disposal Accessories Part names and functions Installing the Interface Board Before installing or removing the Interface Board How to install the Interface Board How to remove the Interface Board Specifications r Trademarks... -
Page 3: Read This First
Read this first! Read this first! WARNING: Do not spill water on this product or allow this product to get wet. Doing so may cause fire, electric shock, or malfunction due to short circuit or overheating. f Do not place a container with liquid close to this product. f Consult your dealer when liquid such as water is spilled on this product. - Page 4 Read this first! Name and quantity of hazardous substances contained in the product Hazardous substances Parts Cr VI PBB PBDE Printed circuit boards (PCB) Accessories This table is prepared in accordance with the provisions of SJ/T 11364. : The amount of hazardous substances included in all homogeneous materials for the relevant part does not exceed the limit specified in GB/T 26572.
-
Page 5: Precautions For Use
The product names and their Model Nos. described in this document are as follows. Product name Product Model No. Remark Interface Board for HDMI An Interface Board equipped with 2 ET-MDNHM10C 2 input HDMI inputs. Interface Board for DVI-D An Interface Board equipped with 2 ET-MDNDV10C 2 input DVI-D inputs. -
Page 6: Disposal
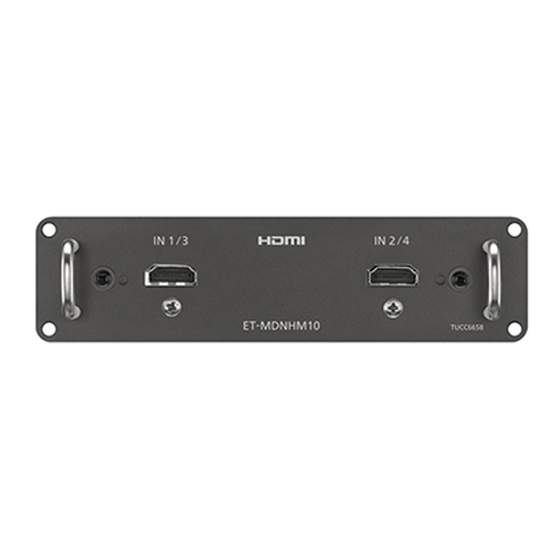
The model numbers of accessories are subject to change without prior notice. Part names and functions r Interface Board for HDMI 2 input (Model No.: ET-MDNHM10C) <HDMI 输入 1> terminal (when <HDMI 输入 2> terminal (when installed in <SLOT 1>... - Page 7 Precautions for use r Interface Board for DVI-D 2 input (Model No.: ET-MDNDV10C) <DVI-D 输入 1> terminal (when <DVI-D 输入 2> terminal (when installed in <SLOT 1> of the display installed in <SLOT 1> of the display device), <DVI-D 输入 3> terminal device), <DVI-D 输入...
-
Page 8: Installing The Interface Board
The figure indicating the installation and removal of the Interface Board is using the combination of the Interface Board for HDMI 2 input (Model No.: ET-MDNHM10C) and the optional projector (Model No.: PT-SRQ13KC) as an example. Illustration of this document may vary from the actual product. -
Page 9: How To Install The Interface Board
Installing the Interface Board How to install the Interface Board Screws (4 locations) Salient Screws (4 locations) Slot cover Guide groove Fig. 1 Fig. 2 Fig. 3 Remove the slot cover. (Fig. 1) f Remove the four screws fixing the slot cover of the display by rotating counterclockwise with a Phillips screwdriver. -
Page 10: How To Remove The Interface Board
Installing the Interface Board How to remove the Interface Board Handle Fig. 1 Remove the Interface Board. (Fig. 1) f Remove the four screws fixing the Interface Board by rotating counterclockwise with a Phillips screwdriver. The removed screws are used to fix the slot cover. f Hold the handle of the Interface Board and remove it slowly. -
Page 11: Specifications
*1 Pixel-Repetition signal (dot clock frequency 27.0 MHz) only Note f “SLOT NX” is a name of the slot unique to Panasonic supporting the signal input for the 4K image. f The video signal that can actually display will vary depending on the display device (projector or flat panel display) that the Interface Board is installed. - Page 12 松下电器 (中国)有限公司 北京市朝阳区景华南街 5 号远洋光华中心 C 座 3 层、6 层 http://panasonic.cn 网站: 原产地 : 中国 发行 : 2019 年 3月 © 松下电器产业株式会社 2015 版权所有。...
Need help?
Do you have a question about the ET-MDNHM10C and is the answer not in the manual?
Questions and answers