Advertisement
Quick Links
Advertisement

Related Manuals for Techni Sport RTA-TS220L


Summary of Contents for Techni Sport RTA-TS220L
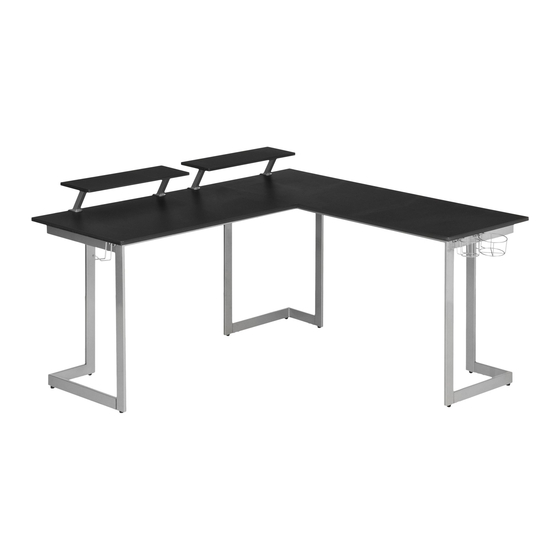
- Page 1 MODEL RTA-TS220L ASSEMBLY INSTRUCTIONS Thank you for purchasing one of our products. Please read carefully the assembly instructions before the installation. Do not discard this manual or any of the packaging material until the unit has been completely assembled 2 PERSONS...
-
Page 2: Main Parts List
RTA-TS220L MAIN PARTS LIST Leg Structure Leg Structure Middle Base Left Base Structure Structure Stud Right Base Structure Short Frame Structure Long Frame Structure Short Tabletop Bracket Fixing SET Long Tabletop Stand Panel Earphone Hanger Stand Support Small Cup Holder... -
Page 3: Screws List
RTA-TS220L MAIN PARTS LAYOUT (FOR REFERENCE): SCREWS LIST:... - Page 4 RTA-TS220L BEFORE YOU START THE ASSEMBLY, PLEASE READ THE FOLLOWING TIPS AND WARNINGS. ☛ Do a quick inventory to make sure the product contains all the parts and hardware. ☛ Missing, damaged and defective parts can be replaced at no cost to you. Please refer to the CONTACT card included with the product.
-
Page 5: Assembly Steps
RTA-TS220L ASSEMBLY STEPS Insert the studs (6) to the bottom of the leg structures (1) and (2), and to the corner of each base structure (3), (4) and (5) as shown. With the short frame structure (7) oriented as shown, attach the structures as indicated: : Leg (1) to frame (7). - Page 6 RTA-TS220L With the long frame structure (8) oriented as shown, attach the structures as indicated: : Leg (1) to frame (8) on the right, and leg (2) to frame (8) on the left; : Base (4) to leg (1) on the right, and base (5) to leg (2) on the left.
- Page 7 RTA-TS220L Using screws (A), secure the legs (1) and (2) to the bases (4) and (5), and to the frame (8) as shown. (This view shows the back side of the frame upside-down on the floor) Using screws (B), washers (F) and nut caps (E), assemble the frame (7) to frame (8) as shown.
- Page 8 RTA-TS220L With the tabletops (9) and (10) upside-down and oriented as shown, attach to them the brackets (11) using screws (A) as shown. (This view shows the tabletops upside-down on the floor) With the help of another person, place the frame from step 6 upside-down over the tabletops (9) and (10) making the holes coincide, then assemble the frame using screws (C) as shown.
- Page 9 RTA-TS220L Carefully and with the help of another person, turn the unit upright, then select the option of your preference: ��, �� or ��, and attach the stand panels to the tabletops by inserting and tightening the screw knobs (12) into the supports from underneath as shown.
- Page 10 P.10 RTA-TS220L P.10 ☛ You have different options for the assembly of the accessory items on either side of the unit; install them according to your needs. Using screws (D), assemble on either side and from underneath the tabletops (9) and (10), the earphones hanger (15), the small cup holder (16), and the large cup holder (17).
-
Page 11: Weight Limits
P.11 P.11 RTA-TS220L AFTER THE ASSEMBLY IS DONE, PLEASE READ CAREFULLY THE FOLLOWING CARE AND MAINTENANCE WARNINGS: WEIGHT LIMITS 11 Lbs. (5 Kg) 130 Lbs. (60 Kg) 130 Lbs. (60 Kg) 3.25 Lbs. (1.5 Kg) 3.25 Lbs. (1.5 Kg) 3.25 Lbs. (1.5 Kg) •Do not exceed the indicated weight limits.
Need help?
Do you have a question about the RTA-TS220L and is the answer not in the manual?
Questions and answers