
Related Manuals for anko VC8260-12A


Summary of Contents for anko VC8260-12A
- Page 1 Vacuum Cleaner User Manual Model no.: VC8260-12A PLEASE READ AND SAVE THESE INSTRUCTIONS FOR FUTURE REFERENCE...
-
Page 2: Important Safeguards
IMPORTANT SAFEGUARDS FOR HOUSEHOLD USE ONLY. This appliance should only be used for domestic cleaning, and must only be used indoors, as described in this user guide. 1. Always switch off and remove the charger from the socket before cleaning the appliance or any maintenance task. - Page 3 WARNING: Please don’t touch the rolling brush with your hands when the machine is in function. WARNING: Please use the charger we supplied with the appliance. Other chargers may cause electrical failure and/or fire. End of Product Life Battery Disposal If the cleaner is to be disposed of, the batteries should be removed.
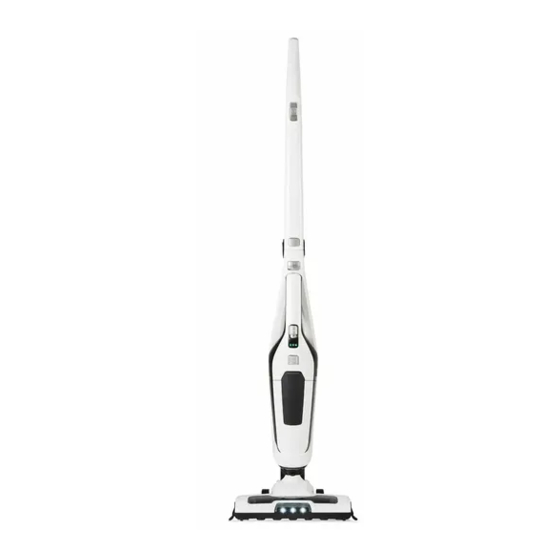
- Page 4 PARTS Stand unit Handheld unit Storage Motorized brush head Charger Wall mount screw Main body Filter Handheld unit release button On/Off switch Handle release button Power/Charging indicator On/Off & speed switch M Dust cup release button Handheld vacuum unit Dust cup 2 in 1 crevice tool Brush head release button...
-
Page 5: How To Assemble
HOW TO ASSEMBLE Unfold the handle from the main body until it locks into place. [1] Align the brush head with the main body and firmly push into the main body until the brush head locks into place. [2] For first use, charge your cleaner for 5hrs and completely discharge battery. -
Page 6: How To Use
HOW TO USE Turn on the vacuum cleaner by pressing the On/Off switch [E] on main body. · Slow: Press once the On/Off switch. · Fast: Press twice the On/Off switch. Remove the handheld unit by pressing the Handheld unit release button [C]. Lift the handheld unit from the Main body. - Page 7 MORE ABOUT THE VACUUM There are three indicator lights on top of the handheld unit indicating the state of charger. When the battery is fully charged, all three indication lights will light up. As the vacuum cleaner is used, the indicator lights will change from three to two, then two to one.
-
Page 8: Maintenance
MAINTENANCE Empty the dust cup Press the dust cup release button and pull out the dust cup Pull out the filter. Empty the dust cup. - Page 9 Cleaning the filter Wash the filter and dust cup under running water. Leave to dry for 24 hours. Make sure the filter and dust bin are dried thoroughly before fitting them back to the unit. IMPORTANT! Filters must be cleaned regularly for best suction performance and to prevent over-heating and damaging the vacuum cleaner...
- Page 10 STORAGE Assemble the handheld unit with vacuum stand, fold the handle and place it against the wall. Wall Mount There is a wall mount accessory supplied with screws and wall plugs if you prefer to stand the vacuum cleaner against the wall. To install the wall mount, position it on the wall and at a suitable height where can hold the handle.
-
Page 11: Troubleshooting
TROUBLE SHOOTING Problem Possible causes Solutions The vacuum cleaner does not 1. The power button on unit 1. Press again the power switch on has not been depressed. button. 2. Bad contact to mains power 2. Check connection and see socket/ charger jack if battery is fully charged Suction not strong... - Page 12 12 MONTH WARRANTY Thank you for your purchase from Kmart. Kmart Australia Ltd warrants your new product to be free from defects in materials and workmanship for the period stated above, from the date of purchase, provided that the product is used in accordance with accompanying recommendations or instructions where provided.
Need help?
Do you have a question about the VC8260-12A and is the answer not in the manual?
Questions and answers
where is the charging port for this vacum
Is that it? no answer
@Mark Farrell A complete waste of time<:":L{ {{L:}{:}:}} me
There is no charge port on the cleaner that I can find,there is a place that looks like it was meant for a charge port but it seems it was never placed on cleaner
The context does not explicitly mention a charge port on the anko VC8260-12A cleaner. However, it states that the vacuum must be used only with the provided battery charger (WJA-Y121750550W), which implies the existence of a charging method, likely involving a charge port.
Therefore, while not directly stated, it is implied that there is a charge port on the anko VC8260-12A cleaner.
This answer is automatically generated
Can’t find where to charge power to
@Rob There is nothing to plug the charger into No port
The answer is not in the manuel because the port the charger plug is supposed to go into does not exist