
Related Manuals for anko ST01


Summary of Contents for anko ST01
- Page 1 Vacuum Cleaner ST01 User Manual PLEASE READ AND SAVE THESE INSTRUCTIONS FOR FUTURE REFERENCE...
-
Page 2: Important Safeguards
IMPORTANT SAFEGUARDS When using your vacuum cleaner basic safety precautions should always be observed. Read all below instructions before using. WARNING: to reduce the risk of fire, electric shock, or injury: 1. Use the Vacuum Cleaner only for its intended use. 2. - Page 3 14. This appliance is intended only for household use. Follow all user instructions in this manual. 15. Do not leave the stick plugged in when un-attended. Unplug the electrical cord when not in use and before servicing. 16. Do not allow to be used as a toy. Close attention is necessary when used by or near children, pets or plants.
-
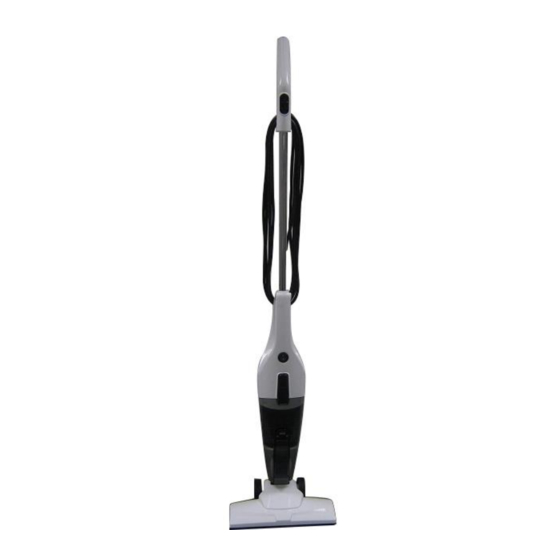
Page 4: Getting To Know Your Vacuum Cleaner
GETTING TO KNOW YOUR VACUUM CLEANER 1. Extension tube handle 2. Release cord hook 3. Handle assembly 4. Extension metal tube 5. Motor unit 6. Handle On/Off power switch 7. Dust cup lock button 8. Dust cup 9. Floor brush assembly 10. -
Page 5: Precautionary Measures
PRECAUTIONARY MEASURES IMPORTANT! If the suction opening in the unit or the hose is blocked, switch off the vacuum cleaner and remove the blocking substance before you start the unit again. Do not operate the vacuum cleaner too close to heaters, radiators or cigarette butts. 2. - Page 6 Push the tube into the vacuum cleaner (No. 3) until you heard a ‘Click’ sound, then the tube will be locked into place. Pull the handle upwards (No.4) to make sure the tube is locked into the hole. (See Fig.3) Fig.
- Page 7 Using the crevice tool Pull back the tab (No. 6) to release the crevice tool and rotate it 180 degrees (No.7). Then push the crevice tool end into the suction hole (No. 8) (See Fig 6). Fig. 6 RECOMMENDATIONS FOR ACCESSORY USAGE Crevice tool: for radiators, crevices, corners, base-boards and between cushions.
-
Page 8: Power Switch
POWER SWITCH There are On/Off power switches on the motor unit (No.11) and on the handle assembly (No. 12) (See Fig 8) Push to the “I” side to turn the vacuum ON. Push to the “O” side to turn the vacuum OFF. Fig. - Page 9 Press “I” on the On/Off power switch turn the unit on. When finished using the unit, press “O” on the On/Off power switch to turn the unit off. When finished using the unit, wind the power cord around the cord winding hooks for easy storage.
- Page 10 2. Pull out the dust cup filter assembly (No. 15), then twist the HEPA filter frame counter- clockwise to take out HEPA filter as direction (No.16). (See Fig. 10) Fig. 10 3. Empty the dust from the dust cup container. 4.
-
Page 11: Troubleshooting
TROUBLE SHOOTING PROBLEM POSSIBLE REASONS POSSIBLE SOLUTIONS VACUUM WILL No power. Check the mains Check the household fuse or circuit electrical power outlet breaker. Replace fuse/reset circuit NOT OPERATE supplying power to the breaker. vacuum cleaner. VACUUM WILL 1. Dust cup container full. 1. - Page 12 12 MONTH WARRANTY Thank you for your purchase from Kmart. Kmart Australia Ltd warrants your new product to be free from defects in materials and workmanship for the period stated above, from the date of purchase, provided that the product is used in accordance with accompanying recommendations or instructions where provided.
Need help?
Do you have a question about the ST01 and is the answer not in the manual?
Questions and answers