
Related Manuals for Pitney Bowes Horizontal Belt Stacker


Summary of Contents for Pitney Bowes Horizontal Belt Stacker
- Page 1 Shipping & Mailing Inserter Horizontal Belt Stacker for Relay Systems Operator Guide International English Edition SV40231 Rev. C October 1, 2015...
- Page 2 Pitney Bowes. We have made every reasonable effort to ensure the accuracy and usefulness of this manual; however, we cannot assume responsibility for errors or omissions or liability for the misuse or misapplication of our products.
-
Page 3: Table Of Contents
Safety ...................iii Chapter 1: Product Overview Horizontal Belt Stacker ............1-3 Your Model ..............1-4 Main Components .............1-5 Control Panel ..............1-6 Change Position of the Control Panel ......1-6 How the Belt Stacker Works ..........1-6 Chapter 2: Stacker Setup and Operation Belt Stacker Setup .............2-3... - Page 4 This page is intentionally blank.
-
Page 5: Safety
Safety Follow these precautions when using your belt stacker: • Read all instructions before you attempt to operate the system. Keep the Operator Guide accessible for quick reference. • Use this equipment only for its intended purpose. • Place the system close to an easily accessible wall outlet. •... - Page 6 • Always follow specific occupational safety and health standards for your workplace. Before running the horizontal belt stacker you should be thoroughly familiar with its controls, setup procedures, and how it interacts with the components in the inserting system. SV40231 Rev. C...
- Page 7 1 ● Product Overview Contents Horizontal Belt Stacker ........1-3 Your Model ..........1-4 Main Components ..........1-5 Control Panel .............1-6 Change Position of the Control Panel ..1-6 How the Belt Stacker Works ......1-6...
- Page 8 This page is intentionally blank...
-
Page 9: Horizontal Belt Stacker
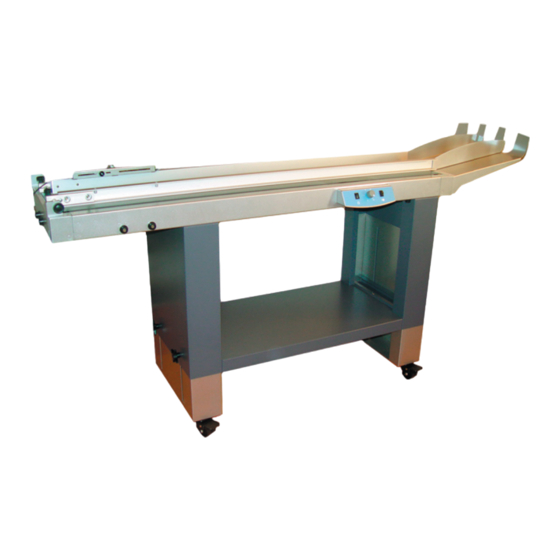
Product Overview • 1 Horizontal Belt Stacker The stacker is an output device for a range of inserting systems and a general output device for other machines such as address printers. Belt Stacker Configurations The belt stacker can operate at right angles (to the left or right) and also in-line with the machine outputting to it, depending on machine and/or material being used. -
Page 10: Your Model
1 • Product Overview The Relay™ 5000/6000/7000/8000 Inserters output small (‘letter’) envelopes at a different height to large (‘flat’) envelopes. Tandem belt stacker configurations are available to allow automatic stacking of both envelope sizes simultaneously. Your Model The belt stacker is tailored to work with the particular machine outputting to it, and the configuration used, by the addition of kits. -
Page 11: Main Components
Product Overview • 1 Main Components The horizontal belt stacker is made up of these main components: Item Description Side guides Control panel box Leg assembly Lockable castors Height adjustment knobs (two on each leg) Stacking tray Entry guide (varies with machine configuration) -
Page 12: Control Panel
1 • Product Overview Control Panel The stacker is controlled by the control panel. It can be positioned on either side of the stacker, depending on system configuration. Change Position of the Control Panel To change the position of the control panel: 1. - Page 13 2 ● Stacker Setup and Operation Contents Belt Stacker Setup ..........2-3 Right-Angled Configuration Setup ....2-3 Run the Stacker in Right-Angle Mode ..2-6 In-Line Configuration Setup - Letter Sized Envelopes ......2-8 Run in In-Line Mode - Letter Sized Envelopes ......2-10 In-Line Configuration Setup - Flat Sized Envelopes ......2-11 Run in In-Line Mode - Flat Sized Envelopes ......2-13...
- Page 14 This page is intentionally blank.
-
Page 15: Belt Stacker Setup
Stacker Setup and Operation • 2 Belt Stacker Setup The belt stacker can be used in either right-angle or in-line configuration with the Relay 5000/6000/7000/8000 Inserters. In-line configuration has two setups: • Letter-sized envelopes (#10, DL/C5) • Flat-sized envelopes (#9, C4); in-line configuration is essential for running flat material Both right-angle and in-line setup and operation are described here. - Page 16 2 • Stacker Setup and Operation To set the stacker up in a right-angled configuration correctly: 1. The exit roller bridge (A) should already be installed to the inserter output. Make sure the bridge assembly is correctly located on its mounting studs.
- Page 17 Stacker Setup and Operation • 2 5. If necessary, loosen the height adjustment knobs (C) on each leg in turn and readjust the stacker height. Alternatively, if the Inserter is on a height adjustable table, the table can be adjusted to achieve the correct height setting.
-
Page 18: Run The Stacker In Right-Angle Mode
2 • Stacker Setup and Operation Run the Stacker in Right-Angle Mode To run the stacker in right-angle mode: 1. Place one envelope on the belt. 2. Loosen the front and rear end side guide knobs (A) of the side guide with the sensor bracket only. - Page 19 Stacker Setup and Operation • 2 7. Adjust the envelope overlap by Short Step moving the start sensor. When the sensor is moved away from the inlet the distance between the envelopes will be larger, and vice versa. Keep the step as small as possible without envelopes building up too much;...
-
Page 20: In-Line Configuration Setup - Letter Sized Envelopes
2 • Stacker Setup and Operation In-Line Configuration Setup - Letter Sized Envelopes This image shows the belt stacker correctly docked to the Relay inserter in the in-line orientation running letters. In this mode the stacker enables the Relay “flats” stacker to remain Flats stacker in use. - Page 21 Stacker Setup and Operation • 2 2. If necessary, loosen the height adjustment knobs (C) on each leg in turn and readjust the stacker height. Alternatively, if the Inserter is on a height adjustable table, the table can be adjusted to achieve the correct height setting.
-
Page 22: Run In In-Line Mode - Letter Sized Envelopes
2 • Stacker Setup and Operation Run in In-Line Mode - Letter Sized Envelopes The stacker side guides will have been locked wide open by your installing engineer as this configuration does not need the side guides to control envelope stacking. 1. -
Page 23: In-Line Configuration Setup - Flat Sized Envelopes
Stacker Setup and Operation • 2 In-Line Configuration Setup - Flat Sized Envelopes This image shows the belt stacker correctly docked to the Relay inserter in the in-line orientation running flats. To set the stacker up in an in-line configuration correctly for flat-sized envelopes: 1. - Page 24 2 • Stacker Setup and Operation 2. Fit the magnetic bracket (C). Make sure it locates correctly over the screws (D). 3. Position the stacker against the output end of the Inserter, centered with the output. Make sure the stacker is positioned firmly against the Inserter covers.
-
Page 25: Run In In-Line Mode - Flat Sized Envelopes
Stacker Setup and Operation • 2 Run in In-Line Mode - Flat Sized Envelopes To run in-line mode with flat-sized envelopes: 1. The stacker side guides will have been locked wide open by your installing engineer as this configuration does not need the side guides to control envelope stacking. -
Page 26: Tandem Belt Stacker
2 • Stacker Setup and Operation Tandem Belt Stacker There is a configuration of the stacker for Relay inserters that enables the automatic stacking of letters and flats simultaneously. This stacker configuration consists of two stacker units mounted onto one set of legs or one table at the correct vertical spacing to receive letter and flats’... - Page 27 3 ● Troubleshooting Contents Troubleshooting ..........3-3 Envelopes Stuck in Inlet Area or Poor Feed into Stacker ......3-3 Envelopes Hit Sensor Bracket ....3-4 Material Doesn’t Transport Fully to Stacker End Stacker Tray ....3-4 Material Topples Over on the Left, Low Number of Items Too ......3-4...
- Page 28 This page is intentionally blank.
-
Page 29: Envelopes Stuck In Inlet Area Or Poor Feed Into Stacker
Troubleshooting • 3 Troubleshooting Envelopes Stuck in Inlet Area or Poor Feed into Stacker Configuration Possible Cause Solution Belt speed too low, material Increase the belt speed builds up and gets stuck Step length too small Increase the step length Side guides set too narrow Adjust the side guides The incoming envelope... -
Page 30: Envelopes Hit Sensor Bracket
3 • Troubleshooting Envelopes Hit Sensor Bracket Configuration Possible Cause Solution Right-angled Rear (sensor) guide set too Move the rear (sensor) guide configurations close to the inserter back Relay in-line Adjustable sensor bracket Pivot sensor bracket slightly (letters) is too close to inserter further back Material Doesn’t Transport Fully to Stacker End Stacker Tray Configuration Possible Cause... - Page 31 4 ● Specifications Contents Material Specifications........4-3 Equipment Specifications ........4-3...
- Page 32 This page is intentionally blank.
-
Page 33: Material Specifications
Specifications • 4 Material Specifications • Side guides are adjustable between 4-1/2” (115mm) and 14” (357mm). Equipment Specifications Standard Features • Variable speed • Adjustable overlap of media • Clear deck switch • Universal power inlet • Lockable castors on all four feet Capacity With a minimum insert in the envelope: •... - Page 34 4 • Specifications Power • 100-240VAC ±10%, 50/60 Hz, 1A • Power consumption 70W • Heat emission 240 Btu/hr (70 Joule/s) Compliance • UL Listed for the United States and Canada • Meets all applicable directives of the European Union SV40231 Rev.
- Page 36 3001 Summer Street Stamford, CT 06926-0700 www.pitneybowes.com SV40231 Rev. C © 2015 Pitney Bowes Inc. All Rights Reserved...
Need help?
Do you have a question about the Horizontal Belt Stacker and is the answer not in the manual?
Questions and answers