Table of Contents
Advertisement
Quick Links
Advertisement
Table of Contents

Related Manuals for Advantech S10A


Summary of Contents for Advantech S10A
- Page 1 Semi-Rugged Tablet PC S10A User Manual Ver 1.0...
-
Page 2: Table Of Contents
S10A User Manual Table of Contents Preface ..............i CE Conformity Statement ..........i FCC Compliance Statement ........... ii Copyright Statement ...........iii Safety Instructions ..........iv Battery Safety ............v RTC Battery Caution ..........v Battery Pack Caution ..........v Battery Charge Notice ..........v Storage and Safety Notice ......... - Page 3 Connecting Headphones........... 20 Connecting a Microphone ......... 20 Turning On............21 Turning On for the First Time........21 Controlling the S10A........... 24 Using the Touch Screen ........... 24 Using the Control Panel Buttons ......... 26 Using the On-Screen Keyboard ........26 Configuring the Function Buttons........
- Page 4 Checking Battery Status ..........59 Power Options ............60 Maintenance ............61 Maintaining the Battery ........... 61 Maintaining the LCD Display ........61 Cleaning the S10A ..........61 Troubleshooting ........... 62 Recovering from a System Crash (Windows XP Professional Embedded).............. 62...
- Page 5 S10A User Manual Recovering from a System Crash (Windows XP Embedded) ..63 Appendix ............65 Specifications............65 Optional Accessories ..........68 External Battery ............ 68 Tablet PC Docking..........69 Adjustable Stand ........... 72 Handstrap and Shoulder Strap........73 Vesa Mount ............75...
-
Page 6: Preface
S10A User Manual Preface CE Conformity Statement Radio products with the CE alert marking comply with the R&TTE Directive (1999/5/EC) issued by the Commission of the European Community. Compliance with this directive implies conformity to the following European Norms (in brackets are the equivalent international standards). -
Page 7: Fcc Compliance Statement
S10A User Manual FCC Compliance Statement This device complies with part 15 of the FCC Rules. Operation is subject to the following two conditions: 1. This device may not cause harmful interference; 2. This device must accept any interference received, includ- ing interference that may cause undesired operation. -
Page 8: Copyright Statement
S10A User Manual interference to radio or television reception, which can be determined by turning the equipment off and on, the user is encouraged to try to correct the interference by one or more of the following measures: • Reorient or relocate the receiving antenna •... -
Page 9: Safety Instructions
Safety Instructions Use the following safety guidelines to help protect yourself and S10A. • Do not attempt to service the S10A yourself. Always follow installation instructions closely. • Be sure that nothing rests on the AC adapter's power cable and that the cable is not located where it can be tripped over or stepped on. -
Page 10: Battery Safety
S10A User Manual Battery Safety RTC Battery Caution RISK OF EXPLOSION IF BATTERY IS REPLACED BY AN INCORRECT TYPE. DISPOSE OF USED BATTERIES ACCORDING TO THE INSTRUCTIONS. • Do not place the battery incorrectly as this may cause danger of explosion. -
Page 11: Storage And Safety Notice
S10A User Manual Storage and Safety Notice Although charge Lithium-Ion batteries may be left unused for several months, their capacity may be depleted due to the build up of internal resistance. If this happens they will require recharging prior to use. Lithium-Ion batteries may be stored at temperatures between -20°C to 50°C, however they may be... -
Page 12: Rugged And Ready To Go
This user manual outlines all you need to know to set up and use your S10A. If you have any further questions or queries, contact our technical support team via our website: www.aca-digital.com. -
Page 13: Package Contents
S10A User Manual Package Contents Ensure all the following items are present when you receive your S10A. If any of these items are missing, contact your vendor immediately. Note Screens used in this manual are for illustrative purposes only. Actual screens may vary depending on your product version. -
Page 14: Exploring The S10A
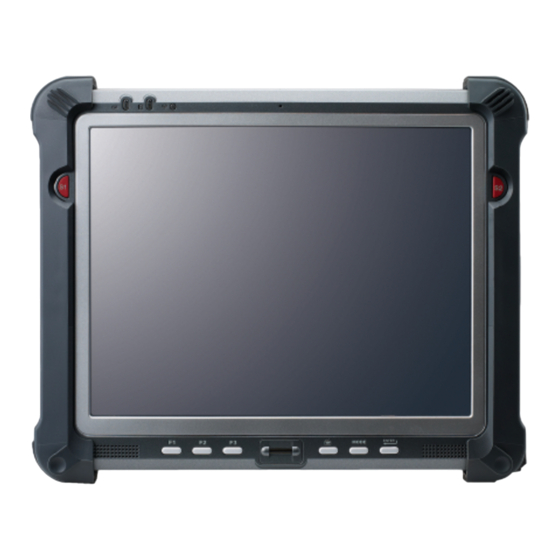
S10A User Manual Exploring the S10A Front View ENTER MODE 11 12 13 14 Component Power LED • Off: Power off • Solid green: Power on / When in power off mode, lights green when charging. • Blinking green: AC power on and the battery is... - Page 15 S10A User Manual Component S1 / Brightness button • Functions as a barcode switch key when a barcode scanner is connected, otherwise, can be assigned as a function key (F4). • When mode is enabled, press to decrease brightness. S2 / Brightness button •...
-
Page 16: Rear View
S10A User Manual Rear View Lock Lock Component Left compartment • Holds the camera and the hard disk drive • Contains the barcode scanner connectors Middle compartment • GPRS connector • SIM card slot Right compartment • Contains connectors for MSR, RFID, or GPS module... -
Page 17: Right View
Right View Component Microphone jack Headphone jack VGA port Serial port Left View DC IN Component Power button USB ports (2) SD card slot DC-in jack... -
Page 18: Bottom View
S10A User Manual Bottom View Component Docking connector... -
Page 19: Getting Started
S10A User Manual Getting Started Installing the Rubber Bumpers To protect the housing case of S10A, install the rubber bumpers. 1. Install the rubber bumpers on the left and right side of S10A. 2. Make sure the rubber bumpers are aligned and locked on the indents. -
Page 20: Inserting A Memory Card
You can insert an SD card to store data, which needs to be later transferred to another machine, or to simply expand the storage capacity of the S10A. You can use SD cards up to 8GB in size. 1. Open the SD card compartment cover. -
Page 21: Removing A Memory Card
S10A User Manual Removing a Memory Card 1. Open the SD card compartment cover. 2. Press the SD card inwards to eject it from the slot. 3. Remove the card and close the SD card compartment cover. -
Page 22: Installing A Gprs Module (Optional)
S10A User Manual Installing a GPRS Module (optional) 1. Make sure the system is turned off. Unscrew the middle compartment cover. 2. Align and insert the connector of the GPRS module with the connector in the compartment. 3. Remove the adhesive cover of the antenna. -
Page 23: Removing 3G Sim Card (Optional)
S10A User Manual 6. Push the SIM card into the slot, with the metallic part facing up and the clipped corner facing inward, until it clicks into place. 7. Screw the middle compartment cover. Note To use the GPRS function, you need to setup and activate the ethernet adapter. -
Page 24: Installing An Msr (Optional)
S10A User Manual Installing an MSR (optional) 1. Make sure the system is turned off. 2. Unscrew the right compartment cover to remove. 3. Attach the MSR connector to the connectors inside the compartment. 4. Screw to secure the MSR module... -
Page 25: Installing A Scanner (Optional)
S10A User Manual Installing a Scanner (optional) The 1D or 2D barcode scanner module comes with a 2M CCD camera. 1. Make sure the system is turned off. 2. Unscrew the left compartment cover. 3. Remove the camera connector. 4. Attach the scanner connector to the connector inside the compartment. -
Page 26: Upgrading Components
S10A User Manual Upgrading Components Removing the Memory 1. Make sure the system is turned off. 2. Move the power switch to the left to ensure battery power is completely cut off. See “Using the Power Switch” on page 8. -
Page 27: Removing The Hard Disk Drive
Lock Removing the Hard Disk Drive S10A comes with an 80G PATA hard disk drive. If more space is required for your application or there is a need to transport the hard disk content, follow the steps below to remove the hard disk drive. -
Page 28: Replacing The Hard Disk Drive
S10A User Manual Replacing the Hard Disk Drive 1. Insert the hard disk into the slot with the connector facing down. 2. Connect the hard disk connector. 3. Screw the left compartment cover back. Removing the Battery 1. Make sure the system is turned off. -
Page 29: Replacing The Battery
S10A User Manual Replacing the Battery 1. Connect the battery connector to the connector inside the compartment. 2. Place the battery inside the Lock Lock compartment. 3. Screw the battery compartment cover back. Lock Lock... -
Page 30: Making Connections
S10A User Manual Making Connections Connecting the Power Before you can use your S10A, you must fully charge the battery. Connect the power adapter as shown and leave to charge for: • a minimum of 4 hours when using the internal battery •... -
Page 31: Connecting Usb Devices
S10A. Connecting a Microphone The S10A features a built-in microphone, but you can still connect an external microphone if needed. Connect the microphone to the microphone jack on the right side of the S10A as shown. -
Page 32: Turning On
S10A User Manual Turning On 1. Move the power switch to the right. 2. Press and hold the power button to turn on the S10A. DC IN Turning On for the First Time (If you are using Windows XP Professional Embedded) When you first turn on the S10A, the following setup screens will appear. - Page 33 Windows. Tap Next to continue. 4. Enter a name to identify your S10A. This the name by which it will be recognized on all connected networks. You can also enter a description if required. Tap Next to continue.
- Page 34 Internet to run the Internet Configuration Wizard. Tap Next to continue. 9. Enter the names of other users of your S10A. You can add up to five users. Tap Next to continue. 10. Tap Finish to complete the setup.
-
Page 35: Controlling The S10A
S10A User Manual Controlling the S10A Using the Touch Screen The S10A is equipped with touch screen technology, for ease of use when you are on the go. Simply tap the screen with your finger to select icons and run applications. - Page 36 S10A User Manual 2. Tap the Calibrate tab and you will see two options: • Standard Calibration: select this option to start 5 points Standard Calibration. • Advanced Calibration: select this option to use 4, 9, 16, or 25 points to calibrate the screen.
-
Page 37: Using The Control Panel Buttons
S10A User Manual Using the Control Panel Buttons The control panel buttons are located on the front side of S10A. See below for a description of each button and its function. Button Name Function Function Press to access your favorite programs. -
Page 38: Configuring The Function Buttons
S10A User Manual Configuring the Function Buttons The F1, F2, F3, S1 (F4) and S2 (F5) can be configured as shortcuts to access your favorite or frequently used programs. 1. Press the function button to which you want to assign a program shortcut to. -
Page 39: Adjusting Screen Brightness
S10A User Manual Adjusting Screen Brightness 1. Ensure mode is enabled. 2. Press brightness, or to increase brightness. to decrease Adjusting the Volume 1. Tap the Volume icon on the system tray. 2. Move the slide to adjust volume. -
Page 40: Wireless Connections
Contact a wireless service provider for more information. The S10A comes pre-loaded with WLAN module, you can send and receive signals to a WiFi network then synchronize files. A wireless network can be added either when the network is detected or by manually entering settings information. - Page 41 S10A User Manual 3. You are prompted to enter a WEP key for secure access. Contact the network administrator for this key. 4. Enter the required WEP key and reenter the key for confirmation and then tap Connect. 5. The wireless connection is negotiated and you see the following screen.
-
Page 42: Configuring A New Wireless Network
S10A User Manual Configuring a New Wireless Network Should you need to configure a set of computers to create a new wireless network, do the following: 1. Tap the wireless icon in the Windows system tray to open the Wireless Network Connection Status screen. - Page 43 S10A User Manual Next to continue. (Skip to step 8 if you decide to configure each computer manually.) 6. Insert your USB flash drive into a free USB slot and select the drive name from the drop- down list.Tap Next to continue.
-
Page 44: Bluetooth Connections
S10A User Manual Bluetooth Connections The S10A comes with built-in Bluetooth functionality that allows you to connect and communicate with other Bluetooth-enabled devices. Setting Up Bluetooth Follow these instructions to set up a Bluetooth connection. 1. Tap Start > Control Panel and double-tap Bluetooth Device Properties to open the Bluetooth Devices screen. - Page 45 If the other device has successfully accepted the passkey, the devices are connected and the Wizard finishes. Note It is recommended that you use a passkey to prevent unauthorized access to your S10A.
-
Page 46: Gprs Connection (Optional)
S10A User Manual GPRS Connection (optional) GPRS function is optional with S10A. It allows you to make 3G connection to the internet. See “Installing a GPRS Module (optional)” on page 11 for installation instruction. Note Before setting up GPRS, obtain the access point (AP) from your SIM card’s network... - Page 47 S10A User Manual 3. Check APN Name, then enter the access point name of your network service provider on the space. In this case, “internet” is the AP name. 4. Tap Connect. 5. When connected, signal strength is shown on the lower left corner of the Connection Manager window.
-
Page 48: Gps Connection (Optional)
S10A User Manual GPS Connection (optional) GPS function comes optional with S10A. It allows you to view your GPS positions. The following illustration demonstrates how the GPS viewer operates. It is only an example. 1. From the Com Port drop down menu... -
Page 49: Using The Fingerprint Software
S10A User Manual Using the Fingerprint Software S10A comes with a fingerprint module. Read the following context to install and use the fingerprint software. Systems Requirements • Pentium IV or higher or other 100% compatible machines • Windows 2000 / XP / Vista •... - Page 50 S10A User Manual 4. Enter the required settings. Check “Use Windows Logon”, then click OK. 5. To register your fingerprints, click Next. 6. Click the finger you want to register. The selected finger will be highlighted, click Next to continue.
- Page 51 S10A User Manual 8. Continue removing and placing your finger until the Back button turns into Next, then click Next. 9. You can continue to register up to 10 fingers. Click the Continue to continue to register another finger. Note It is recommended to register at least 2 or more fingers in case your finger gets hurt.
-
Page 52: How To Open The Fingerprint Software Menu
S10A User Manual How to Open the Fingerprint Software Menu There is only one way to open the Menu for Fingerprint software. Verify Your Fingerprint 1. Click the Fingerprint Software tray icon and swipe your finger to verify your fingerprint. or press click Password to enter the correct password. -
Page 53: Ie Auto Login
S10A User Manual IE Auto Login IE Auto Login allows you to automate the entry of username and password on a web site. At first, you save your username and/or password for a web site. When you go to the web site, IE Auto Login fills in the dialog boxes automatically after a successful fingerprint or password verification. - Page 54 S10A User Manual 3. Click the icon on the taskbar of Internet Explorer and choose “Save username and password”. 4. Verify your fingerprint or password. 5. After verification succeeds, the username and/or password is saved.
-
Page 55: Ie Auto Login Auto-Filling
S10A User Manual IE Auto Login Auto-Filling Method 1: Start Internet Explorer and go to the web site where you have saved your username and/or password. Verify your fingerprint or password when asked. -
Page 56: Web Site Login And Auto Detect
S10A User Manual Method 2: You can also go to the web site directly without starting Internet Explorer via the menu for Fingerprint Access. Click IE Auto Login and choose the web site you want to go to. Internet Explorer... -
Page 57: Auto Login Database Manager
S10A User Manual Auto Login Database Manager You can delete ID and Password, and manage all the URLs you’ve already registered. Sending ID and Password Automatically If you choose the option, when you visit the web site, your ID and password will automatically be filled and auto login will be done. -
Page 58: Resize
S10A User Manual Secure Lock “Unlock Drive”: 1. Go to “Secure Lock” and select “Unlock Drive”. 2. When the Secure Lock is on the condition of “Unlock”, you can see the Virtual Disk Encrypt Disk (P:) in the Windows Explorer. -
Page 59: Fingerprint Security
S10A User Manual 3. In the Resize window, there are two ways to change the capacity of the Virtual Disk. • One is to drag the scroll bar to the left/right to decide the size. • Another is to enter the capacity you would like to change. - Page 60 S10A User Manual 3. Moving files into an encrypted folder will cause those files to be automatically encrypted. When removing files from an encrypted folder to a non-encrypted area, “Fingerprint Authentication” dialog will ask you for your fingerprint, and the file will be decrypted.
-
Page 61: File Security
S10A User Manual File Security File Encryption: Your encrypted files can only be accessed by fingerprint (or password). 1. Point the cursor to the file you want to encrypt and right- click. Choose “Encrypt File” from the menu. 2. When authentication is successful, the file will be encrypted. -
Page 62: User Settings
S10A User Manual 3. When authentication is successful, the file will be decrypted. 4. The icon of the decrypted file will have no lock and will go back to its normal appearance. User Settings Open “Menu for Fingerprint Software > User Settings”. -
Page 63: Fingerprint Registration
S10A User Manual Fingerprint Registration 1. Right-click on the tray icon and select Fingerprint Registration. 2. In the “Fingerprint Identification” windows, there are two ways to verify your fingerprint. Method 1. • Finger Identification: Verify your previously registered fingerprint. The green fingers show which fingers have been registered. -
Page 64: Windows Logon Setting
S10A User Manual Windows Logon Setting 1. Open “Menu for Fingerprint Software > User Settings”. 2. Set “Windows Logon Setting”. 3. Restart Windows, you must swipe your finger to logon. 4. If the fingerprint verification succeeds, you can logon Windows. -
Page 65: Screen Saver Lock Setting
S10A User Manual Screen Saver Lock Setting Introduction When the “Screen Saver Lock” starts, only an authorized person can unlock the Screen Saver by verifying his/her fingerprint or password. The Screen Saver Lock makes your PC more secure. The main function of “Screen Saver Lock” is to disable the keyboard and the mouse. -
Page 66: Quick Bar Auto Hiding Setting
S10A User Manual Quick Bar Auto Hiding Setting 1. Open “Menu for Fingerprint Software > User Settings > Quick Bar Auto Hiding Setting”. • Never hide Quick Bar: If you don’t want to hide the Quick Bar, please check this option. -
Page 67: Uninstall
S10A User Manual Uninstall There are two ways you can uninstall the software. • Click Windows Start > All Programs > Fingerprint Software > Uninstall. • Click Windows Start > Control Panel > Add or Remove Programs, choose “Remove Fingerprint Application” then click “Change/Remove”. - Page 68 S10A User Manual 3. “Delete Fingerprint Software” and the following messages will appear. Click Yes to complete the uninstallation.
-
Page 69: Advanced Settings
S10A User Manual Advanced Settings Configuring Touch Screen Function Tap the pointer device icon in the system tray then select the Tools tab > or tap Start > All Programs > PenMount Universal Driver > PenMount Control Panel to access PenMount Control Panel. -
Page 70: Checking Battery Status
S10A User Manual Checking Battery Status As it is likely you will be using your S10A when out and about, it is important that you monitor the battery status regularly, to ensure you do not run out of power at a critical moment. -
Page 71: Power Options
S10A User Manual Power Options You can configure specific power options to best suit your needs and to get the most out of your battery. Tap on the Power icon in the system tray to view the power options menu. See below for a description of the settings for each power option. -
Page 72: Maintenance
LCD screen cleaner. Cleaning the S10A 1. Turn off the S10A and unplug the power cord. 2. Wipe the screen and exterior with a soft, damp cloth moistened only with water. Do not use liquid or aerosol cleaners on the screen, as these will discolor the finish and damage the screen. -
Page 73: Troubleshooting
(Windows XP Professional Embedded) In the unlikely event that your S10A should crash, do the following to re-boot your system if you are using Windows XP Professional Embedded. 1. Connect a USB keyboard to the USB port on your S10A. MOLEX Print Scroll... -
Page 74: Recovering From A System Crash (Windows Xp Embedded)
Windows XPE Recovery folder on your local drive to the USB flash drive. 7. Connect the USB flash drive and a keyboard to your S10A and turn on the computer. 8. Press the Del key repeatedly during boot up to enter the BIOS screen. - Page 75 S10A User Manual 13.Highlight Save & Exit Setup and press Enter. 14.Press Y to save and exit when the confirmation message appears. 15.The system will now enter recovery mode. Click OK twice to continue. 16. Once the pro- cess is complete, click Quit, remove the USB flash drive and the system will restart automatically.
-
Page 76: Appendix
S10A User Manual Appendix Specifications Feature Description Windows XP Embedded/ Operating System Windows XP Professional Embedded Windows Vista Basic Processor Intel ATOM Z530 1.6G / Z510 1.1G Chipset US15W Memory One SO-DIMM DDRI 533 support up to 2GB Storage Compact Flash (CF) Memory Card (4G/8G) Display 10.4”... - Page 77 S10A User Manual Feature Description Power LED: Off: Power off Solid green: Lit when charging in power off mode, off when charging is complete Blinking green: Power on, battery is charging in power on mode Solid yellow: Power on, battery low...
- Page 78 S10A User Manual Feature Description Certification CE, FCC 1D / 2D Barcode Scanner MSR 1+2+3 track RFID 13.56M GPS Module Optional GPRS Device / Desk Docking Accessories Hand Strap VESA Mount External Battery Holster...
-
Page 79: Optional Accessories
S10A User Manual Optional Accessories External Battery You can use an external battery to extend the power of your tablet PC. Battery specification: 3800mA 3S2P Installing the External Battery 1. Remove the external battery contacts cover from the tablet PC (A). -
Page 80: Tablet Pc Docking
PC to another PC. Attach the S10A to the docking stand as shown. To charge the external battery, attach the battery to the docking stand as shown below. - Page 81 S10A User Manual Docking Connectors See below for the rear view of the docking and a description of all ports and connectors. DC19V Component Function Connect an RJ-45 cable to access LAN LAN port connection. Connect a serial cable to connect to another...
- Page 82 S10A User Manual Docking Specifications Feature Description Product Name S10A Tablet PC Docking Model Number S10AC One LAN port One RS-232 External I/O Interfaces Two USB 2.0 host connectors One DC-in Universal AC 90V ~ 265V, 47~63Hz input; 19V, Power Adapter 3.16A output...
-
Page 83: Adjustable Stand
S10A User Manual Adjustable Stand You can use the adjustable stand to provide desk support when you are at home or in your office. Attaching the Adjustable Stand 1. Fasten four screws to attach the two stand brackets to your Tablet PC. -
Page 84: Handstrap And Shoulder Strap
A detachable handstrap and shoulder strap are provided to carry your Tablet PC securely and safely. You can use the supplied handstrap and shoulder strap separately or together to carry the S10A when you are outside your home or office. Handstrap Shoulder Strap... - Page 85 S10A User Manual The handstrap makes it easy to carry the device on one hand. Lock Lock • Attach the shoulder strap to the rear of your tablet PC using two screws as shown. Lock Lock...
-
Page 86: Vesa Mount
S10A User Manual When using the handstrap and shoulder strap together: • Attach the handstrap to the rear of your tablet PC using the four screws. Then hook the shoulder strap as shown. Lock Lock Vesa Mount Vesa mount can be used with a variety of alternate mounting solutions such as wall mounts. - Page 87 4RF Exposure Information (SAR) This device meets the government’s requirements for exposure to radio waves. This device is designed and manufactured not to exceed the emission limits for exposure to radio frequency (RF) energy set by the Federal Communications Commission of the U.S. Government. The exposure standard employs a unit of measurement known as the Specific Absorption Rate, or SAR.
Need help?
Do you have a question about the S10A and is the answer not in the manual?
Questions and answers