Table of Contents
Advertisement
Available languages
Available languages
Quick Links
Advertisement
Chapters
Table of Contents

Related Manuals for Festo 8131016


Summary of Contents for Festo 8131016
- Page 1 8131016, 8131017 Charging Station Robotino 4 Mobile Robotics Operating instructions Betriebsanleitung Instrucciones de utilización Notice d'utilisation 操作说明 Festo Didactic 8134684 en/de/es/fr/zh 11/2019...
- Page 2 Revision level: 11/2019 Authors: Dimitrios Tsakas, Mustafa Ersoy Layout: Frank Ebel © Festo Didactic SE, Rechbergstraße 3, 73770 Denkendorf, Germany, 2020 +49 711 3467-0 www.festo-didactic.com +49 711 34754-88500 did@festo.com Reproduction, distribution and utilisation of this document, as well as the communication of its contents to others without explicit authorisation, is prohibited.
- Page 3 Se sobreentiende que el uso de términos en género masculino incluye también los correspondientes términos de género femenino. El uso de una sola forma de género no supone ninguna discriminación específica, sino que sirve para mejorar la lectura y la compresión de los textos. © Festo Didactic 8134684...
- Page 4 Les instructions de service doivent avoir été lues avant la mise en service. Se conformer aux consignes de sécurité. Le non-respect peut entraîner de graves dommages corporels ou matériels. 在本操作说明书中仅以男教师、男学生等称谓,当然也指女教师和女学生等。仅使 用一种性别形式并不表示性别歧视,而仅是为了便于内容的阅读和理解。 小心 本操作说明书必须始终可供用户使用。 调试之前必须阅读操作说明书。 必须注意遵守安全注意事项。 如不遵守,可能会造成严重人身伤害或财产损失。 © Festo Didactic 8134684...
-
Page 5: Table Of Contents
Mechanical setup of the charging station ______________________________________________ 19 Adjusting the height of the docking plug _______________________________________________ 22 Electrical connection _______________________________________________________________ 23 Accessories ______________________________________________________________________ 24 Maintenance and cleaning __________________________________________________________ 24 Further information and updates _____________________________________________________ 25 Disposal _________________________________________________________________________ 25 © Festo Didactic 8134684... -
Page 6: General Prerequisites For Operating The Devices
Damaged devices must be barred from further use and removed from the laboratory or classroom. – Damaged connecting cables, tubing and hydraulic hoses represent a safety risk and must be removed from the laboratory or classroom. © Festo Didactic 8134684... -
Page 7: Safety Instructions And Pictograms
... indicates a potentially hazardous situation that may result in moderate or slight personal injury or severe property damage if not avoided. NOTE ... indicates a potentially hazardous situation that may result in property damage or loss of function if not avoided. © Festo Didactic 8134684... -
Page 8: Pictograms
Robotino 4 Charging Station – Operating instructions 2.2 Pictograms Hazard warning Warning – dangerous electric voltage Read and observe the operating and safety instructions prior to commissioning. Warning – potentially explosive substances Electrostatically sensitive devices Information and references to other documentation © Festo Didactic 8134684... -
Page 9: Intended Use
Festo Didactic as a result of malicious intent or gross negligence. -
Page 10: For Your Safety
Knowledge of the basic safety instructions and safety regulations is a fundamental prerequisite for safe handling and trouble-free operation of Festo Didactic components and systems. These operating instructions include the most important instructions for safe use of the components and systems. -
Page 11: Obligations Of The Operating Company
All persons who have been entrusted to work with the components and systems undertake to complete the following steps before beginning work: • Read the chapter concerning safety and the warnings in these operating instructions • Familiarize themselves with the basic regulations regarding occupational safety and accident prevention © Festo Didactic 8134684... -
Page 12: Work Instructions And Safety Precautions
Use a tool such as a screwdriver when actuating mechanical limit switches. CAUTION • Follow the instructions regarding positioning of the components. 5.3 Electrical system WARNING Risk of explosion and fire! Make sure that the rechargeable batteries are never short-circuited. © Festo Didactic 8134684... - Page 13 Safe operation of the device is no longer possible in the event of any of the following issues: – Visible damage – Malfunction – Inappropriate storage – Incorrect transport – Switch off the power supply immediately. – Protect the device to prevent it from being restarted accidentally. © Festo Didactic 8134684...
- Page 14 Pay attention to the current consumption values of the external device • Observe the polarity • Ensure that the connector cable is routed without crushing, shearing, cutting or other mechanical hazards. • Secure the connector cable adequately © Festo Didactic 8134684...
-
Page 15: Technical Data
6 Technical data 6.1 General data Parameter Value Operating voltage 1 AC 120 V±10%, 60 Hz (order no. 8131016) 1 AC 230 V ±10%, 50/60 Hz (order no. 8131017) Power consumption Max. 240 W Charging voltage, battery 10.8 … 18 V Charging current, battery Max. -
Page 16: Contact Assignment For The Docking Plug
The power supply cable must be ordered separately. 6.2 Contact assignment for the docking plug 24 V BATT + BATT GND Table: Contact assignment for the docking plug Figure 1: Docking plug, PCB view (soldered side) © Festo Didactic 8134684... -
Page 17: Description
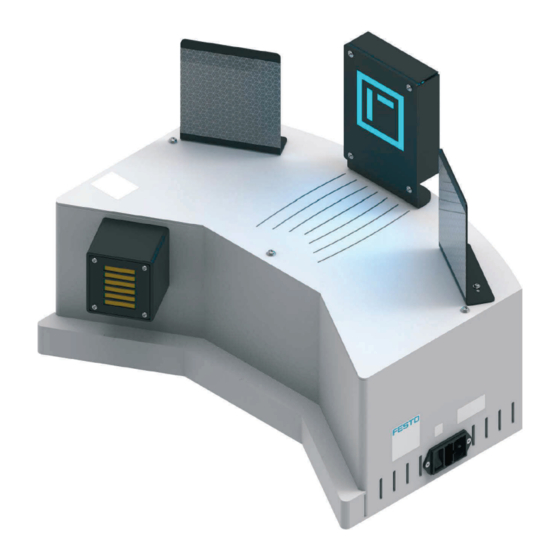
4: Illuminated marker, 5: IEC plug, 6: Fuse, 7: On/off switch, 8 Docking plug Figure 2: Charging station The blue LED (2) on the top of the charging station indicates whether the voltage is being applied. © Festo Didactic 8134684... -
Page 18: Commissioning
The charging station's power supply cable must not be positioned within the robot's range of action. The connecting cable could be damaged by the drive pulleys. CAUTION Tripping hazard Do not place the charging station on transit routes. © Festo Didactic 8134684... -
Page 19: Mechanical Setup Of The Charging Station
IEC plug. The illuminated marker is pre-installed on the charging station prior to delivery. It is on top of the packaging and already plugged in on the inside of the charging station. © Festo Didactic 8134684... - Page 20 Additional paper markers can be generated in the Properties area of the Robotino® View marker detection module. Figure 7: Back of marker with adjustment potentiometer © Festo Didactic 8134684...
- Page 21 6. Mount the two reflectors on the charging station (one on each side) using the enclosed screws. 7. Plug the power supply cable back into the charging station's IEC plug. 8. Switch the charging station on. Figure 8: Charging station with reflectors © Festo Didactic 8134684...
-
Page 22: Adjusting The Height Of The Docking Plug
6. Replace the cover and fasten it in place using the screws. 7. Plug the power supply cable back into the charging station's IEC plug. 8. Switch the charging station on. Figure 9: 4 screws for adjusting the height of the docking plug © Festo Didactic 8134684... -
Page 23: Electrical Connection
ST4 (battery pack 3) Yellow Green Brown Black Batt - Batt + Check the assignment of ST2 and ST4 on the charging station. If the assignment does not match that in the table, adjust it accordingly. © Festo Didactic 8134684... -
Page 24: Accessories
ZA, IN, PT, SG, HK, (GB), (AE), order no.: 350367 9 Maintenance and cleaning Festo Didactic systems and components are to a great extent maintenance free. The following components should be cleaned at regular intervals with a soft, lint-free cloth or brush: •... -
Page 25: Further Information And Updates
Robotino 4 Charging Station – Operating instructions 10 Further information and updates Further information and updates to the technical documentation for the Festo Didactic components and systems are available on the following website: www.ip.festo-didactic.com 11 Disposal Electronic waste contains reusable materials and must not be disposed of with the rubbish. - Page 26 Robotino 4 Charging Station – Operating instructions © Festo Didactic 8134684...
- Page 27 In Betrieb nehmen _________________________________________________________________ 40 Mechanischer Aufbau der Ladestation ________________________________________________ 41 Höhenanpassung des Andocksteckers ________________________________________________ 44 Elektrischer Anschluss _____________________________________________________________ 45 Zubehör _________________________________________________________________________ 46 Wartung und Reinigung ____________________________________________________________ 46 Weitere Informationen und Aktualisierungen __________________________________________ 47 Entsorgung ______________________________________________________________________ 47 © Festo Didactic 8134684...
-
Page 28: Allgemeine Voraussetzungen Zum Betreiben Der Geräte
Es dürfen keine Geräte mit Schäden oder Mängeln verwendet werden. – Schadhafte Geräte sind zu sperren und aus dem Labor- oder Unterrichtsraum zu entnehmen. – Beschädigte Verbindungsleitungen, Druckluftschläuche und Hydraulikschläuche stellen ein Sicherheitsrisiko dar und müssen aus dem Labor- oder Unterrichtsraum entfernt werden. © Festo Didactic 8134684... -
Page 29: Sicherheitshinweise Und Piktogramme
… weist auf eine möglicherweise gefährliche Situation hin, die zu mittleren und leichten Körperverletzungen oder zu schwerem Sachschaden führen kann, wenn sie nicht vermieden wird. HINWEIS … weist auf eine möglicherweise gefährliche Situation hin, die zu Sachschaden oder Funktionsverlust führen kann, wenn sie nicht vermieden wird. © Festo Didactic 8134684... -
Page 30: Piktogramme
Robotino 4 Ladestation – Betriebsanleitung 2.2 Piktogramme Warnung vor einer Gefahrenstelle Warnung vor gefährlicher elektrischer Spannung Vor Inbetriebnahme die Betriebsanleitung und Sicherheitshinweise lesen und beachten. Warnung vor explosionsgefährlichen Stoffen Elektrostatisch gefährdete Bauelemente Informationen und Verweise auf andere Dokumentationen © Festo Didactic 8134684... -
Page 31: Bestimmungsgemäße Verwendung
Regeln gebaut. Dennoch können bei unsachgemäßer Verwendung Gefahren für Leib und Leben des Benutzers oder Dritter und Beeinträchtigungen der Komponenten entstehen. Das Lernsystem von Festo Didactic ist ausschließlich für die Aus- und Weiterbildung im Bereich Automatisierung und Technik entwickelt und hergestellt. Das Ausbildungsunternehmen und/oder die Ausbildenden hat/haben dafür Sorge zu tragen, dass die Auszubildenden die Sicherheitsvorkehrungen, die... -
Page 32: Für Ihre Sicherheit
4 Für Ihre Sicherheit 4.1 Wichtige Hinweise Grundvoraussetzung für den sicherheitsgerechten Umgang und den störungsfreien Betrieb der Komponenten und Systeme von Festo Didactic ist die Kenntnis der grundlegenden Sicherheitshinweise und der Sicherheitsvorschriften. Diese Betriebsanleitung enthält die wichtigsten Hinweise, um die Komponenten und Systeme sicherheitsgerecht zu betreiben. -
Page 33: Verpflichtung Des Betreibers
Alle Personen, die mit Arbeiten an den Komponenten und Systemen beauftragt sind, verpflichten sich, vor Arbeitsbeginn: • das Sicherheitskapitel und die Warnhinweise in dieser Betriebsanleitung zu lesen, • die grundlegenden Vorschriften über Arbeitssicherheit und Unfallverhütung zu beachten. © Festo Didactic 8134684... -
Page 34: Arbeits- Und Sicherheitshinweise
Benutzen Sie zur Betätigung von mechanischen Grenztastern ein Werkzeug, z. B. einen Schraubendreher. VORSICHT • Beachten Sie Angaben zur Platzierung der Komponenten. 5.3 Elektrik WARNUNG Explosions- und Brandgefahr! Stellen Sie sicher, dass die Akkus zu keinem Zeitpunkt kurzgeschlossen werden. © Festo Didactic 8134684... - Page 35 – sichtbarer Beschädigung, – defekter Funktion, – unsachgemäßer Lagerung oder – unsachgemäßem Transport ist kein gefahrloser Betrieb des Geräts mehr möglich. – Schalten Sie sofort die Spannung ab. – Schützen Sie das Gerät vor unbeabsichtigtem Wiedereinschalten. © Festo Didactic 8134684...
- Page 36 Vergleichen Sie die Versorgungsspannung mit der bereitgestellten Spannung. • Beachten sie die Stromaufnahmen des externen Gerätes • Beachten Sie die Polarität • Beachten Sie, dass die Leitung ohne Quetschen, Scheren, Schneiden oder anderen mechanischen Gefährdungen verlegt wird. • Fixieren Sie die Leitung ausreichend © Festo Didactic 8134684...
-
Page 37: Technische Daten
Robotino 4 Ladestation – Betriebsanleitung 6 Technische Daten 6.1 Allgemeine Daten Parameter Wert Betriebsspannung 1AC 120 V±10%, 60 Hz (Bestell-Nr. 8131016) 1AC 230 V ±10%, 50/60 Hz (Bestell-Nr. 8131017) Leistungsaufnahme Max. 240 W Ladespannung, Akku 10,8 … 18 V Ladestrom, Akku Max. -
Page 38: Kontaktbelegung Des Andocksteckers
Vermeiden Sie einen zeitgleichen Betrieb dieses Gerätes mit störempfindlichen Geräten. Die Netzanschlussleitung muss separat bestellt werden. 6.2 Kontaktbelegung des Andocksteckers 24 V AKKU + AKKU GND Tabelle: Kontaktbelegung des Andocksteckers Abbildung 10: Andockstecker, Ansicht Platine (Lötseite) © Festo Didactic 8134684... -
Page 39: Beschreibung
1: grüne LED „Robotino angedockt“, 2: blaue LED „Betriebsspannung vorhanden“, 3: Reflektoren, 4: beleuchteter Marker, 5: Kaltgerätestecker, 6: Sicherung, 7: Ein-/Ausschalter, 8 Andockstecker, Abbildung 11: Ladestation Die blaue LED (2) auf der Oberseite der Ladestation zeigt an, ob die Betriebsspannung vorhanden ist. © Festo Didactic 8134684... -
Page 40: In Betrieb Nehmen
WARNUNG Gefahr durch elektrischen Schlag! Die Netzanschlussleitung der Ladestation darf sich nicht im Aktionsraum des Roboters befinden. Die Anschlussleitung könnte durch die Antriebsrollen beschädigt werden. VORSICHT Gefahr durch stolpern Positionieren Sie die Ladestation nicht im Verkehrsweg. © Festo Didactic 8134684... -
Page 41: Mechanischer Aufbau Der Ladestation
Schalten Sie die Ladestation vor Arbeiten am Gerät aus und ziehen Sie die Netzanschlussleitung aus dem Kaltgerätestecker. Die Ladestation kommt vormontiert mit dem beleuchteten Marker. Dieser liegt in der Verpackung oben auf und ist bereits auf der Innenseite der Ladestation eingesteckt. © Festo Didactic 8134684... - Page 42 Abbildung 15: Anschlussplatine für den beleuchteten Marker Die Helligkeit des Markers kann mit einem Schlitzschraubendreher an der Rückseite des Markers eingestellt werden. Zusätzliche Papiermarker können in den Eigenschaften des Marker-Erkennungs- bausteins von Robotino View generiert werden. Abbildung 16: Rückseite Marker mit Einstellpotenziometer © Festo Didactic 8134684...
- Page 43 6. Montieren Sie beide Reflektoren mit den beigelegten Schrauben auf beiden Seiten der Ladestation. 7. Stecken Sie die Netzanschlussleitung wieder in den Kaltgerätestecker der Ladestation. 8. Schalten Sie die Ladestation ein. Abbildung 17: Ladestation mit Reflektoren © Festo Didactic 8134684...
-
Page 44: Höhenanpassung Des Andocksteckers
6. Legen Sie den Deckel auf und schrauben Sie ihn fest. 7. Stecken Sie die Netzanschlussleitung wieder in den Kaltgerätestecker der Ladestation. 8. Schalten Sie die Ladestation ein. Abbildung 18: 4 Schrauben für Höhenverstellung des Andocksteckers © Festo Didactic 8134684... -
Page 45: Elektrischer Anschluss
Akku + ST4 (Akkupack 3) Gelb Grün Braun Schwarz Akku - Akku + Prüfen Sie die Belegung von ST2 und ST4 an der Ladestation. Stimmt die Belegung nicht mit der Tabelle überein, passen Sie diese an. © Festo Didactic 8134684... -
Page 46: Zubehör
Stecker gemäß SANS 164-1 für ZA, IN, PT, SG, HK, (GB), (AE), Bestell-Nr.: 350367 9 Wartung und Reinigung Die Komponenten und Systeme von Festo Didactic sind weitestgehend wartungsfrei. In regelmäßigen Abständen sollten: • die Linsen der optischen Sensoren, der Faseroptiken sowie Reflektoren •... -
Page 47: Weitere Informationen Und Aktualisierungen
Robotino 4 Ladestation – Betriebsanleitung 10 Weitere Informationen und Aktualisierungen Weiter Informationen und Aktualisierungen zur technischen Dokumentation der Komponenten und Systeme von Festo Didactic finden Sie im Internet unter der Adresse: www.ip.festo-didactic.com 11 Entsorgung Elektronische Altgeräte sind Wertstoffe und gehören nicht in den Hausmüll. Die Entsorgung erfolgt über die kommunalen Sammelstellen. - Page 48 Robotino 4 Ladestation – Betriebsanleitung © Festo Didactic 8134684...
- Page 49 Estructura mecánica de la estación de carga ___________________________________________ 63 Ajuste de la altura del conector de acoplamiento ________________________________________ 66 Conexión eléctrica _________________________________________________________________ 67 Accesorios _______________________________________________________________________ 68 Mantenimiento y limpieza __________________________________________________________ 68 Informaciones complementarias y actualizaciones _______________________________________ 69 Eliminación ______________________________________________________________________ 69 © Festo Didactic 8134684...
-
Page 50: Condiciones Generales Para El Uso De Los Equipos
Los equipos defectuosos deberán inhabilitarse y retirarse del laboratorio o aula donde se impartan las clases. – Los cables de conexión, los tubos flexibles de aire comprimido y los tubos flexibles hidráulicos dañados representan un peligro y deben retirarse del laboratorio o del aula. © Festo Didactic 8134684... -
Page 51: Instrucciones De Seguridad Y Pictogramas
NOTA ...indica que existe un posible peligro, que puede causar daños materiales o una pérdida de las funciones si no se adoptan las medidas necesarias para evitarlo. © Festo Didactic 8134684... -
Page 52: Pictogramas
Advertencia de tensión eléctrica peligrosa Antes de la puesta en funcionamiento, leer y respetar las instrucciones de utilización y las instrucciones de seguridad. Advertencia de sustancias explosivas Elementos sensibles a las descargas electrostáticas Información y referencias a otros documentos © Festo Didactic 8134684... -
Page 53: Uso Previsto
Festo Didactic haya ocasionado dichos daños premeditadamente o con extrema negligencia. -
Page 54: Indicaciones De Seguridad
4 Indicaciones de seguridad 4.1 Observaciones importantes Para un uso seguro y sin fallas de los componentes y sistemas de Festo Didactic, es indispensable conocer las indicaciones básicas de seguridad y las instrucciones de seguridad correspondientes. Estas instrucciones de utilización contienen las indicaciones más importantes para un uso correcto y seguro de los componentes y sistemas. -
Page 55: Obligaciones Asumidas Por El Operador
Todas las personas que trabajan con los componentes y sistemas se comprometen, antes de utilizar el equipo, a lo siguiente: • leer el capítulo relativo a la seguridad y las advertencias de seguridad incluidas en estas instrucciones, • respetar las disposiciones básicas de seguridad laboral y de prevención de accidentes. © Festo Didactic 8134684... -
Page 56: Indicaciones De Seguridad Y Utilización
ATENCIÓN • Respete las indicaciones sobre el posicionamiento de los componentes. 5.3 Sistema eléctrico ADVERTENCIA Peligro de explosión e incendio Asegúrese de que en ningún momento se han producido cortocircuitos en las baterías. © Festo Didactic 8134684... - Page 57 – daño visible, – funcionamiento defectuoso, – almacenamiento incorrecto o – transporte inadecuado ya no es posible el funcionamiento seguro del equipo. – Desconecte inmediatamente la tensión. – Evite que el equipo pueda volverse a conectar. © Festo Didactic 8134684...
- Page 58 • Observe el consumo de corriente del equipo externo • Respete la polaridad • Observe que el cable esté tendido sin aplastamiento, cizallamiento, corte u otro riesgo mecánico. • Fije el cable de la forma adecuada © Festo Didactic 8134684...
-
Page 59: Especificaciones Técnicas
6 Especificaciones técnicas 6.1 Datos generales Parámetros Valor Tensión de funcionamiento 1AC 120 V±10%, 60 Hz (n.º de art. 8131016) 1AC 230 V ±10%, 50/60 Hz (n.º de art. 8131017) Consumo de potencia Máx. 240 W Tensión de carga, batería 10,8-18 V Corriente de carga, batería... -
Page 60: Asignación De Contactos Del Conector De Acoplamiento
El cable de conexión a la red tiene que pedirse por separado. 6.2 Asignación de contactos del conector de acoplamiento 24 V BATERÍA + BATERÍA GND Tabla: Asignación de los contactos del conector de acoplamiento Imagen 19: Conector de acoplamiento, vista de la PCB (lado de soldadura) © Festo Didactic 8134684... -
Page 61: Descripción
3: Reflectores; 4: Marcador iluminado; 5: Conector IEC; 6: Fusible; 7: Interruptor de conexión y desconexión; 8 Conector de acoplamiento. Imagen 20: Estación de carga El diodo emisor de luz azul (2) en la parte superior de la estación de carga indica si hay tensión de funcionamiento. © Festo Didactic 8134684... -
Page 62: Poner En Funcionamiento
El cable de conexión a la red de la estación de carga no debe entrar en la zona de acción del robot. Las poleas de accionamiento podrían dañar el cable de conexión. ATENCIÓN Peligro por tropiezos No coloque la estación de carga en la vía de tránsito. © Festo Didactic 8134684... -
Page 63: Estructura Mecánica De La Estación De Carga
IEC. La estación de carga viene de serie con el marcador iluminado. Este se encuentra en la parte superior del embalaje y ya está enchufado en el interior de la estación de carga. © Festo Didactic 8134684... - Page 64 Se pueden generar marcadores de papel adicionales en las propiedades del módulo de detección de marcadores de Robotino View. Imagen 25: Parte trasera del marcador con potenciómetro de ajuste © Festo Didactic 8134684...
- Page 65 6. Monte ambos reflectores en ambos lados de la estación de carga con los tornillos suministrados. 7. Vuelva a enchufar el cable de conexión a la red en el conector IEC de la estación de carga. 8. Encienda la estación de carga. Imagen 26: Estación de carga con reflectores © Festo Didactic 8134684...
-
Page 66: Ajuste De La Altura Del Conector De Acoplamiento
7. Vuelva a enchufar el cable de conexión a la red en el conector IEC de la estación de carga. 8. Encienda la estación de carga. Imagen 27: 4 tornillos para el ajuste de la altura del conector de acoplamiento © Festo Didactic 8134684... -
Page 67: Conexión Eléctrica
3) Verde Marrón Negro Batería - Rojo Batería + Compruebe la asignación de ST2 y ST4 en la estación de carga. Si la asignación no coincide con la expuesta en la tabla, haga los cambios correspondientes. © Festo Didactic 8134684... -
Page 68: Accesorios
ZA, IN, PT, SG, HK, (GB), (AE), n.º de art.: 350367 9 Mantenimiento y limpieza Los componentes y sistemas de Festo Didactic casi no requieren trabajos de mantenimiento. Sin embargo, deberán ejecutarse regularmente los trabajos que se indican a continuación: •... -
Page 69: Informaciones Complementarias Y Actualizaciones
Estación de carga de Robotino 4 – Instrucciones de utilización 10 Informaciones complementarias y actualizaciones En la dirección de internet que se indica a continuación puede consultar información complementaria y las actualizaciones de la documentación técnica de los componentes y sistemas de Festo Didactic: www.ip.festo-didactic.com 11 Eliminación Los aparatos electrónicos son reciclables y no son residuos domésticos. - Page 70 Estación de carga de Robotino 4 – Instrucciones de utilización © Festo Didactic 8134684...
- Page 71 Structure mécanique de la station de charge ___________________________________________ 85 Réglage en hauteur du connecteur d'amarrage _________________________________________ 88 Raccordement électrique ___________________________________________________________ 89 Accessoires ______________________________________________________________________ 90 Maintenance et nettoyage __________________________________________________________ 90 Informations complémentaires et mises à jour __________________________________________ 91 Mise au rebut ____________________________________________________________________ 91 © Festo Didactic 8134684...
-
Page 72: Exigences Générales Pour L'utilisation Des Appareils
être retirés de la salle de classe ou de la salle de TP. – Les câbles de liaison, tuyaux d'air comprimé et tuyaux hydrauliques endommagés présentent un risque pour la sécurité et doivent être retirés de la salle de classe ou de TP. © Festo Didactic 8134684... -
Page 73: Consignes De Sécurité Et Pictogrammes
à modérées ou des dommages matériels graves si elle n'est pas évitée. NOTE … signale une situation potentiellement dangereuse pouvant causer des dommages matériels ou une perte de fonction si elles n'est pas évitée. © Festo Didactic 8134684... -
Page 74: Pictogrammes
Avertissement concernant une tension électrique dangereuse Avant la mise en service, lire et observer la notice d'utilisation et les consignes de sécurité. Avertissement concernant les substances explosives Composants sensibles aux charges électrostatiques Informations et renvois vers d'autres documentations © Festo Didactic 8134684... -
Page 75: Utilisation Prévue
Le système didactique de Festo Didactic est exclusivement destiné à la formation initiale et continue dans le domaine de l’automatisation et de la technique. Il incombe à l’établissement de formation et/ou aux formateurs de faire respecter par les étudiants les consignes de sécurité... -
Page 76: Pour Votre Sécurité
4.1 Notes importantes La condition de base de l’utilisation en toute sécurité et du parfait fonctionnement des composants et des systèmes de Festo Dictatic est une bonne connaissance des directives et consignes fondamentales de sécurité. La présente notice d'utilisation contient les informations essentielles pour utiliser les composants et systèmes en toute sécurité. -
Page 77: Engagement De L'exploitant
Toutes les personnes chargées de travailler sur les composants et systèmes s’engagent, avant de commencer, à : • lire le chapitre concernant la sécurité et les avertissements figurant dans la présente notice, • respecter les prescriptions fondamentales de sécurité au travail et de prévention des accidents. © Festo Didactic 8134684... -
Page 78: Consignes De Travail Et Précautions De Sécurité
Utilisez un outil, par exemple un tournevis, pour actionner les capteurs mécaniques de fin de course. ATTENTION • Notez les indications concernant l'implantation des composants. 5.3 Données électriques AVERTISSEMENT Risque d'explosion et d'incendie ! Veiller à ce qu'à aucun moment les accumulateurs ne soient en court-circuit. © Festo Didactic 8134684... - Page 79 – dysfonctionnement, – stockage impropre ou de – transport non conforme l’utilisation sans danger de l’appareil n’est plus possible. – Coupez immédiatement la tension. – Empêchez toute remise en marche involontaire de l’appareil. © Festo Didactic 8134684...
- Page 80 Respectez l'intensité absorbée de l'appareil externe • Respectez la polarité • Veillez à ce que le câble soit posé sans risque d'écrasement, de cisaillement, de coupure ou d'autres risques mécaniques. • Fixez le câble de manière adéquate © Festo Didactic 8134684...
-
Page 81: Caractéristiques Techniques
6 Caractéristiques techniques 6.1 Caractéristiques générales Paramètres Valeur Tension de service 1 AC 120 V±10%, 60 Hz (réf. 8131016) 1 AC 230 V ±10%, 50/60 Hz (réf. 8131017) Puissance absorbée 240 W max. Tension de charge, 10,8 … 18 V... -
Page 82: Brochage Du Connecteur D'amarrage
Le cordon d'alimentation doit être commandé séparément. 6.2 Brochage du connecteur d'amarrage 24 V ACCUMULATEUR + ACCUMULATEUR GND Tableau : brochage du connecteur d'amarrage Illustration 28 : connecteur d'amarrage, vue de la platine (côté brasage) © Festo Didactic 8134684... -
Page 83: Description
4 : marqueur lumineux, 5 : connecteur avec broche de terre, 6 : fusible, 7 : interrupteur marche/arrêt, 8 : connecteur d'amarrage, Illustration 29 : station de charge La diode luminescente bleue (2) sur le dessus de la station de charge indique si la tension de service est disponible. © Festo Didactic 8134684... -
Page 84: Mise En Service
Le cordon d'alimentation de la station de charge ne peut pas se trouver dans l'espace d'action du robot. Les galets d'entraînement pourraient endommager le câble de raccordement. ATTENTION Danger d'achoppement Ne positionner pas la station de charge dans une voie de circulation. © Festo Didactic 8134684... -
Page 85: Structure Mécanique De La Station De Charge
La station de charge est pré-montée avec le marqueur lumineux. Celui-ci se trouve sur le dessus de l'emballage et est déjà branché à l'intérieur de la station de charge. © Festo Didactic 8134684... - Page 86 à l'aide d'un tournevis plat sur la face arrière du marqueur. Des marqueurs papier supplémentaires peuvent être générés dans les propriétés du module de détection de marqueurs de Robotino View. Illustration 34 : face arrière du marqueur avec potentiomètre de réglage © Festo Didactic 8134684...
- Page 87 6. Montez les deux réflecteurs à l'aide des vis fournies sur les deux côtés de la station de charge. 7. Branchez à nouveau le cordon d'alimentation dans le connecteur avec broche de terre de la station de charge. 8. Allumez la station de charge. Illustration 35 : station de charge avec réflecteurs © Festo Didactic 8134684...
-
Page 88: Réglage En Hauteur Du Connecteur D'amarrage
7. Branchez à nouveau le cordon d'alimentation dans le connecteur avec broche de terre de la station de charge. 8. Allumez la station de charge. Illustration 36 : 4 vis pour le réglage en hauteur du connecteur d'amarrage © Festo Didactic 8134684... -
Page 89: Raccordement Électrique
Accumulateur + ST4 (pack d'accus 3) Jaune Vert Marron Noir Accumulateur - Rouge Accumulateur + Vérifier le brochage de ST2 et ST4 sur la station de charge. Si le brochage ne correspond pas au tableau, adaptez-le. © Festo Didactic 8134684... -
Page 90: Accessoires
Connecteur selon SANS 164-1 pour ZA, IN, PT, SG, HK, (GB), (AE), réf. : 350367 9 Maintenance et nettoyage Les composants et systèmes de Festo Didactic ne nécessitent pratiquement aucun entretien. Il convient toutefois, à intervalles réguliers, de nettoyer : •... -
Page 91: Informations Complémentaires Et Mises À Jour
Station de charge Robotino 4 – Notice d'utilisation 10 Informations complémentaires et mises à jour La documentation technique des composants et des systèmes Festo Didactic fait l’objet d’informations complémentaires et de mises à jour que vous trouverez sur Internet à l’adresse : www.ip.festo-didactic.com... - Page 92 Station de charge Robotino 4 – Notice d'utilisation © Festo Didactic 8134684...
- Page 93 常规数据 _______________________________________________________________________ 103 连接插头的触点分布 _____________________________________________________________ 104 说明 ___________________________________________________________________________ 105 功能 ___________________________________________________________________________ 105 调试 ___________________________________________________________________________ 106 充电站的机械结构 _______________________________________________________________ 107 连接插头的高度调整 _____________________________________________________________ 110 电接口 _________________________________________________________________________ 111 附件 ___________________________________________________________________________ 112 维护保养和清洁 _________________________________________________________________ 112 更多信息及更新 _________________________________________________________________ 113 废弃处理 _______________________________________________________________________ 113 © Festo Didactic 8134684...
-
Page 94: 运行设备的一般性前提条件
– 在实验室或者教室内以及在实验室或者教室外必须至少提供一个紧急停机装置。 • 必须对实验室或者教室采取措施,防止负载电源或者气源被意外接通。 – 例如通过一个钥匙开关 – 例如通过可以上锁的开关阀 • 实验室或者教室必须通过故障电流保护装置 (RCD) 加以防护。 – 仅允许在配备有故障电流保护装置的培训教室中运行电气设备(例如电源装置、压缩机、液压 机组)。 – 应将一个差动电流 ≤ 30 mA 的 B 型 RCD 保护开关用作故障电流保护装置。 • 实验室或者教室必须通过过电流保护装置加以防护。 – 保险丝或者断路器 • 不允许使用任何有损坏或者缺陷的装置。 – 损坏的设备必须加以禁用,并且从实验室或者教室中取走。 – 损坏的连接电缆、压缩空气软管和液压软管会构成安全风险,因此必须从实验室或者教室中取 走。 © Festo Didactic 8134684... -
Page 95: 安全注意事项和图标
Robotino 4 充电站 – 操作说明书 2 安全注意事项和图标 2.1 安全注意事项 危险 … 提示直接的危险情形,如果不加以避免,则可能导致死亡或者严重的人身伤害。 警告 … 提示可能的危险情形,如果不加以避免,则可能导致死亡或者严重的人身伤害。 小心 … 提示可能的危险情形,如果不加以避免,则可能导致轻度及中度人身伤害或者导致严 重的财产损失。 提示 … 提示可能的危险情形,如果不加以避免,则可能导致财产损失或者功能丧失。 © Festo Didactic 8134684... - Page 96 Robotino 4 充电站 – 操作说明书 2.2 图标 针对危险部位的警告 危险电压警告标志 在调试前阅读并且注意操作说明书和 安全注意事项。 针对爆炸危险物的警告 静电敏感元件 信息和其他技术文档参考 © Festo Didactic 8134684...
-
Page 97: 按规定使用
Robotino 4 充电站 – 操作说明书 3 按规定使用 只能使用 Festo Didactic 的学习系统的部件和系统: • 在教学和培训企业中按规定使用 • 在安全技术完善的状态下 部件和系统都是根据当前技术水平及认可的安全技术规定制造的。尽管如此,违规使用仍然可能会给用 户或第三方带来生命危险并导致部件损坏。 Festo Didactic 的学习系统是专门为自动化和技术领域的培训和进修开发和配置的。培训机构和/或培训人员应确保学 员遵守本操作说明书中描述的安全预防措施。 因此,Festo Didactic 对在纯培训环境之外使用本装置期间导致的对学员、培训机构和/或第三方的伤害将不承担任何责任; 除非此类伤害是由于 Festo Didactic 故意或严重过失造成的。 © Festo Didactic 8134684... -
Page 98: 为了您的安全
Robotino 4 充电站 – 操作说明书 4 为了您的安全 4.1 重要注意 了解基本安全注意事项和安全规定是确保 Festo Didactic 部件和系统的安全操作及无故障运行的基本前提条件。 本操作说明包含有关安全运行部件和系统的最重要信息。尤其是使用这些部件和系统进行工作的所有人 员都应遵守安全注意事项。此外,还必须注意并遵守装置使用地点的现行法规及事故预防规定。 警告 必须立即排除可能影响到安全的故障! 小心 由于不当的修理或者改动可能会出现不可预料的运行状态。请勿对本操作说明未说明 的部件和系统进行任何修理或改动。 © Festo Didactic 8134684... -
Page 99: 运营商的职责
Robotino 4 充电站 – 操作说明书 4.2 运营商的职责 操作员有义务仅允许符合下列条件的人员在部件和系统上工作: • 熟悉关于工作安全和事故预防的基本规定,并接受过部件和系统操作方面的指导培训, • 阅读并理解本操作说明中的安全章节和警告提示。 应定期对人员在工作方面的安全意识开展检查。 4.3 学员的义务 在开始工作之前,所有被委托在部件和系统上执行工作的人员有义务: • 阅读本操作说明中的安全章节和警告提示, • 注意遵守关于工作安全和事故预防的基本规定。 © Festo Didactic 8134684... -
Page 100: 工作和安全注意事项
Robotino 4 充电站 – 操作说明书 5 工作和安全注意事项 5.1 概要 小心 • 仅允许学员在培训人员的监督下在部件和系统上执行工作。 • 注意数据表中有关各部件的说明,特别是所有的安全注意事项! 5.2 机械装置 警告 • 切断电源! – 在电路上工作之前,请关闭工作电源和控制电源。 – 仅允许在停机状态下将手伸入装置。 – 注意驱动装置可能的延时运转时间。 • 故障查找过程中有致伤危险! – 使用工具来操作机械限位开关,例如:螺丝刀。 小心 • 请注意有关部件放置的信息。 5.3 电气部分 警告 爆炸和火灾危险! 确保电池不会发生短接。 © Festo Didactic 8134684... - Page 101 • 注意确保连接电缆不要长期处于拉伸状态下。 • 铺设连接电缆时,要防止其扭折或剪切。 • 请勿将导线铺设到高温表面上。 – 高温表面相应地标有警告标志。 小心 • 带接地点的设备必须始终接地。 – 如果已有接地接口(黄绿色实验室插口),则必须始终与保护接地连接。必 须始终首先接触保护接地(在电压之前),并且只允许最后断开(断开电压 后)。 – 有些设备的漏电流较高。这些设备还必须通过一根接地安全引线接地。 • 仅使用规定的、具有正确额定电流强度和跳闸特性的保险丝。 • 除非技术数据中另有说明,否则该设备没有集成保险丝。 • 当 – 损坏明显、 – 功能损坏、 – 存储不当或 – 运输不当时 不能够安全运行设备。 – 立即关断电压。 – 防止设备意外重新接通。 © Festo Didactic 8134684...
- Page 102 Robotino 4 充电站 – 操作说明书 小心 静电放电 机器人会出现不可预见的行为。 • 应在可放电的底座上运行。 • 通过穿上合适的鞋子和衣物避免静电放电。 提示 静电放电会导致设备损毁 在打开前,将充电站接地。 取下盖子。不要接触任何电气部件。留意静电放电(英语 electrostatic discharge,ESD)。 提示 短路会导致设备损毁 设备包含壳体开口以便于冷却。注意,不得因剪断芯线末端等导致有导电零件进入。 提示 工作电压错误会使设备损毁 注意外部设备的电压范围。 • 将供电电压与提供的电压相比较。 • 注意外部设备的耗用电流 • 注意极性 • 注意,敷设导线时,不得有夹伤、剪切、切割或其他机械危险。 • 将导线充分固定 © Festo Didactic 8134684...
-
Page 103: 技术数据
Robotino 4 充电站 – 操作说明书 6 技术数据 6.1 常规数据 参数 数值 工作电压 1AC 120 V±10%, 60 Hz(订货号 8131016) 1AC 230 V ±10%, 50/60 Hz(订货号 8131017) 功率消耗 最高 240 W 充电电压,蓄电池 10.8 … 18 V 充电电流,蓄电池 最高 6 A,耐抗短路,耐抗过载 Robotino 供电电压... -
Page 104: 连接插头的触点分布
Robotino 4 充电站 – 操作说明书 提示 无线电干扰 这款 A 级设备是为工业环境而设计的。在其他环境中,设备可能会导致无线电干扰。 避免将本设备与对干扰敏感的设备同时使用。 电源电缆必须单独订购。 6.2 连接插头的触点分布 24 V rd(红) 蓄电池 + bk(黑) 蓄电池 GND bu(蓝) wh(白) gn(绿) bn(棕) 表格:连接插头的触点分布 插图 37:连接插头,印刷电路板视图(焊接侧) © Festo Didactic 8134684... - Page 105 Robotino 4 充电站 – 操作说明书 7 说明 7.1 功能 充电站是为配合移动学习系统 Robotino 4 (订货号8101344)使用而设计的。充电站创造了技术前提,可以在无需其他操作的情况下连接 Robotino 4 并且为蓄电池充电。在充电过程中,可以继续运行 Robotino,并且对其进行编程。 1:绿色 LED“Robotino 已连接”, 2:蓝色 LED“存在工作电压”,3:反射器, 4:发光标记,5:低功率设备插头,6:保险丝,7:开关,8 连接插头, 插图 38:充电站 充电站顶部的蓝色 LED (2) 显示工作电压是否存在。 © Festo Didactic 8134684...
- Page 106 1. 通过使用摄像机和 Robotino 4 的距离传感器启动。 2. 通过使用摄像机和标记识别启动。 3. 通过使用一台选配的激光扫描器,并且对反射器加以识别来启动。 7.2 调试 1. 在室内定位充电站。 2. 根据启动方式,在充电站顶部安装发光标记 (4) 或者两个反射器 (3)。为此,使用随附的安装套件。 3. 将电源电缆插入低功率设备插头 (5)。 4. 在开关 (7) 上接通充电站。 5. 按照装配说明书中的描述,将接触插头(订货号 8131075)安装到 Robotino 4 正面的充电槽上(行驶方向左侧),并且将接触插头接线至蓄电池电路板。 警告 充电会导致危险! 充电站的电源电缆不允许位于机器人的活动区域中。驱动滚轮可能会导致连接电缆损 坏。 小心 存在绊倒的危险 不要将充电站定位在交通路线上。 © Festo Didactic 8134684...
-
Page 107: 充电站的机械结构
Robotino 4 充电站 – 操作说明书 7.3 充电站的机械结构 可以根据具体的启动方式,对充电站进行扩展。 插图 39:发光标记 插图 40:反射器 警告 充电会导致危险! 在充电站上作业前,将其关闭并且将电源电缆从低功率设备插头中拔下。 充电站交付时已经预装了发光标记。它在包装中位于上部,并且已经插接在充电站内侧。 © Festo Didactic 8134684... - Page 108 Robotino 4 充电站 – 操作说明书 不使用激光传感器运行 Robotino 4 如果不使用激光传感器运行 Robotino 4,则安装发光标记。 请按下列方式进行: 1. 将标记用两个随附的螺钉和垫圈居中固定在充电站顶部。确保不拉拽已经插接好的电缆。 2. 将电源电缆重新插入充电站的低功率设备插头。 3. 接通充电站。二维码亮起。 插图 41:带有发光标记的充电站 插图 42:带有发光标记插头的印刷电路板 可以用一把一字头螺丝刀在标记的背面设 置标记的亮度。 可以在 Robotino View 的标记识别模块的属性中生成额外的纸质 标记。 插图 43:带有设定电位计的标记背面 © Festo Didactic 8134684...
- Page 109 Robotino 4 充电站 – 操作说明书 使用激光传感器运行 Robotino 4 如果使用激光传感器运行 Robotino 4,则安装两个反射器。 请按下列方式进行: 1. 松开三个将充电站的盖子和外壳连接的螺栓。确保在安装过程中没有任何小零件掉入设备中。 2. 不要将盖子完全取下,因为标记的电缆还处于插入状态。 3. 松开外壳内部左侧的 M8 插头并且将电缆和插头拉过盖子上的开口。 4. 用随附的塑料帽封闭盖子上的开口。 5. 重新固定所有螺钉。 6. 用随附的螺钉在充电站的两侧安装两个反射器。 7. 将电源电缆重新插入充电站的低功率设备插头。 8. 接通充电站。 插图 44:带有反射器的充电站 © Festo Didactic 8134684...
-
Page 110: 连接插头的高度调整
Robotino 4 充电站 – 操作说明书 7.4 连接插头的高度调整 根据具体的地面情况,可能需要在充电站上对连接插头的触点进行高度调整。 请按下列方式进行: 1. 松开三个将充电站的盖子和外壳连接的螺栓。确保在安装过程中没有任何小零件掉入设备中。 2. 不要将盖子完全取下。标记的电缆处于插入状态。 3. 松开外壳内侧用来固定连接插头的四个螺钉。 4. 在 Robotino 4 上将接触面和插头对齐。 5. 然后固定四个螺钉。 6. 放上盖子并且用螺栓将其固定。 7. 将电源电缆重新插入充电站的低功率设备插头。 8. 接通充电站。 插图 45:用于连接插头高度调节的 4 个螺栓 © Festo Didactic 8134684... -
Page 111: 电接口
黄色 绿色 棕色 黑色 蓄电池 - 红色 蓄电池 + ST2(蓄电池组 1) 黄色 绿色 棕色 黑色 蓄电池 - 红色 蓄电池 + ST4(蓄电池组 3) 黄色 绿色 棕色 黑色 蓄电池 - 红色 蓄电池 + 在充电站上检查 ST2 和 ST4 的布置。如果布置和表格不相符,则加以调整。 © Festo Didactic 8134684... -
Page 112: 维护保养和清洁
插头,符合 BS 1363 用于 GB、IE、MY、SG、UA、HK、AE,订货号:350363 • 插头,符合 AS 3112 用于 AU、NZ、CN、AR,订货号:350364 • 插头,符合 SEV 1011 用于 CH,订货号:350366 • 插头,符合 SANS 164-1 用于 ZA、IN、PT、SG、HK、(GB)、(AE),订货号:350367 9 维护保养和清洁 Festo Didactic 的部件和系统基本上无需保养。应定期: • 对光学传感器的透镜、光纤加工头和反射器 • 接近开关的有效表面 • 整个部件或系统 用一块不起毛的软布或毛刷进行清洁。 提示 不得使用腐蚀性或研磨性清洁剂。 © Festo Didactic 8134684... -
Page 113: 更多信息及更新
Robotino 4 充电站 – 操作说明书 10 更多信息及更新 关于 Festo Didactic 部件和系统技术文档的更多信息和更新,可登录公司官网查找: www.ip.festo-didactic.com 11 废弃处理 废旧的电子设备属于可回收材料,不属于生活垃圾。通过当地的回收点开展废弃处置。 © Festo Didactic 8134684... - Page 114 Robotino 4 充电站 – 操作说明书 © Festo Didactic 8134684...
- Page 116 Festo Didactic SE Rechbergstraße 3 73770 Denkendorf Germany +49 711 3467-0 www.festo-didactic.com +49 711 34754-88500 did@festo.com...
Need help?
Do you have a question about the 8131016 and is the answer not in the manual?
Questions and answers