Table of Contents
Advertisement
Quick Links
Advertisement
Table of Contents

Subscribe to Our Youtube Channel
Related Manuals for M2 AAD

Summary of Contents for M2 AAD
- Page 1 USER´S GUIDE 01.12.04 EN...
-
Page 2: Table Of Contents
CONTENT Warning ................page 3 6.9 Switching off Schema – feet version........page 27 Introduction ............... page 4 Maintenance ..............page 28 Function ................page 5 release unit (cutter) replacement ......... page 28 3.1 Construction and principal ..........page 5 7.2 Filter replacement .............. -
Page 3: Warning
1. Warning Skydiving is a dangerous activity which can result in serious or even fatal injury. Training and experience are required in order to reduce such risk. Using the m safety device during skydiving can significantly reduce the risks. Never solely rely on the m , since it is not the primary tool for opening of your parachute. -
Page 4: Introduction
2. Introduction The m safety device provides automatic cutting of the closing loop of the reserve parachute in cases where the safety of the skydiver is in danger. It is constructed and manufactured based on the latest skydiving research. Its function fully complies with the requirements of current skydiving. -
Page 5: Function
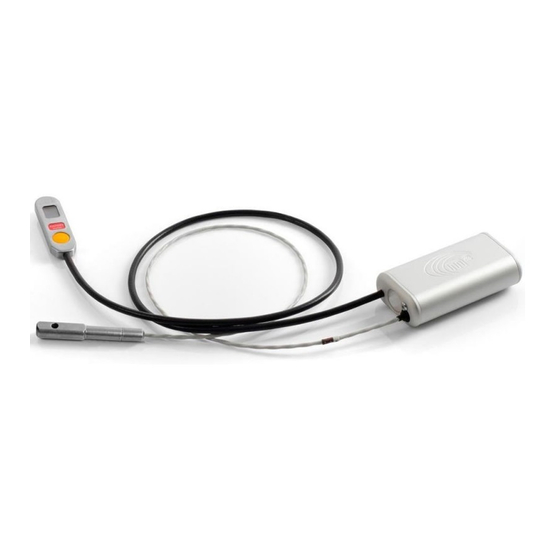
3. Function Construction and principal The m is constructed in order to comply with the requirements for resistance and correct function in all situations. It operates with minimum requirements for energy consumption, which enables it to retain a sufficient energy source capacity for its entire service life without the necessity of battery replacement. - Page 6 3. Function 3.3.3 The m function for landing at a different altitude above sea level than the altitude the aircraft takes off from Only three options can occur in regard to the skydiver´s landing: Landing location at the same elevation as the take-off location in such a case, the m device requires for the aircraft to ascend up to at least 40m;...
- Page 7 3. Function Landing location higher than the take-off location The m device must be preset to the positive value for the elevation difference between the take-off and landing location altitudes. The altitude lock in such a case depends on the landing location, i.e. as per version 450m or 900m, plus the specified altitude difference. In order to provide problem-free functioning and take-off detection ability in such a case, the m device requires an ascent up to at least 40m above the take-off location and, upon reaching and exceeding this preset altitude of +40m, remaining above this altitude level...
- Page 8 3. Function Landing location lower than the take-off location The m device must be preset to the negative value for the elevation difference between the take-off and the landing location altitude. The altitude lock in such cases depends on the landing location, i.e. as per version 450m or 900m, minus the specified altitude difference. In or- der to provide problem free functioning and take-off detection ability in such cases, the m device requires an ascent up to at least 40m abo- ve the take-off location and, upon reaching the preset altitude of +40m, remaining above this altitude level for at least 90 seconds.
- Page 9 3. Function Should you accidentally land in a location 30m higher or lower than the preset landing elevation, switch the device off after landing and turn it on just before the next dive. The device must always be switched off during transport. 3.3.4 Altitude protection zone of the m device –...
-
Page 10: Activation Zone
3.4 Activation zone AZgz – Activation zone above ground zero; EXPERT 270m (885ft) 100m (330ft) STUDENT 330m (1085ft) 60m (200ft) TANDEM 610m (2000ft) 100m (330ft) BAgz – Beginning of activation zone above ground zero; EXPERT 270m (885ft) STUDENT 330m (1085ft) TANDEM 610m (2000ft) -
Page 11: Altitude Lock
3.5 Altitude lock UAgz – The altitude for unlocking during ascent (of plane) above ground zero; EXPERT 450m (1475ft) STUDENT 450m (1475ft) TANDEM 900m (2950ft) LAgz – The altitude for locking during descent (on parachute) above ground zero; EXPERT 100m (330ft) STUDENT 60m (200ft) TANDEM... -
Page 12: Limited Speed
3.6 Limited speed LSgz – Limited speed above ground zero in AZgz; EXPERT 35m/s (78mph) at 270m (885ft) STUDENT 20m/s (45mph) at 330m (1085ft) TANDEM 35m/s (78mph) at 610m (2000ft) -
Page 13: Models
4. Models EXPERT Activation occurs if the altitude above the landing area is below 270m (885 ft) and the descent speed is over 35 m/s (78 mph). The altitude lock is 450m (1475 ft). Activation will not occur under an altitude of 100m (330 ft). STUDENT Activation occurs if the altitude above the landing area is below 330m (1085 ft) and the descent speed is over 20 m/s (45 mph). -
Page 14: Installation
5. Installation Installation of AAD m into containers made by various manufacturers can be performed solely by those persons with senior-master ri- gger certification, or a holder of a comparable equivalent according to the legislation of the individual countries where the m is installed. - Page 15 5. Installation The thick cable of the control unit is always second and must be Cable of Control Unit placed on the wound thin cable. If the m device body is placed in such a way that the thick cable is higher than the thin cable, wind the cable counter-clockwise from the front view.
- Page 16 5. Installation Cables must not be placed in the pocket for the device body and, at the risk of cable damage, must not be even partially under the device body. Elastic pouch with Processing Unit Control Unit The cutter and the control unit location must comply with the harness manufacturer’s manual so that in both cases at least mi- nimum cable spacing is ensured.
-
Page 17: Control
6. Control Switching the unit “on” Quickly press the control button (2) on the control unit body (1). Upon the icon being dis- played (3) immediately press the control button a second time; the icon will be displayed; immediately press the button a third time; when the icon is displayed, immediately press the button for the fourth time. -
Page 18: Switching The Device Off
6. Control Switching the unit off Quickly press the control button (2) on the control unit body (1). Upon the icon being displayed (3) immediately press the button for a second time; the icon will be displayed; immediately press the button for a third time; when the icon is displayed, press the button for the fourth time. - Page 19 6. Control Pressing the button upon digit 5 being on the display will add a further 50m. The display will show 0. Press the button and the setting is confirmed. The display will automatically sequentially show the icons “-“ “2“ “5“ “0“ “-“ (four digits in the feet version) for your verifi- cation and the device will complete the auto-test and calibration –...
-
Page 20: Information In The Device Memory Calibrated In Meters (M)
6. Control Information in the device memory calibrated in meters (m) 6.4.1 Display description The m retains information which is available to the user upon following the steps below. The following information can be found in the memory. Opening altitude of the last dive (4 digits = 0000 to 9999m); Total number of dives during the device’s operation (5 digits = 0-30000 dives);... - Page 21 6. Control 6.4.2 Sequence for displaying information in the device memory Upon activating the m as per chapter 6.1, the display will show icon . Quickly press the control button (2) on the control unit body (1). The icon will be displayed, then the icon, immediately press the control button, and the icons below will appear sequentially (as per chapter 6.4.1).
-
Page 22: Information In The Device Memory Calibrated In Feet (Ft)
6. Control Information in the device memory calibrated in feet (ft) 6.5.1 Display description The m retains information which is available to the user upon following the steps below. The following information can be found in the memory. Opening altitude of the last dive (5 digits = 00000 to 99999ft); Total number of dives during the device’s operation (5 digits = 0-30000 dives);... - Page 23 6. Control 6.5.2 Sequence for displaying information in the device memory Upon activating the m as per chapter 6.1, the display will show icon . Quickly press the control button (2) on the control unit body (1). The icon will be displayed and then the icon, immediately press the control button, and the icon below will appear sequentially (as per chapter 6.5.1).
-
Page 24: Switching On Schema - Meter Version
6. Control Switch on - sequence menu meter version switch on sequence self test & set ground zero stisk click error click click click click click click click click click landing wil be on ground zero click click click click click click click... -
Page 25: Switching Off Schema - Meter Version
6. Control switch o sequence Switch off - sequence menu d [4] - last jump deploy altitude = 0 - 9999 (m) meter version J [5] - total jumps counter = 0 - 30000 (jumps) c [3] - correction altitude for next jump = 000 - 990 (m) b [2] - remaining battery capacity = 99 - 0 (%) click n [6] - device serial number = XXXXXX... -
Page 26: Switching On Schema - Feet Version
6. Control switch on sequence Switch on - sequence menu feet version click self test & set ground zero click click error click click click click click click click click landing will be on ground zero click click click digit 1000x click click... -
Page 27: Switching Off Schema - Feet Version
6. Control d [5] - last jump deploy altitude = 0 - 30000 (ft) Switch off - sequence menu J [5] - total jumps counter = 0 - 30000 (jumps) feet version switch o c [4] - correction altitude for next jump = 0 - 2990 (ft) sequence b [2] - remaining battery capacity = 99 - 0 (%) n [6] - device serial number = XXXXXX... -
Page 28: Maintenance
7. Maintenance cutter replacement If the m device has been activated, there are two ways in which the device can be again made functional: 7.1.1 Performance of a general analysis and cutter replacement: complete the form included in the manual with a detailed description of the event (activation) and send the form, along with the entire m device, to the address of either the manufacturer, MarS a.s. -
Page 29: Filter Replacement
7. Maintenance Filter replacement 7.2.1 Procedure when m is used under water The m is a waterproof security device. It remains waterproof for up to 24 hours in a depth of 2m (6.5 ft). Nevertheless, it is necessary to complete the following tasks upon the device having made contact with water: Immediately switch the m device off and remove it from the container. -
Page 30: Battery
7. Maintenance Battery 7.3.1 The total service life of the device is 15 years + 3 months for warehousing before sale to the end user, without any need of ba- ttery replacement or other maintenance. The total service life is restricted to 15,000 jumps, with approximately 20 minutes per each dive;... -
Page 31: Ensuring Closing Loop To The Washer
8. Ensuring closing loop to the washer Version 1 Pierce the center of the cord Version 2... -
Page 32: Error Reports
9. Error reports Error reports will be displayed on the device with the . icon. If this icon appears on the display of the control unit, the m must not be used for diving until the defect-failure is resolved. In order to discover the type of error, proceed as follows: Quickly press the control button (2) on the control unit body (1). -
Page 33: Technical Data
Total service life of the m and service life of batteries The total service life of the AAD m is 15 years or a total of 5000 flight hours, which is approximately 15,000 dives (a dive is considered to be a maximum of 20 minutes from start-landing). The total service life of the batteries is 15 years + 3 months for storing the m prior to it being sold to the end user. -
Page 34: Warranty
11. Warranty 11.1 All the parts used in the m device, and its total correct function as per the specified limits in chapter 9, Technical data, are covered by the manufacturer’s 24-month warranty, valid from the date of purchase. 11.2 The warranty does not cover damages occurring from common use of the m device, incorrect installation, or non-standard handling.
Need help?
Do you have a question about the AAD and is the answer not in the manual?
Questions and answers