
Related Manuals for Magnetek Flex I-Chip


Summary of Contents for Magnetek Flex I-Chip
- Page 1 Flex I-Chip Remote Crane Controls August 2010 Part Number: 198-50014 © 2010 Magnetek Material Handling...
- Page 2 This manual may not be reproduced in whole or in part by any means whatsoever without the expressed written permission of MAGNETEK. Flex I-Chip Remote Crane Controls August 2010 2 of 28...
- Page 3 Magnetek Products to know, understand and follow all of these requirements. It is the responsibility of the owner of the Magnetek Products to make its employees aware of all of the above listed requirements and to make certain that all operators are properly trained. No one should use Magnetek Products prior to becoming familiar with and being trained in these requirements.
-
Page 4: Table Of Contents
Table C-2. Combination of Transmitter Toggle + A/B Push Button Select ........... 26 10. BRAKE Function (not required if programmed directly on the decoder module - Section E) ..27 PASSWORD / Security Code Function ....................27 Flex I-Chip Remote Crane Controls August 2010 4 of 28... -
Page 5: Exterior Illustrations
11) Test mode select button SQ2 LED (external receiving module) 12) External receiving module input slot I-Chip slot 13) External power input slot (not provided) Internal battery compartment 14) Power switch Flex I-Chip Remote Crane Controls August 2010 5 of 28... -
Page 6: Testing Complete Transmitter
LCD screen when pressed, then those push buttons are defective. If all the information is correct then the transmitter handset is in good order. Go on to section D to Flex I-Chip Remote Crane Controls August 2010 6 of 28... -
Page 7: Testing Encoder Board
T - - M - - ↓ ↓ ↓ Serial number Type Mode Plug all the required cables onto this unit Plug all the cables from this unit to the encoder board. Flex I-Chip Remote Crane Controls August 2010 7 of 28... - Page 8 LCD screen when pressed, then those push buttons are defective. 10) If all the information is correct then the encoder board is in good order. If this is the case, then the transmitting board is defective. Flex I-Chip Remote Crane Controls August 2010 8 of 28...
-
Page 9: Testing Receiving Module
If SQ2 LED blinks red with all the transmitter information shown on the LCD screen then the decoder module is defective. Flex I-Chip Remote Crane Controls August 2010 9 of 28... -
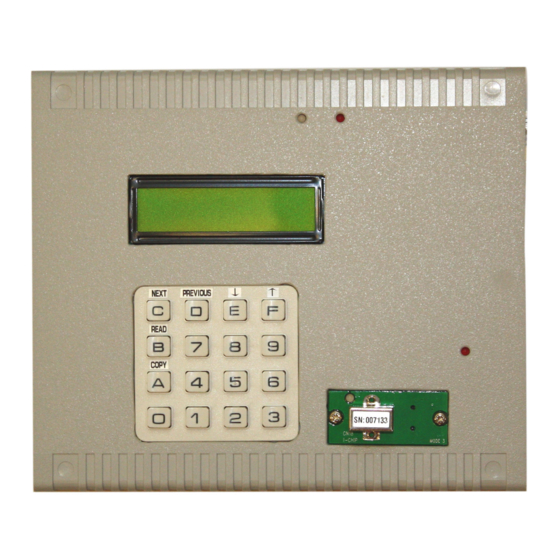
Page 10: Decoder Module Programming
Press the Test Mode Select button until the LCD screen displays “Decoder Programming 4”. Set the serial number, system type, Start/Aux and brake function by using Next, Previous, ↑ & ↓ arrows and keypad. Press Copy button when done. Flex I-Chip Remote Crane Controls August 2010 10 of 28... -
Page 11: I-Chip Programming
I-Chip onto the same I-Chip slot, press the COPY button to transfer information from the programmer unit to the empty I-Chip (red light will appear on the I-Chip LED, then turn green again). This will complete the programming. Flex I-Chip Remote Crane Controls August 2010 11 of 28... -
Page 12: Program System Serial Number
(FUNCTION relay will open when e-stop button is pressed down) FUNCTION relay works simultaneously with receiver MAIN. When finished, take the same I-Chip and insert it onto the I-Chip programming port (located on the Flex I-Chip Remote Crane Controls August 2010 12 of 28... -
Page 13: Program Transmitter Output Power
↑ & ↓ arrows or the number buttons directly to set transmitter push button functions. The transmitter push button function tables on the following pages tell you which number value correspond to which push button function. Flex I-Chip Remote Crane Controls August 2010 13 of 28... - Page 14 00001011 00001100 00001101 00001110 00001111 00010000 Table A-2. Inline Transmitter Toggle with LED Displays Dip-switch PB10 PB11 PB12 Setting 00000001 00010001 00010010 00010011 00000101 00010100 00010101 00010110 00000101 00010100 00010101 Flex I-Chip Remote Crane Controls August 2010 14 of 28...
- Page 15 Table A-2. Inline Transmitter Toggle with LED Displays Dip-switch PB10 PB11 PB12 Setting 00010110 00001001 00010111 00011000 00011001 00001101 00011010 00011011 00011100 Flex I-Chip Remote Crane Controls August 2010 15 of 28...
- Page 16 Table B-1. A/B Push Button Select Select Type A: A, B, A, B… Magnetek/Enrange Select Type A: A+B, A, B, A+B… Select Type B: Off, A, B, Off… Select Type C: A, B, A+B, A… Select Type D: Off, A, B, A+B, Off…...
- Page 17 Table B-1. A/B Push Button Select Select Type A: A, B, A, B… Magnetek/Enrange Select Type A: A+B, A, B, A+B… Select Type B: Off, A, B, Off… Select Type C: A, B, A+B, A… Select Type D: Off, A, B, A+B, Off…...
- Page 18 Table B-1. A/B Push Button Select Select Type A: A, B, A, B… Magnetek/Enrange Select Type A: A+B, A, B, A+B… Select Type B: Off, A, B, Off… Select Type C: A, B, A+B, A… Select Type D: Off, A, B, A+B, Off…...
- Page 19 Table B-2. Inline A/B Push Button Select Select Type A: A, B, A, B… Magnetek/Enrange Select Type A: A+B, A, B, A+B… Select Type B: Off, A, B, Off… Select Type C: A, B, A+B, A… Select Type D: Off, A, B, A+B, Off…...
- Page 20 Table B-2. Inline A/B Push Button Select Select Type A: A, B, A, B… Magnetek/Enrange Select Type A: A+B, A, B, A+B… Select Type B: Off, A, B, Off… Select Type C: A, B, A+B, A… Select Type D: Off, A, B, A+B, Off…...
- Page 21 Table B-2. Inline A/B Push Button Select Select Type A: A, B, A, B… Magnetek/Enrange Select Type A: A+B, A, B, A+B… Select Type B: Off, A, B, Off… Select Type C: A, B, A+B, A… Select Type D: Off, A, B, A+B, Off…...
- Page 22 Table B-2. Inline A/B Push Button Select Select Type A: A, B, A, B… Magnetek/Enrange Select Type A: A+B, A, B, A+B… Select Type B: Off, A, B, Off… Select Type C: A, B, A+B, A… Select Type D: Off, A, B, A+B, Off…...
- Page 23 10101101 A/3.4 10101110 B/3.4 10101111 C/3.4 10110000 D/3.4 10110001 A/3.4 10110010 B/3.4 10110011 C/3.4 10110100 D/3.4 10110101 A/1.2 10110110 B/1.2 10110111 C/1.2 10111000 D/1.2 10111001 A/1.2 10111010 B/1.2 10111011 C/1.2 Flex I-Chip Remote Crane Controls August 2010 23 of 28...
- Page 24 11001101 A/3.4 11001110 B/3.4 11001111 C/3.4 11010000 D/3.4 11010001 A/3.4 11010010 B/3.4 11010011 C/3.4 11010100 D/3.4 11010101 A/1.2 11010110 B/1.2 11010111 C/1.2 11011000 D/1.2 11011001 A/1.2 11011010 B/1.2 11011011 C/1.2 Flex I-Chip Remote Crane Controls August 2010 24 of 28...
- Page 25 Table C-1. Combination of Transmitter Toggle + A/B Push Button Select Dip-switch PB10 PB11 PB12 Setting 11011100 D/1.2 Flex I-Chip Remote Crane Controls August 2010 25 of 28...
- Page 26 11101101 A/3.4 11101110 B/3.4 11101111 C/3.4 11110000 D/3.4 11110001 A/3.4 11110010 B/3.4 11110011 C/3.4 11110100 D/3.4 11110101 A/3.4 11110110 B/3.4 11110111 C/3.4 11111000 D/3.4 11111001 A/3.4 11111010 B/3.4 11111011 C/3.4 Flex I-Chip Remote Crane Controls August 2010 26 of 28...
-
Page 27: Brake Function (Not Required If Programmed Directly On The Decoder Module - Section E)
JP6 must be inserted (not required if programmed directly on the decoder module – Section E). PASSWORD / Security Code Function Only push button #1 through #4 is used for the password function. “1” represents PB1, “2” Flex I-Chip Remote Crane Controls August 2010 27 of 28... - Page 28 PB2, “3” represents PB3 and “4” represents PB4. 1 1 1 1 : Password function disabled (manufacture preset) Flex I-Chip Remote Crane Controls August 2010 28 of 28...
Need help?
Do you have a question about the Flex I-Chip and is the answer not in the manual?
Questions and answers