Advertisement
What's in the box?
In addition to this guide, the package includes the following items:
GW-7838-M
Technical Support
service@icpdas.com
www.icpdas.com
For Desktop Web
Technical support:service@icpdas.com
Plastic Rail
Resources
How to search for drivers, manuals and
spec information on ICP DAS website.
For Mobile Web
Model Name
Model Name
GW-7838-M Quick Start
v1.0, November 2020
CA-0910
Screw Driver
(1C016)
P1
Advertisement
Table of Contents

Subscribe to Our Youtube Channel
Related Manuals for ICP DAS USA GW-7838-M


Summary of Contents for ICP DAS USA GW-7838-M
- Page 1 GW-7838-M Quick Start v1.0, November 2020 What’s in the box? In addition to this guide, the package includes the following items: Screw Driver GW-7838-M Plastic Rail CA-0910 (1C016) Resources How to search for drivers, manuals and Technical Support spec information on ICP DAS website.
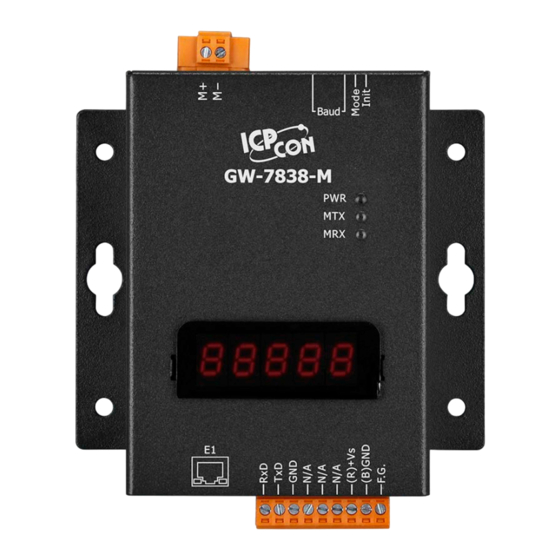
- Page 2 Appearance LED Indicator Name Description ON: Power On,OFF: Power Off Power LED M-Bus transmit Flash: M-Bus transmitting M-Bus receive Flash: M-Bus receiving 7-segment LED IP Address Ethernet IP address DIP Switch Description Normal Work Firmware Update Configuration mode Reserve Technical support:service@icpdas.com...
- Page 3 The GW-7838-M utility (MBus Utility) can be downloaded from the website: http://ftp.icpdas.com/pub/cd/fieldbus_cd/m-bus/converter/I-7590/software/ Step1: Connect the PC Ethernet to the GW-7838-M. Then set the DIP switch to the configuration mode (DIP 1 OFF, DIP 2 ON) and then power it on. Step2: Execute the M-Bus utility, and select Ethernet item and input IP address under the “Configure”...
- Page 4 Step3: Afterwards, the M-Bus utility shows all settings stored in the GW-7838-M if it had been configured before. You can refer to the “GW-7838-M user’s manual” to configure the M-Bus meter setting according to the kind of meter. After save all the settings, export the configuration file.
Need help?
Do you have a question about the GW-7838-M and is the answer not in the manual?
Questions and answers