Table of Contents
Advertisement
Quick Links
Advertisement
Table of Contents

Related Manuals for Acclaim Lighting AL Dot


Summary of Contents for Acclaim Lighting AL Dot
- Page 1 AL Dot User guide...
-
Page 3: Table Of Contents
Welcome Safety Supplied items Optional extras INSTALLATION ............5 Power and control wiring Maximum cable lengths / number of fixtures Extending AL Dot runs DMX channel designations OPERATION ............10 Addressing fixtures Testing emitter output FURTHER INFORMATION ........12 Troubleshooting Specifications... -
Page 4: Introduction
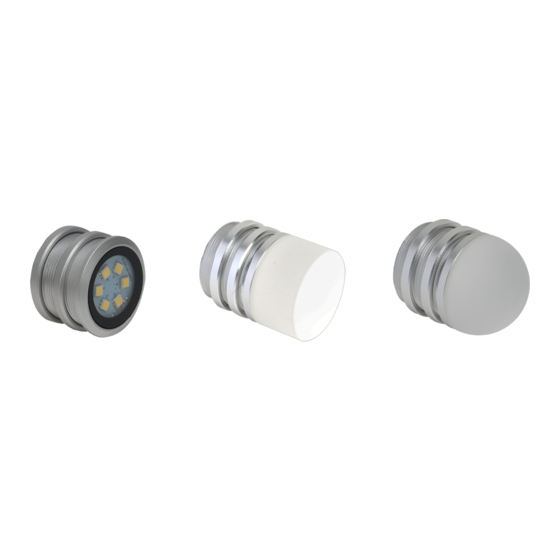
Spectrum RGBW (W=3000K) color mixing variants. There are three lens options to suit your installation type: Clear flat, diffused flat or diffused dome. Each AL Dot features a large screw threaded body (diameter 1.73”/44mm) with two aluminum locking rings to allow for panel mounting, where necessary. -
Page 5: Supplied Items
SUPPLIED ITEMS AL Dots with clear flat, diffused flat and diffused dome lens options Available with 3000K, 4000K, RGB or Spectrum RGBW emitter options OPTIONAL EXTRAS Feed cable 10’ (3m) [ADOFC10] Link cables 1’ (30cm) [ADOLC1] 5’ (1.5m) [ADOLC5] 10’ (3m) [ADOLC10] End cap [ADOEC]... - Page 6 OPTIONAL EXTRAS (CONTINUED) Small power supply (100-240VAC, 50-60Hz input) 24VDC 30W (powers 1 x 8 AL Dot run) [APS-30-24] includes 4.6 feet (1.4m) cable with bare conductors Large power supplies (115-230VAC, 47-63Hz input) 24VDC 240W (powers 1 x 50 AL Dot run)
-
Page 7: Installation
TO MOUNT AN AL DOT 1 Unscrew and remove the first (rear) locking ring from the AL Dot body. 2 Carefully slide the locking ring along the AL Dot’s cable and T-piece so that it is completely detached. 3 Feed the AL Dot’s cable and T-piece through the pre-prepared mounting hole and insert the body of the AL Dot into the hole. -
Page 8: Power And Control Wiring
Due to the limited current carrying capacity of the internal Connections to feed cables are best power buses, runs of AL Dot fixtures must not exceed 100 feet protected within (30m). See page 8 if longer runs are needed. junction boxes with... -
Page 9: Maximum Cable Lengths / Number Of Fixtures
However, the total number of AL Dot fixtures must be reduced accordingly so that the total cable run does not exceed 100 feet (30m). For instance, if 1’ (30cm) link cables were used between each of the AL Dot fixtures, the total number of fixtures would need to be reduced to 33: 33 fixtures / 100 feet (30m) of total cable length See page 8 if longer runs are needed. -
Page 10: Extending Al Dot Runs
EXTENDING AL DOT RUNS Due to the limited current carrying capacity of the internal power buses, runs of AL Dot fixtures must not exceed 100 feet / 50 units when they are directly connected to each other (less when link cables are also used - see page 7). Where more AL Dots / longer runs are required, you can either arrange separate parallel runs of fixtures, or use the optional T-cable [AGDT1] from Acclaim Lighting. -
Page 11: Dmx Channel Designations
DMX CHANNEL DESIGNATIONS The various AL Dot variants apply their LED emitters to DMX channels in different ways, as summarized in the table below. 3000K 4000K Spectrum RGBW White White Green Green Blue Blue White (3000K) The channel allocations above are shown beginning at DMX address 1. When you configure a fixture with an alternative DMX address, that value will become the first channel in the list shown above and the other channels will increment from there. -
Page 12: Operation
Management) for all configuration via the DMX interface. This allows multiple devices to be configured either before or after installation. Note: Each AL Dot fixture is supplied with its DMX address set to 1 by default. Various third party DMX/RDM tools are available; Acclaim Lighting recommends the Swisson XMT-350 for this task. -
Page 13: Testing Emitter Output
TESTING EMITTER OUTPUT After you have addressed each AL Dot fixture we recommend that you also test each one prior to installation. This can be achieved with your RDM (Remote Device Management) tool. Various third party DMX/RDM tools are available; Acclaim Lighting recommends the Swisson XMT-350 for this task. -
Page 14: Further Information
FURTHER INFORMATION TROUBLESHOOTING LUMINAIRE DOESN’T TURN ON • Check that power is correctly applied to the fixture and that there is no damage to the power input cord. • (DMX models) Use an RDM tool (such as the Swisson XMT-350) to check the settings and internal temperature of the fixture. -
Page 15: Dimensions
DIMENSIONS CLEAR FLAT LENS MODEL DIFFUSED FLAT AND DOMED LENS MODELS www.acclaimlighting.com... -
Page 16: Limited Product Warranty
If the requested repairs or service (including parts replacement) are within the terms of this warranty, Acclaim Lighting will pay return shipping charges only to a designated point within the United States. If the entire instrument is sent, it must be shipped in its original package. - Page 18 www.acclaimlighting.com...
Need help?
Do you have a question about the AL Dot and is the answer not in the manual?
Questions and answers