Table of Contents
Advertisement
Quick Links
Quick Installation Guide
Thanks for Choosing Dinstar's VoIP Gateway!
安装设备之前请仔细阅读本安装指导。鼎信通达为客户提供全方位的技术支持,需要更多在线
Please read this guide carefully before installing the gateway. If you need any technical
技术支持,请拨打技术支持热线电话:0755-26456110/112。
support
, please contact us
邮箱:support@dinstar.com 网址:www.dinstar.cn
Tel: +86 755 61919966
Email: support@dinstar.com
注意:
Website: www.dinstar.com
本文档用于为设备安装提供简明快捷的操作指导;更详细的参数说明和配置向导请参照相关用户手册。
欢 迎 您 选 购D A G系 列 语 音 网 关 产 品 !
DAG1000-4S4O
DAG2000-8S8O
.
Advertisement
Table of Contents

Related Manuals for Dinstar DAG1000-4S4O


Summary of Contents for Dinstar DAG1000-4S4O
- Page 1 Quick Installation Guide DAG1000-4S4O DAG2000-8S8O Thanks for Choosing Dinstar’s VoIP Gateway! 安装设备之前请仔细阅读本安装指导。鼎信通达为客户提供全方位的技术支持,需要更多在线 Please read this guide carefully before installing the gateway. If you need any technical 技术支持,请拨打技术支持热线电话:0755-26456110/112。 support , please contact us 邮箱:support@dinstar.com 网址:www.dinstar.cn Tel: +86 755 61919966 Email: support@dinstar.com 注意:...
-
Page 2: Description Of Indicators
Product Model & Number of Ports Port Type Model DAG1000-4S4O DAG2000-8S8O Please check the model of your gateway before installation,and then refer to corresponding installation instructions. Description of Indicators Indicator Definition Status Description The gateway is powered on Power Indicator... -
Page 3: Indicators & Interfaces
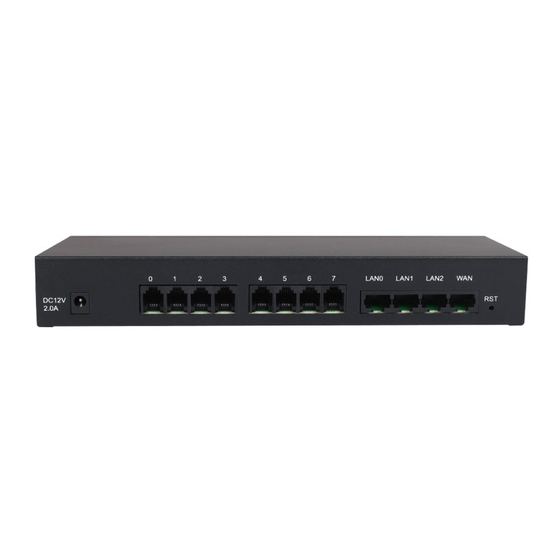
Indicators & Interfaces DAG1000-4S4O Power Indicator Network Link Indicator FXO In-use FXS In-use Running Indicator Network Speed Indicator Indicator Indicator Power Port Reset Button FXS Ports FXO Ports LAN Ports WAN Port DAG2000-8S8O Power Indicator FXS In-use FXO In-use Running Indicator... -
Page 4: Installation Attentions
Anti-jamming: to reduce interference, it’s highly recommended that telephone lines and PSTN lines connected to the gateway should be placed away from power cables; Power supply: DAG1000-4S4O is equipped with 12VDC power adapter, while DAG2000-8S8O accepts AC input voltage of 100-240V. Please ensure safe and stable power supply;... - Page 5 Connection Diagram for DAG2000-8S8O Connect gateway with network Network Cable Network Cable Switch Connect FXS port with Telephone line Connect FXO port with PSTN line RJ11Telephone Line PSTN Line PSTN Telephone Connect gateway with power input Grounding Cable Ground Point AC 100-240V...
- Page 6 Modify PC’s IP Address To log in the Web Management System of the gateway, you need to modify the IP address of PC first to make it at the same network segment with the gateway. On the PC, click ‘Network (or Ethernet) → Properties’. Double-click ‘Internet Protocol Version 4 (TCP/IPv4)’.
- Page 7 Log in Web Management System Open a web browser and enter the gateway’s IP address (default IP is 192.168.11.1). Then input username and password in the displayed login GUI. Both the default username and password are admin. Modify Gateway’s IP Address If you want to modify the IP address of the DAG gateway, please click ‘Network →...
- Page 8 Basic Configurations of FXO (1) Create Port Group You are advised to divide PSTN lines into several groups and then distribute them to different port groups. Generally, PSTN lines belonging to a same telecom operator are distributed to a same port group. Click Call&Routing →Port Group , and then click...
- Page 9 (3) Create Outbound Route On the Call & Routing→<IP→Tel Routing> interface,click Add to create an outbound route for the IP trunk. As shown in the following figure, Caller/Callee Prefix is set as ‘any’ and calls from IP trunk 63<eLA> are routed to port group 15<TELE>. (4) Create Inbound Route On the Call &...
-
Page 10: Basic Operations
官 方 网 址 :h t t p : / / w w w . d i n s t a r . c n Shenzhen Dinstar Co., Ltd. 新 浪 微 博 :h t t p : / / w e i b o . c o m / v o i p d i n s t a r 新...
Need help?
Do you have a question about the DAG1000-4S4O and is the answer not in the manual?
Questions and answers