Table of Contents
Advertisement
Quick Links
TRIONet
TECHNICAL REFERENCE MANUAL
WELCOME TO
THE WORLD OF
DEWETRON!
Congratulations on your new device! It
will supply you with accurate, complete
and reproducible measurement results
for your decision making.
Look forward to the easy handling and
the flexible and modular use of your
ISO9001
DEWETRON product and draw upon
more than 25 years of DEWETRON
expertise in measurement engineering.
EN ISO 14001
THE MEASURABLE DIFFERENCE.
Advertisement
Table of Contents

Related Manuals for Dewetron TRIONet


Summary of Contents for Dewetron TRIONet
- Page 1 Look forward to the easy handling and the flexible and modular use of your ISO9001 DEWETRON product and draw upon more than 25 years of DEWETRON expertise in measurement engineering. EN ISO 14001 THE MEASURABLE DIFFERENCE.
- Page 2 Copyright © DEWETRON GmbH This document contains information which is protected by copyright. All rights are reserved. Reproduction, adaptation, or translation without prior written permission is prohibited, except as allowed under the copyright laws. All trademarks and registered trademarks are acknowledged to be the property of their owners.
- Page 3 The compact, distributable TRIONet accepts any two of the multi-channel TRION series plug-in modules. The TRIONet connects to any Windows computer via either USB or Ethernet – and TRIONet mainframes can be interconnected using Ethernet. Because of the Ethernet interface, TRIONet mainframes can be placed up to 100 meters apart from each other.
- Page 4 PREFACE Notes...
-
Page 5: Table Of Contents
Synchronization (daisy-chaining multiple TRIONet units) …………………………………………………… 44 Synchronization examples …………………………………………………………………………………………………… 45 Connect CPAD2/3 modules to your TRIONet ……………………………………………………………………… 46 Maintenance ……………………………………………………………………………………………………………………… 49 Troubleshooting ………………………………………………………………………………………………………………… 60 CE-Certificate of conformity 450114 • TRIONet • Technical Reference Manual • Printing version 1.0.6 • April 09, 2020... - Page 6 TABLE OF CONTENT...
-
Page 7: General Information, Safety Instructions
Please note: Products arriving at our repair department without RMA require follow-up calls and investigation, which lead to longer turnaround. Only the team of DEWETRON is allowed to perform any kinds of repairs to your system to assure a safe and proper operation in future. -
Page 8: Warranty Information
Warranty Information A copy of the specific warranty terms applicable to your DEWETRON product and replacement parts can be obtained from your local sales and service office. Restricted Rights Legend Use austrian law for duplication or disclosure. -
Page 9: Safety Conventions
DEWETRON GmbH assumes no liability for the customer’s failure to comply with these requirements. 450114 • TRIONet • Technical Reference Manual • Printing version 1.0.6 • April 09, 2020... -
Page 10: General Safety And Hazard Warnings For All Dewetron Systems
SAFETY INSTRUCTIONS Your safety is our primary concern! Please be safe! General safety and hazard warnings for all DEWETRON systems > Use this system under the terms of the specifications only to avoid any possible danger. If the unit is used in a manner not specified by the manufacturer the protection can be impaired! >... - Page 11 > Do not disassemble the system! There is a high risk of getting a perilous electric shock. Capacitors still might charged, even the system has been removed from the power supply. 450114 • TRIONet • Technical Reference Manual • Printing version 1.0.6 • April 09, 2020...
- Page 12 SAFETY INSTRUCTIONS > Direct exposure of any DEWETRON product to strong sunlight or other heat radiation shall be prevented, as this could excessively heat up the product and lead to permanent damage of the product. > The electrical installations and equipments in industrial facilities must be observed by the security regulations and insurance institutions.
-
Page 13: Maintenance
> Many components within the chassis are sensitive to static discharge damage. Always wear a ground wrist strap and service the unit only in static-free environment. > Do not use harsh chemical cleaning agents! 450114 • TRIONet • Technical Reference Manual • Printing version 1.0.6 • April 09, 2020... -
Page 14: Windows Updates And Antivirus/Security Software
Problematic network stacks Often intrusive IT software or network processes can interfere with the primary function of the DEWETRON system: to record data. Therefore we recommend strongly against the installation of IT/MIS software and running their processes on any DEWETRON data acquisition system, and cannot guarantee the performance of our systems if they are so configured. -
Page 15: Main System
320 x 205 x 55 mm (12.6 x 8 x 2.2 in.) Weight typ. 1.9 kg (4.2 lbs) without modules 1) TRION3™ modules are not supported. 450114 • TRIONet • Technical Reference Manual • Printing version 1.0.6 • April 09, 2020... -
Page 16: Dimensions
Dimensions in mm (1 inch = 25.4 mm) What's in the box? (standard accessory) 1 x TRIONet 1 x external AC power supply 1 x USB 3.0 cable (2 m, 6 ft) 1 x LAN cable (2 m, 6 ft) -
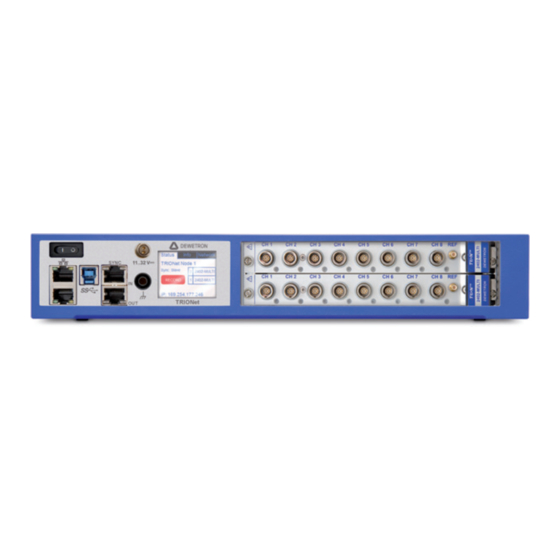
Page 17: Trionet At A Glance
Chassis terminal TRION™-SYNC-BUS interface USB 3.0 interface connector (type B) Gigabit Ethernet interface Locking mechanism for stacking units 10 Release button for locking mechanism 11 Fans 450114 • TRIONet • Technical Reference Manual • Printing version 1.0.6 • April 09, 2020... - Page 18 MAIN SYSTEM 1 Power-on switch The power-on switch is used to switch on the system. 2 Power supply input connector Input range: 10 .. 32 V (external AC/DC power supply with mating connector included) More details see chapter 'Power supply'. Lemo EGG.1B.302 3 TRION™...
- Page 19 MAIN SYSTEM 4 Touch screen display The integrated touch screen display of the TRIONet shows all relevant information straight on the device. To switch between the tabs, simply touch the display. Following displays are shown: STATUS TAB: The status tab follows the boot screen animation and shows information about TRION hardware, sync status, IP- address and transfer/recording status.
- Page 20 MAIN SYSTEM NET TAB: The 'Net' display tab shows the network settings of the TRIONet device itself and the client if connected. In this tab there is also the possibility of resetting the IP-address of the TRIONet. Information on how to change IP-address and subnet mask please see chapter 'Configuring your TRIONet with DEWETRON Explorer (formerly DEWE2Explorer)'.
- Page 21 Optional cables: > TN-DCHAIN-SET-0.2 A set of two cables (data and sync) for daisy-chaining two TRIONet units in stacked configuration, cable length approx. 0.2 m. Other cables on request. WARNING: The total length of the SYNC cable between TRIONet units must not exceed 100 m (328 ft), otherwise the data won't synchronize! 450114 •...
- Page 22 7 USB 3.0 interface connector (Universal Serial Bus) The TRIONet is equipped with a USB 3.0 interface (type B) to connect to a Laptop or PC. 2 m (6 ft) USB 3.0 cable included. The USB 3.0 interface meets standard USB pin assignment.
- Page 23 3) Press the release button of the lower unit to unlock them. 11 Fans On the right side of the TRIONet two temperature-controlled ultra silent fans are installed. Check the fans frequently for pollution depending on environmental conditions. To gain access to the fans unscrew the two star screws and remove the protective grille of the fans.
-
Page 24: Installing A Trion™ Module Into The Trionet
Step 1: Proper ESD precautions must be taken to avoid any damage to the unit. Step 2: Power off and unplug all connected cables including sensors from the TRIONet unit and TRION™ series modules. Step 3: Identify a supported TRION™ peripheral slot. -
Page 25: Power Supply
MAIN SYSTEM Power supply The TRIONet is powered by an external AC/DC power supply which is included as standard accessory. External AC/DC power supply (included as standard accessory) 65 W AC/DC power supply Input: Rated input voltage: 100 .. 240 V (max. -
Page 26: Connecting Your Trionet To Your Laptop/Pc
Connecting your TRIONet to your Laptop/PC To connect your TRIONet to a Laptop or PC, you can either use USB 3.0 or Gigabit Ethernet. To do so, you have to install measurement software of your choice as well as all drivers for the TRIONet before connecting it to the Laptop/ PC. - Page 27 Laptop/PC on the network (assuming that it also haven't been assigned an address manually or automatically) to find out if 169.254.1.1 is free. If it is, then the TRIONet assigns that address to its network card. If that address is already in use by another device on the same network, then it tries the next IP 169.254.1.2 and so on, until it finds a free...
- Page 28 ZeroConf via USB3.0 If the TRIONet is connected via USB 3.0 cable (included in the kit) to the Laptop/PC, WINDOWS will automatically detect a new hardware and install the corresponding USB 3.0 to Ethernet adapter driver (ASIX AX88179). To check if the drivers have been installed correctly, right click on the network icon at the bottom right of your taskbar and select 'Open Network and Sharing Center'.
- Page 29 ZeroConf via Cat6 Ethernet cable If the TRIONet is connected via Cat6 Ethernet cable (included in the kit) to the Laptop/PC, ZeroConf will automatically assign the TRIONet as well as the Laptop/PC with an IP-address of the address block 169.254.0.0/16 (169.254.1.0 to 169.254.254.255).
- Page 30 Manually setting up Gigabit Ethernet connection of host PC (static IP) After the TRIONet has been connected via Gigabit Ethernet cable (included in the kit) to the Laptop/PC, right click on the network icon at the bottom right of your taskbar and select 'Open Network and Sharing Center'.
- Page 31 WINDOWS 10 Check 'Use the following IP adress:' and use an IP address within the same range as the TRIONet (e.g. 192.168.0.151). The current IP address of the TRIONet is shown on the status display. Use the following subnet mask: 255.255.255.0.
- Page 32 MAIN SYSTEM WINDOWS 7 WINDOWS 10 Reboot your Laptop/PC.
- Page 33 Manually setting up USB 3.0 connection of host PC After the TRIONet has been connected via USB 3.0 cable (included in the kit) to the Laptop/PC, WINDOWS will automatically detect a new hardware and install the corresponding USB 3.0 to Ethernet adapter driver (ASIX AX88179) when connected to the internet.
- Page 34 2 meters (< 6 ft.)! The total length of the cable must not exceed 2 m (6 ft.), otherwise the TRIONet won't connect to the Laptop/PC! DEWETRON offers USB 3.0 cables for your TRIONet in perfect length.
- Page 35 Right click the corresponding adapter (ASIX AX88179..) and select 'Properties' from the menu. WINDOWS 7 WINDOWS 10 Select 'Internet Protocol Version 4 (TCP/IPv4)' and click on 'Properties' afterwards. WINDOWS 7 WINDOWS 10 450114 • TRIONet • Technical Reference Manual • Printing version 1.0.6 • April 09, 2020...
- Page 36 MAIN SYSTEM Check 'Use the following IP adress:' and use an IP address within the same range as the TRIONet (e.g. 192.168.0.151). The actual IP address of the TRIONet is shown on the status display. Use the following subnet mask: 255.255.255.0.
- Page 37 After connecting the TRIONet with your Laptop/PC via desired interface, start the DEWETRON Explorer (formerly DEWE2Explorer) which has been installed with the TRION package, usually via 'Start' > 'All programs' > 'DEWETRON' > 'DEWETRON Explorer (formerly DEWE2Explorer)' or just type 'DEWETRON Explorer (formerly DEWE2Explorer)' in the search bar.
- Page 38 (formerly DEWE2Explorer) will show some information (name of chassis, installed TRION™ modules...) Select TRIONet to show information Also, the status display of the TRIONet will now show a 'connected' symbol. When deselecting the TRIONet in the DEWETRON Explorer (formerly DEWE2Explorer), the 'connected' symbol will disappear from the status display of the unit.
- Page 39 MAIN SYSTEM To change the IP-address or the name of the TRIONet node just select and right click the unit in the DEWETRON Explorer (formerly DEWE2Explorer). TRIONet Node menu Select 'Change Node IP' from the menu. Choose 'static' and type in a new IP-address and subnet mask and hit 'OK'.
- Page 40 To change the name of the Node select and right click the TRIONet and choose 'Rename Node' from the menu. Select 'Rename Node' from the menu Type in a new name for your TRIONet Node and hit 'OK'. The name will also automatically update on the status display of the unit.
- Page 41 WINDOWS 10 OXYGEN installation Start the OXYGEN installation by plugging in the DEWETRON Installation media USB stick shipped with your TRIONet into your computer, and execute the “oxygen_x86_setup.exe” or “oxygen_x64_setup.exe” file on the USB drive, de- pending on your platform. Follow the instructions of the installer.
-
Page 42: Setup Trionet In Oxygen
After successfully connecting your TRIONet with the Laptop/PC, run OXYGEN usually via 'Start' > 'All Programs' > 'DEWETRON' > 'OXYGEN' or just type 'OXYGEN' in the search bar and hit enter. When you first start OXYGEN in some cases a Windows Firewall prompt will pop up blocking the software. Make sure to allow access through the firewall by clicking on 'Allow access'. - Page 43 Now switching to 'Channel list' will display the TRIONet and installed modules. If there is no TRIONet shown in 'Channel list', the unit is not setup correctly or there is any other issue with the connection. Make sure you have precisely followed the instructions described in chapter 'Connecting your TRIONet to your Laptop/PC' otherwise move to chapter 'Troubleshooting'.
-
Page 44: Synchronization (Daisy-Chaining Multiple Trionet Units)
TRION-SNYC-BUS The TRION-SYNC-BUS (SYNC IN, SYNC OUT) is used to synchronize two or more TRIONet units with up to 100 m distance between each node. The 10 Mhz clock signal, along with acquisition control signals, is transmitted via the RJ- 45 connection. -
Page 45: Synchronization Examples
100 m SYNC (328 ft) 100 m LAN (328 ft) Max. cable length to Laptop/PC: 100 m LAN (328 ft) 1.8 m USB (6 ft) 450114 • TRIONet • Technical Reference Manual • Printing version 1.0.6 • April 09, 2020... -
Page 46: Connect Cpad2/3 Modules To Your Trionet
With the flexibility of TRION series modules, it is possible to connect any CPAD2/CPAD3 modules directly to your TRIONet. For the following examples a TRION-CAN module is required. A TRION-CAN module can support up to 10 CPAD2/CPAD3 modules. No additional power supply is required. - Page 47 CAN + PS CAN + PS CAN + PS CAN + PS CAN + PS <= 10 CPAD modules <= 10 CPAD modules <= 10 CPAD modules 450114 • TRIONet • Technical Reference Manual • Printing version 1.0.6 • April 09, 2020...
- Page 48 MAIN SYSTEM For the following examples a TRION-MULTI module is required. A TRION-MULTI module can drive up to 1x CPAD2/ CPAD3 module directly. If more than one CPAD2/CPAD3 modules are used an additional power supply via a split cable is required. PC/Laptop LAN/USB TRION-MULTI module...
-
Page 49: Maintenance
MAIN SYSTEM Maintenance Firmware upgrade In this chapter we will describe on how to perform a firmware upgrade of your TRIONet. Requirements: > TRIONet > Torx T10 screwdriver > USB drive (received from DEWETRON or self-created USB drive) > 10 minutes of time Switch-off the instrument. - Page 50 Reassemble the sidepanel Power Consum.: 15.3 W in reverse order of System Temp.: 43.5 C disassembly. Switch-on Env. Temp.: 24.2 C the TRIONet. The current Firmware revision Firmware: 2.4.2.0 firmware revision is Server: 2.4.30645 displayed on the 'Info' tab. S/N: CXXXXXXX...
- Page 51 MAIN SYSTEM Create USB drive for firmware upgrade If you haven't received an USB drive from DEWETRON with the latest firmware, please follow the next steps on how to create a USB drive to upgrade the firmware of your TRIONet.
- Page 52 MAIN SYSTEM Extract the 'trionet_create_stick_R2.x.x.zip' in the same folder After extracting following files should be available: > trionet_create_stick_R2.x.x.zip > trionet_update_image_R2.x.x.img > win32DiskImager-x.x.x-install.exe > README.txt Run Win32DiskImager-x.x.x-install.exe (if not already installed). The install wizard will guide you through the installation process.
- Page 53 Win32DiskImager will not list any harddrives. Browse and select the image file which has been extracted in step 3 (trionet_update_image_R2.x.x.img) by clicking the folder icon. 450114 • TRIONet • Technical Reference Manual • Printing version 1.0.6 • April 09, 2020...
- Page 54 All .eep and .hex files are included in the image file. In general, with firmware version 5.0 or higher it is recommended anyway to perform a remote update of the TRIONet. Congratulations! You now have successfully created a USB drive for firmware update of your TRIONet.
- Page 55 MAIN SYSTEM Updating firmware files on existing USB drive The next steps will describe on how to update the firmware files on your DEWETRON or self created USB drive. Requirements: > USB drive (DEWETRON factory default or created USB drive as described in chapter 'Create USB drive for firmware upgrade') >...
- Page 56 MAIN SYSTEM Copy & Replace the existing files on your USB drive with the files currently downloaded and extracted. Your USB drive has been successfully updated. WARNING: The firmware update won't work if the firmware files are copied on an empty USB drive only.
- Page 57 MAIN SYSTEM Perform a remote update of your TRIONet w/o a USB drive (requires Firmware 5.0 or newer) The next steps will describe on how to update the firmware files on your TRIONet without the needs of a USB drive. Requirements: >...
- Page 58 After clicking on 'Software Update' a browser window pops open (depending on installed browser on your Laptop/PC). This window shows you the set IP-address as well as the installed firmware on your TRIONet. Furthermore, there is also a link to the latest update image file if it hasn't been downloaded yet.
- Page 59 During the update process, the display will show the following message: "Update started. Update started Do not power off" Do not power off After the update process the TRIONet will restart automatically. The current firmware revision is displayed on the 'Info' tab. Highlighted tab 'Info' Status Info Power Consum.:...
-
Page 60: Troubleshooting
1.8 meters (6 ft) and check if the adaptor works properly. Two TRIONet units are daisy-chained and implemented into an existing company network. Only one TRIONet is found. What can I do? >... - Page 61 - Oxygen - DEWETRON Measurement Application If you are using third-party firewall software please contact your IT-administration or refer to the corresponding technical reference manual. 450114 • TRIONet • Technical Reference Manual • Printing version 1.0.6 • April 09, 2020...
- Page 62 MAIN SYSTEM Two or more TRIONet units are connected to a Laptop/PC and found in DEWETRON Explorer (formerly DEWE2Explorer) but unfortunately measuring in Oxygen fails. > Check if there has been a demo system created in your DEWETRON Explorer (formerly DEWE2Explorer) and remove it.
-
Page 63: Ce-Certificate Of Conformity
EN 55011 Class B Immunity EN 61000-6-2 Group standard Graz, June 01, 2016 Place / Date of the CE-marking Ing. Thomas Propst / Manager Total Quality 450114 • TRIONet • Technical Reference Manual • Printing version 1.0.6 • April 09, 2020... - Page 64 NOTES...
Need help?
Do you have a question about the TRIONet and is the answer not in the manual?
Questions and answers