Maxitrol GV60 Advanced Troubleshooting
Gas valve
Hide thumbs
Also See for GV60:
- Operating instructions manual (52 pages) ,
- Installation and operating instructions manual (43 pages) ,
- Installation and operating instructions manual (22 pages)

Subscribe to Our Youtube Channel
Related Manuals for Maxitrol GV60


Summary of Contents for Maxitrol GV60
- Page 1 Advanced Troubleshooting f i r e - p a r t s . c o m Mertik Maxitrol GV60 Gas Valve © 2013, Maxitrol Company...
- Page 2 - p a r t s . c o m GV60 System Features © 2013, Maxitrol Company...
- Page 3 GV60 System Features The Mertik Maxitrol GV60 system is a motorized modulating gas valve. f i r e - p a r t s . c o m It is controlled by: remote handset, wall switch, touchpad. © 2013, Maxitrol Company...
- Page 4 GV60 System Features f i r e - p a r t s . c o m Battery Operated System. Electronic Ignition System – “On Demand Pilot” system. Defaults to Manual Mode after ignition. Controls flame height by changing gas pressure.
- Page 5 GV60 System Features f i r e - p a r t s . c o m Standard Remote Display Remote Timer/Thermostat Full Variable Receiver Handset Handset Remote Handset Remote Handset (with light and fan) © 2013, Maxitrol Company...
- Page 6 GV60 System Features Connections f i r e - p a r t s . c o m © 2013, Maxitrol Company...
-
Page 7: Components And Accessories
GV60 System Features Components and Accessories f i r e - p a r t s . c o m Switch Panel Interrupter Block Ignition Cable Thermo Current Cable Thermo Current Cable with ON/OFF switch without ON/OFF switch Wall Switch Touch Pad Mains Adaptor with connections for EU, UK, and U.S. - Page 8 GV60 System Features Low Battery Receiver When the receiver battery power is low, the GV60 system shuts off the fire and pilot. f i r e - p a r t s . c o m Five Day Shut Off (CSA version) The system shuts off the fire and pilot if there is no change in flame height for 5 days.
- Page 9 GV60 System Features Advanced Features - Standard Display f i r e - p a r t s . c o m Large temperature indicator Multilevel energy indicator (4 bars) 6-hour No Communication Turn Down (CE, CSA) Manual Mode/Temperature/Timer Mode: The valve will turn to pilot flame if the batteries in the handset are low or if the handset is out of communication range for a 6-hour period.
- Page 10 GV60 System Features Advanced Features - Optional Light/Dimmer f i r e - p a r t s . c o m Turns light on and off and adjusts brightness. Circulating Fan The fan has 4 speed levels from low (1 bar) to high (4 bars) and can be turned off.
- Page 11 GV60 System Features Advanced Features - Optional Receiver Overheating Turn Down (only available on fan and light option) f i r e - p a r t s . c o m System with circulating fan and light/dimmer turns the valve to pilot flame if the temperature reading of the receiver is higher than 140°F (60°C).
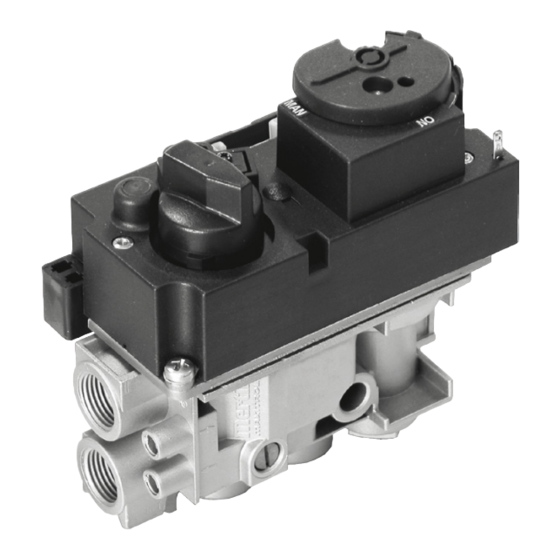
- Page 12 - p a r t s . c o m GV60 Control Valve Components © 2013, Maxitrol Company...
- Page 13 Control Valve Components Inside the Valve Head f i r e - p a r t s . c o m 6 VDC Motor with Clutch for Manual Operation Clutch Flame Height Knob Driven by Motor © 2013, Maxitrol Company...
- Page 14 Inside the Valve Head Solenoid gets a burst of power from the receiver. f i r e - p a r t s . c o m Plunger with Solenoid Coil Plunger pushes valve head here. © 2013, Maxitrol Company...
- Page 15 Inside the Valve Head f i r e - p a r t s . c o m The Valve Head and Solenoid Coil The solenoid coil plunger pushes the Electromagnet valve head and opens the main burner. © 2013, Maxitrol Company...
- Page 16 Control Valve Components Inside the Valve Head Micro Switch to limit rotation. f i r e - p a r t s . c o m Cams control high, low fire and Micro Switch OFF position. © 2013, Maxitrol Company...
- Page 17 Remove small plug to access the adjustment screw. Turn the adjustment screw to set required burner pressure (high fire). Pressure is increased by turning clockwise or decreased by turning counterclockwise. This adjustment is required for fuel conversions. © 2013, Maxitrol Company...
- Page 18 180°, and then slide it back onto the conversion plug until it snaps. Insert the conversion plug into the valve and turn it clockwise until it bottoms out. © 2013, Maxitrol Company...
- Page 19 Pilot Adjustment Screw (for vented units only) Clockwise = Decrease Counterclockwise = Increase NOTE: The default setting of the pilot adjustment screw is preset to the maximum. Therefore, it is only possible to decrease the pilot. © 2013, Maxitrol Company...
- Page 20 WARNING: The pressure test ports use a captured screw. It will not fall out but it must be retightened after checking both inlet and manifold pressure. IMPORTANT! Check pressure test ports for leaks after test is complete. © 2013, Maxitrol Company...
- Page 21 - p a r t s . c o m Fuel Conversion: This minimum rate screw should be changed when converting from one fuel another. Unless appliance manufacturer does recommend change. Always follow the OEM’s instructions. © 2013, Maxitrol Company...
- Page 22 Control Valve Components Thermocouple Circuit Interrupter Installation: f i r e - p a r t s . c o m 1. Tighten brass part of interrupter block into valve. Hand tight plus turn. Thermocouple Circuit Interrupter Block © 2013, Maxitrol Company...
- Page 23 Control Valve Components Thermocouple Circuit Interrupter Installation: f i r e - p a r t s . c o m 2. Insert spade connectors into plastic spacer. 3. Insert plastic spacer into the interrupter block. © 2013, Maxitrol Company...
- Page 24 Control Valve Components Thermocouple Circuit Interrupter Installation: f i r e - p a r t s . c o m 4. Thread thermocouple into female end of interrupter block. Hand tight plus turn. © 2013, Maxitrol Company...
- Page 25 Figure 1. Figure 1 Over tightening of the thermocouple can cause damage as seen in Figure 2. Damage to the thermocouple decreases the available surface contact area and results in much higher resistance. Figure 2 © 2013, Maxitrol Company...
- Page 26 - p a r t s . c o m GV60 Receiver Components © 2013, Maxitrol Company...
-
Page 27: Receiver Components
Receiver Components f i r e - p a r t s . c o m The receiver module is the brain. It is not just a battery box! © 2013, Maxitrol Company... - Page 28 65,000 random codes to select from. NOTE: This is a one time setting only, and is not required after mains power failure or changing the batteries of the handset or receiver. Small Flame Button on Handset © 2013, Maxitrol Company...
- Page 29 Receiver Components Wire Harness Connections f i r e - p a r t s . c o m To Wall Switch To Valve © 2013, Maxitrol Company...
- Page 30 Receiver Components Wire Harness Connections f i r e - p a r t s . c o m Watch for bent pins © 2013, Maxitrol Company...
- Page 31 Receiver Components Wire Harness Connections Universal Receiver f i r e - p a r t s . c o m Auxiliary and/or Latching Solenoid Connection V Module Connection © 2013, Maxitrol Company...
- Page 32 Receiver Components Power Connection f i r e - p a r t s . c o m AC Mains Adapter AC Mains Adapter or Remote Battery Box Connection Remote Battery Box © 2013, Maxitrol Company...
- Page 33 - p a r t s . c o m Remote Battery Box WARNING: NEVER connect a 9-Volt battery directly to the cable of the remote battery box. This connection is only to be used to connect the receiver to the remote battery box. © 2013, Maxitrol Company...
- Page 34 NOTE: Always check for proper New and old batteries and different brands battery installation. of batteries should not be used together. Mixing of various batteries can cause the batteries to overheat, leak and/or explode. © 2013, Maxitrol Company...
- Page 35 Make certain the red cable (1/4”) is connected to the red terminal, and the yellow cable (3/16”) is connected to the yellow terminal. Verify that the Red Terminal: from Thermocouple connections are tight. Yellow Terminal: back to ON/OFF Switch © 2013, Maxitrol Company...
- Page 36 Antenna Wire NOTE: Antenna wire can be moved for better reception. WARNING: Never allow the antenna wire to come in contact with, or too close to, the igniter cable. Remember it is an antenna after all… © 2013, Maxitrol Company...
- Page 37 Receiver Components Receiver to Valve Control Cable Green Micro Switch White f i r e - p a r t s . c o m Brown Motor Purple Blue Ground Yellow Black Impulse Magnet...
-
Page 38: Troubleshooting
Troubleshooting f i r e - p a r t s . c o m Potential Problem: Customer calls and says “Why is my fireplace not working the way it should?” QUESTIONS FOR TECHNICIAN TO ASK © 2013, Maxitrol Company... - Page 39 Troubleshooting the GV60 QUESTIONS TO ASK POSSIBLE CAUSE 1. Is the room temperature and the time showing on the A blank display could indicate that the 9Volt battery in the f i r e - p a r t s . c o m remote display? handset needs to be replaced.
- Page 40 Troubleshooting the GV60 QUESTIONS TO ASK POSSIBLE CAUSE f i r e - p a r t s . c o m 6. Has the knob not moved in 5 days? After 5 days of no movement the pilot will shut off.
- Page 41 GV60 f i r e - p a r t s . c o m Troubleshooting TEST THE BATTERIES © 2013, Maxitrol Company...
- Page 42 Troubleshooting the GV60 Testing the Batteries TEST: Check batteries for proper voltage. f i r e - p a r t s . c o m PROCEDURE: Connect “+” test probe on last pin. Connect “-” test probe to ground, e.g.
- Page 43 GV60 f i r e - p a r t s . c o m Troubleshooting TEST THE INITIAL RECEIVER OUTPUT © 2013, Maxitrol Company...
- Page 44 Troubleshooting the GV60 Testing Initial Receiver Output TEST: Do you hear the “clunk” when the solenoid coil engages? f i r e - p a r t s . c o m PROCEDURE: Connect “+” test probe on yellow wire.
- Page 45 GV60 Troubleshooting f i r e - p a r t s . c o m Potential Problem: The appliance will not light with the handset. TEST THE VALVE © 2013, Maxitrol Company...
- Page 46 INCORRECT. CORRECT. MANUAL knob should be MANUAL knob is not fully in the ON position. The GV60 will fully in the ON position. not operate properly with the knob in this position. © 2013, Maxitrol Company...
- Page 47 Troubleshooting the GV60 Testing the Valve TEST: Manually light the fireplace to verify the gas supply f i r e - p a r t s . c o m is sufficient. PROCEDURE: Turn MANUAL knob to MAN. Insert small tool and depress the plunger.
- Page 48 GV60 Troubleshooting f i r e - p a r t s . c o m Potential Problem: The appliance will not light with the handset. TEST THE ELECTRONICS © 2013, Maxitrol Company...
- Page 49 Troubleshooting the GV60 Testing the Electronics f i r e - p a r t s . c o m TEST: Test the thermocouple circuit voltage by measuring the mV at the red and black connections at the thermocouple interrupter block.
- Page 50 Troubleshooting the GV60 Testing the Electronics TEST: Take a mV reading at the red terminal. f i r e - p a r t s . c o m PROCEDURE: Connect “+” test probe on red wire. Connect “-” test probe to ground, e.g.
- Page 51 Troubleshooting the GV60 Testing the Electronics f i r e - p a r t s . c o m TEST: Take a mV reading at the yellow terminal. PROCEDURE: Connect “+” test probe on yellow wire. Connect “-” test probe to ground, e.g.
- Page 52 Troubleshooting the GV60 Testing the Electronics TEST: Test the drop-out voltage by taking a mV reading at f i r e - p a r t s . c o m the yellow terminal. PROCEDURE: Connect “+” test probe on yellow wire.
- Page 53 GV60 Troubleshooting f i r e - p a r t s . c o m Potential Problem: The flame height will not change. VERIFY MOTOR OPERATION © 2013, Maxitrol Company...
- Page 54 Troubleshooting the GV60 Verifying Motor Operation TEST: Verify that the motor is receiving power. f i r e - p a r t s . c o m PROCEDURE: Connect “+” test probe on the purple wire. Connect “-” test probe to ground, e.g. valve body or appliance chassis.
- Page 55 Troubleshooting the GV60 Verifying Motor Operation TEST: Verify that the motor is getting power. f i r e - p a r t s . c o m PROCEDURE: Connect “+” test probe on brown wire. Connect “-” test probe to ground, e.g. valve body or appliance chassis.
- Page 56 GV60 Troubleshooting f i r e - p a r t s . c o m Potential Problem: Intermittent Operation TEST GAS PRESSURE © 2013, Maxitrol Company...
- Page 57 Troubleshooting the GV60 Testing Gas Pressure TEST: Check gas pressure at pressure test ports on valve. PROCEDURE: The pressure test ports use a captured screw. It will not fall out but it must be retightened after checking both inlet and manifold pressure.
Need help?
Do you have a question about the GV60 and is the answer not in the manual?
Questions and answers
how is thermocouple
The thermocouple in the Maxitrol GV60 system is used to monitor the pilot flame and generate a small voltage. This voltage is measured at the thermocouple interrupter block to ensure proper operation. If the thermocouple does not detect a flame, the system shuts off the gas supply for safety. Additionally, a second thermocouple shuts off the fire if the main burner fails to ignite within approximately 20 seconds.
This answer is automatically generated