Table of Contents
Advertisement
Quick Links
Advertisement
Table of Contents

Subscribe to Our Youtube Channel
Related Manuals for Metrohm NIRS Vial Heater


Summary of Contents for Metrohm NIRS Vial Heater
- Page 1 NIRS Vial Heater Manual 8.921.8009EN / 2020-09-30...
- Page 3 Metrohm AG CH-9100 Herisau Switzerland Phone +41 71 353 85 85 Fax +41 71 353 89 01 info@metrohm.com www.metrohm.com NIRS Vial Heater Manual 8.921.8009EN / 2020-09-30...
- Page 4 Technical Communication Metrohm AG CH-9100 Herisau techcom@metrohm.com This documentation is protected by copyright. All rights reserved. This documentation has been prepared with great care. However, errors can never be entirely ruled out. Please send comments regarding possible errors to the address above.
-
Page 5: Table Of Contents
Packaging ................9 5.1.2 Checks ..................9 Location ................. 9 Installing the NIRS Vial Heater ..........9 Connecting the NIRS Vial Heater to the power grid ..11 6 Operation 7 Maintenance 8 Technical specifications Ambient conditions ............19 Energy supply ..............19 Dimensions ................ - Page 6 Front NIRS Vial Heater ............... 7 Figure 2 Rear NIRS Vial Heater ................ 8 Figure 3 Operating voltage 115 V ..............12 Figure 4 Operating voltage 230 V ..............12 Figure 5 NIRS Vial Heater – Controller ............13 ■■■■■■■■ NIRS Vial Heater...
-
Page 7: Introduction
■■■■■■■■■■■■■■■■■■■■■■ 1 Introduction 1 Introduction The NIRS Vial Heater is operated in combination with the NIRS XDS Trans- mission OptiProbe Analyzer. The NIRS Vial Heater is used to pre-heat samples and control their temper- ature during the data collection process. Controlled temperature can be selected and maintained above room temperature and below 200 °C. - Page 8 1.1 Symbols and conventions ■■■■■■■■■■■■■■■■■■■■■■ CAUTION This symbol draws attention to possible damage to instruments or instrument parts. NOTE This symbol highlights additional information and tips. ■■■■■■■■ NIRS Vial Heater...
-
Page 9: Intended Use
2 Intended use 2 Intended use The NIRS Vial Heater is used for heating samples that are solid or very vis- cous at room temperature. It is installed once and remains in place until a calibration is necessary. If a calibration needs to be carried out, the NIRS Vial Heater needs to be replaced by the calibration fixture. -
Page 10: Safety Instructions
The electrical safety when working with the instrument is ensured as part of the international standard IEC 61010. WARNING Only personnel qualified by Metrohm are authorized to carry out service work on electronic components. WARNING Never open the housing of the instrument. The instrument could be damaged by this. -
Page 11: Tubing And Capillary Connections
Set up the instrument in a well-ventilated location (e.g. fume cup- ■ board). Keep all sources of flame far from the workplace. ■ Clean up spilled liquids and solids immediately. ■ Follow the safety instructions of the chemical manufacturer. ■ NIRS Vial Heater ■■■■■■■■... -
Page 12: Recycling And Disposal
The correct disposal of your old instrument will help to prevent negative effects on the environment and public health. More details about the disposal of your old instrument can be obtained from your local authorities, from waste disposal companies or from your local dealer. ■■■■■■■■ NIRS Vial Heater... -
Page 13: Overview Of The Instrument
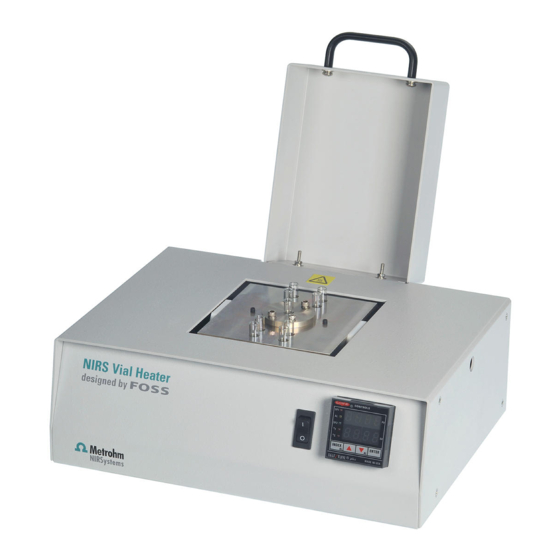
■■■■■■■■■■■■■■■■■■■■■■ 4 Overview of the instrument 4 Overview of the instrument Front Figure 1 Front NIRS Vial Heater Transmission probes Cover Heating block Controller On/off switch NIRS Vial Heater ■■■■■■■■... -
Page 14: Rear
4.2 Rear ■■■■■■■■■■■■■■■■■■■■■■ Rear Figure 2 Rear NIRS Vial Heater Fan filter Voltage selection switch Fuse compartment Power socket ■■■■■■■■ NIRS Vial Heater... -
Page 15: Installation
Location The NIRS Vial Heater should be placed in a work area with adequate room for normal use, including loading and unloading of vials, and sufficient room for fan circulation behind the instrument. - Page 16 5.3 Installing the NIRS Vial Heater ■■■■■■■■■■■■■■■■■■■■■■ 3 Securing the heating block Tighten the 2 setscrews that are located at the top of the heating ■ block with the ball driver. ■■■■■■■■ NIRS Vial Heater...
-
Page 17: Connecting The Nirs Vial Heater To The Power Grid
5 Installation Connecting the NIRS Vial Heater to the power grid The NIRS Vial Heater is supplied with power cords for both North Ameri- can and international use. The cord for international use is a “Harmonized International Power Cord” with color-coded, stripped leads for use with approved local wiring connectors. - Page 18 5.4 Connecting the NIRS Vial Heater to the power grid ■■■■■■■■■■■■■■■■■■■■■■ Changing the voltage selection Required accessories: Small coin or other suitable object ■ 1 Insert the coin into the horizontal slot. 2 Move the selector switch up or down.
-
Page 19: Operation
Once cool, the sample spill should be cleaned using appropriate solvents and following all recommended safety precautions. Figure 5 NIRS Vial Heater – Controller NIRS Vial Heater ■■■■■■■■... - Page 20 (lower display) display the setpoint. WARNING Hot surfaces The NIRS Vial Heater can reach temperatures of up to 250 °C during operation. Touching it may cause burns, and nearby objects may ignite or become damaged. Overheated samples may cause the vial to burst and thus may injure persons.
- Page 21 The actual temperature will now be displayed in red and the desired temperature will be displayed in green. 5 Once the displayed temperature of the Vial Heater stabilizes, analyze the sample according to your established analytical protocol. NIRS Vial Heater ■■■■■■■■...
-
Page 22: Maintenance
4 Switching the Vial Heater on Turn the on/off switch in the front of the Vial Heater to "I". The Vial Heater is ready for operation again. Replacing the fuse Required accessories: Flat-blade screwdriver ■ Spare fuse ■ ■■■■■■■■ NIRS Vial Heater... - Page 23 3 Open the fuse door using a small flat-blade screwdriver. 4 Lift out the old fuse and discard. 5 Insert the new fuse into the fuse clip and snap in place by closing the fuse door. NIRS Vial Heater ■■■■■■■■...
- Page 24 ■■■■■■■■■■■■■■■■■■■■■■ 6 Reinstall the power cord (see chapter 5.4, page 11). 7 Turn the on/off switch in the front of the Vial Heater to "I". 8 Order a spare fuse (see chapter 9, page 20). ■■■■■■■■ NIRS Vial Heater...
-
Page 25: Technical Specifications
100–120 VAC or 220–240 VAC, 50–60 Hz Power consump- max. 200 W tion Dimensions Width 317 mm (without probes) Height 172 mm (cover closed) Height 324 mm (cover open) Depth, 248 mm (front to back) Weight 2.9 kg NIRS Vial Heater ■■■■■■■■... -
Page 26: Accessories
The PDF file with the accessories data is created. NOTICE Once you have received your new product, we recommend download- ing the accessories list from the Internet, printing it out and keeping it together with the manual for reference purposes. ■■■■■■■■ NIRS Vial Heater... -
Page 27: Index
Overview of the instrument .. 8 Fuse Connect Replace ......16 To power grid ..... 11 Safety instructions ...... 4 Service ........4 NIRS Vial Heater Electrostatic charge ....5 Setpoint Install ........9 Energy supply Change ......14 Nominal voltage ....19 Supply voltage ......
Need help?
Do you have a question about the NIRS Vial Heater and is the answer not in the manual?
Questions and answers